So far, we have set up several Kubernetes master and worker nodes and configured networking between them,
so they’re all on a network that can reach each other. We also made sure the firewall and network security groups are configured correctly
to allow for the Kubernetes control plane components to reach each other.
Assume that we have also set up all the Kubernetes
control plane components such as the qAPI server,
the etcd servers, kubelets, etc., and we are finally ready
to deploy our applications.
But before we can do that,
there’s something that we must address.
We talked about the network
that connects the nodes together,
but there’s also another layer of networking that is crucial
to the clusters functioning,
and that is the networking at the pod layer.
Our Kubernetes cluster is soon going to have a large number
of pods and services running on it.
How are the pods addressed?
How do they communicate with each other?
How do you access the services running on these pods
internally from within the cluster
as well as externally from outside the cluster?
These are challenges that Kubernetes expects you to solve.
As of today, Kubernetes does not come
with a built-in solution for this.
It expects you to implement a networking solution
that solves these challenges.
However, Kubernetes have laid out clearly,
the requirements for pod networking.
Let’s take a look at what they are.
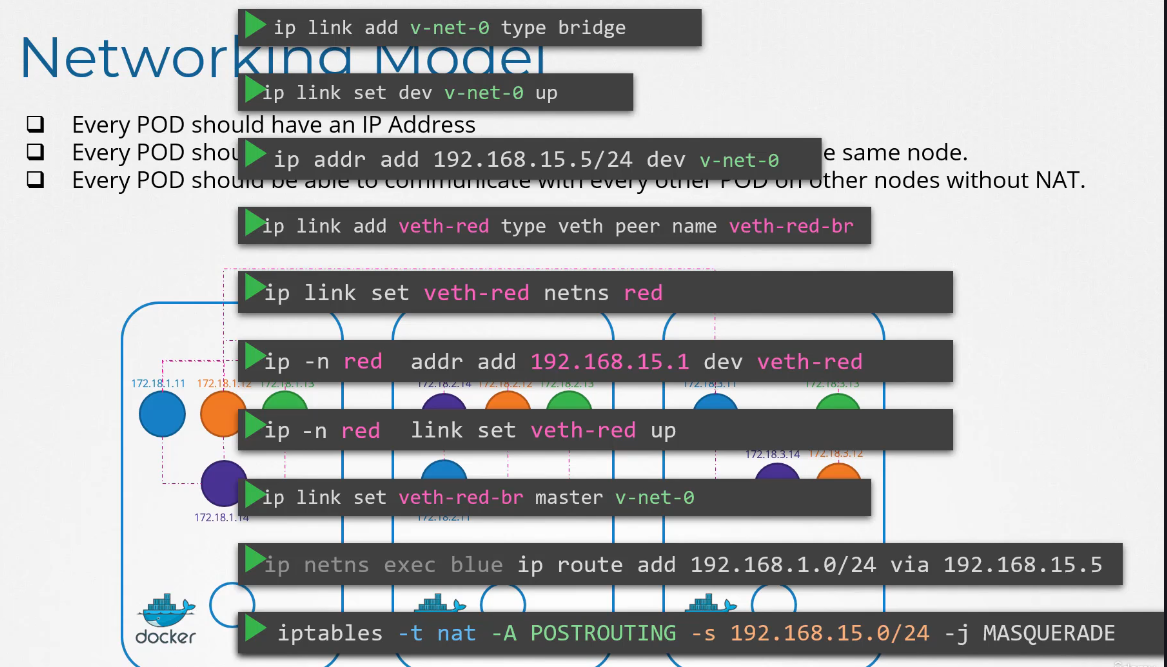
Kubernetes expects every pod
to get its own unique IP address
and that every pod should be able to reach every other pod
within the same node using that IP address.
And every pod should be able
to reach every other pod on other nodes as well
using the same IP address.
It doesn’t care what IP address that is and what range
or subnet it belongs to.
As long as you can implement a solution that takes care
of automatically assigning IP addresses
and establish connectivity between the pods in a node
as well as pods on different nodes, you’re good.
Without having to configure any natural rules.
So how do you implement a model
that solves these requirements?
Now, there are many networking solutions available out there
that does these, but we’ve already learned
about networking concepts, routing, IP address management,
namespaces, and CNI.
So let’s try to use that knowledge to solve this problem
by ourselves first.
This will help in understanding how other solutions work.
I know there is a bit of repetition,
but I’m trying to relate the same concept
and approach all the way from plain network namespace
on Linux all the way to Kubernetes.
So we have a three-node cluster.
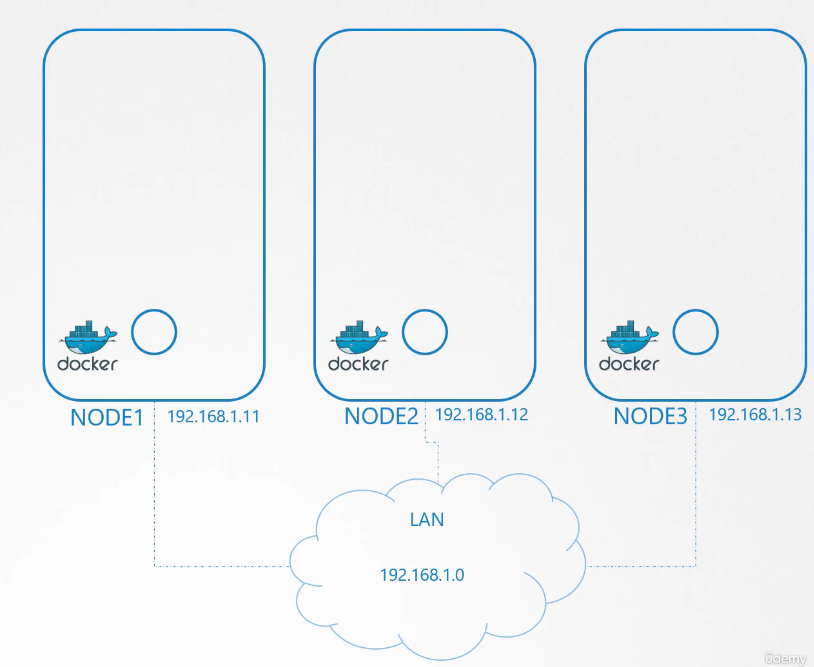 It doesn’t matter which one is master or worker.
They all run pods either for management
or workload purposes.
As far as networking is concerned,
we’re going to consider all of them as the same.
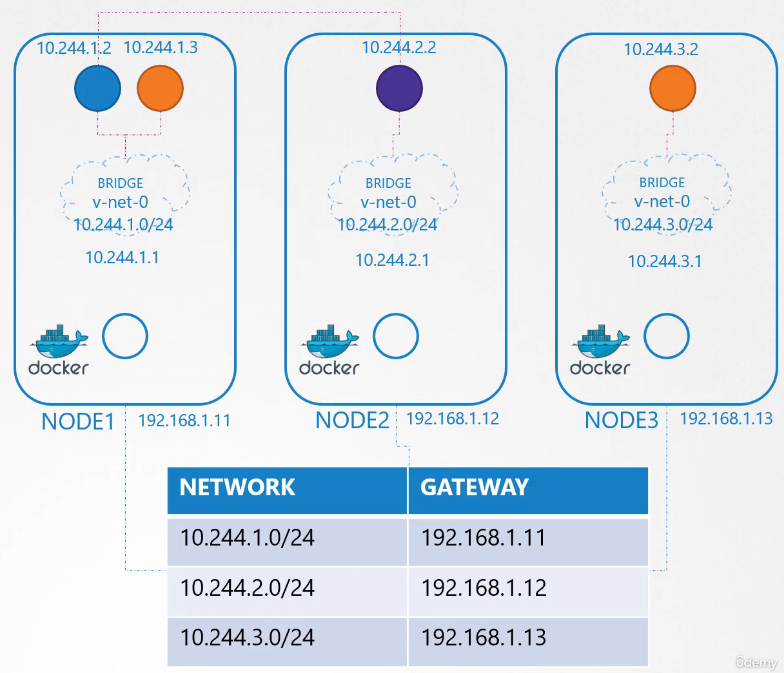
So first, let’s plan what we’re going to do.
The nodes are part of an external network
and has IP addresses in the 192.168.1 series.
Node one is assigned 11, node two is 12,
and node three is 13.
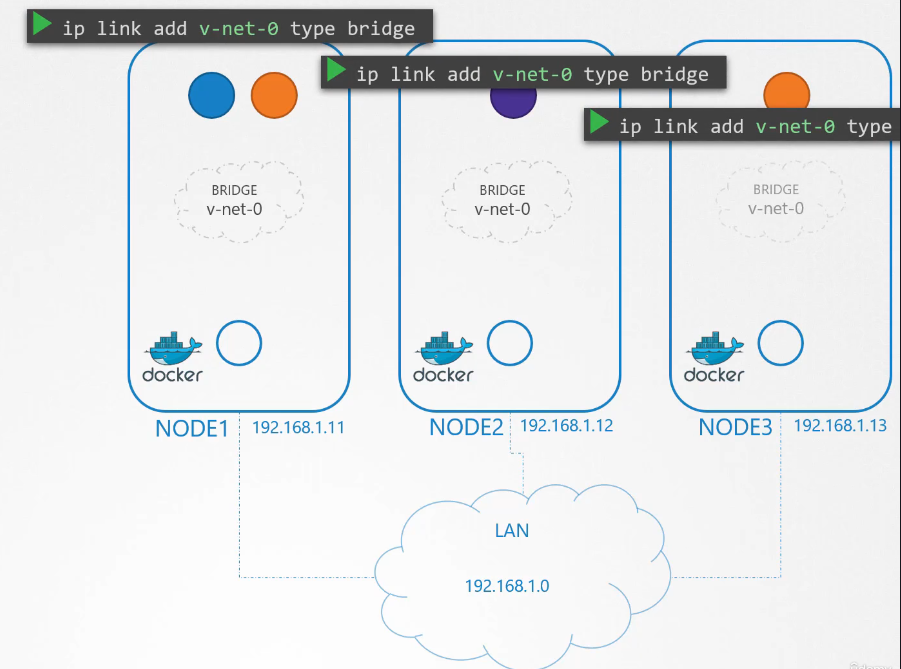
Next step, when containers are created,
Kubernetes creates network name spaces for them.
To enable communication between them,
we attach these namespace to a network, but what network?
We’ve learned about bridge networks
that can be created within nodes to attach namespace.
So we create a bridge network on each node.
And then bring them up.
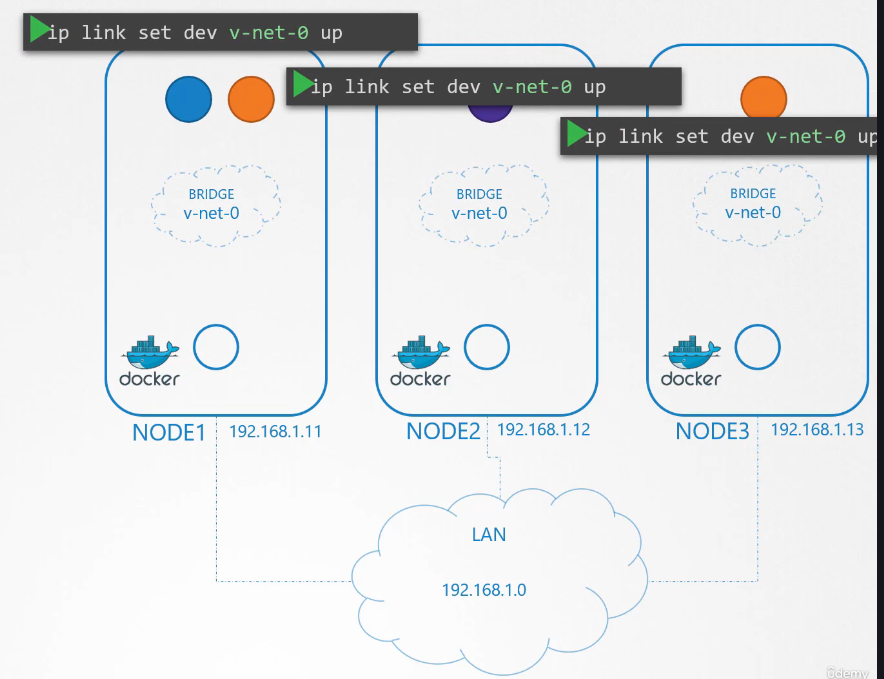 It’s time to assign an IP address
to the bridge interfaces or networks.
But what IP address?
We decide that each bridge network
will be on its own subnet.
Choose any private address range,
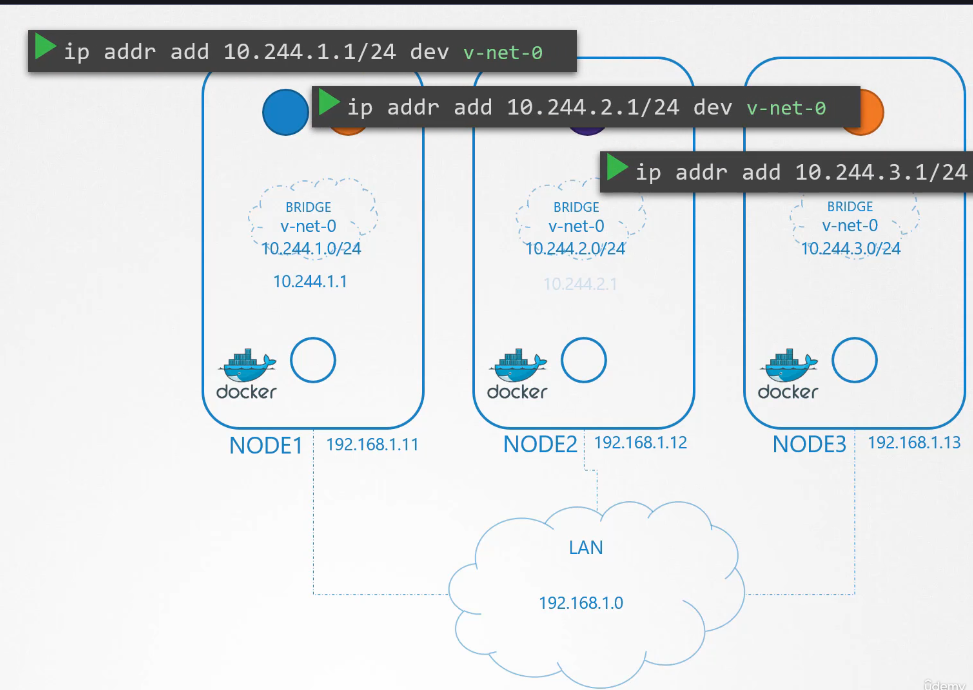 say, 10.240.1, 10.240.2 and 10.240.3.
Next, we set the IP address for the bridge interface.
So we have built our base.
The remaining steps are to be performed for each container
and every time a new container is created,
so we write a script for it.
Now, you don’t have to know
any kind of complicated scripting.
It’s just a file that has all commands
we will be using.
And we can run this multiple times
for each container going forward.
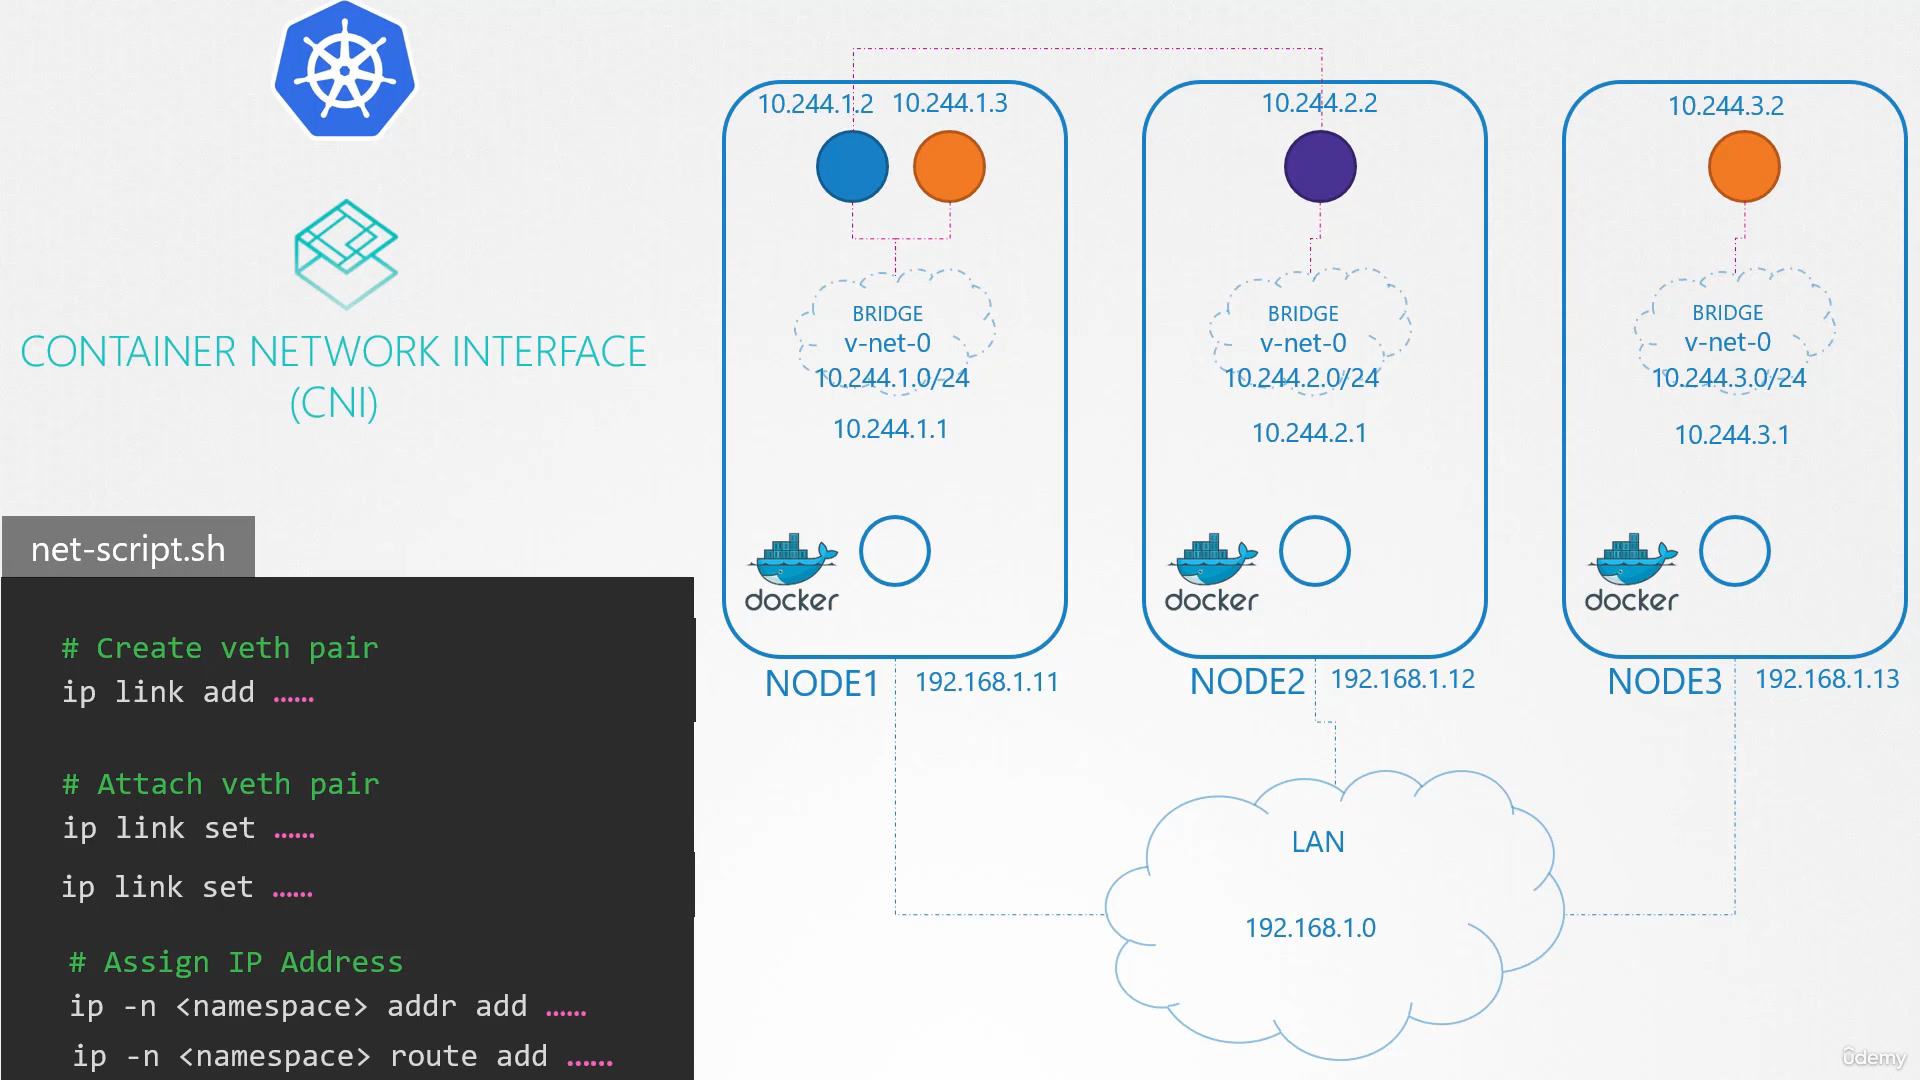
To attach a container to the network, we need a pipe
or a virtual network cable.
 We create that using the ip link add command.
Don’t focus on the options as they’re similar
to what we saw in our previous lectures.
Assume that they vary depending on the inputs.
We then attach one end to the container
and another end to the bridge using the ip link set command.
We then assign IP address using the ip addr command
and add a route to the default gateway.
But what IP do we add?
We either manage that ourselves
or store that information in some kind of database. For now, we will assume it is 10.244.1.2,
which is a free IP in the subnet.
We discuss about IP address management in detail
in one of the upcoming lectures.

Finally, we bring up the interface.
We then run the same script,
this time for the second container with its information
and gets the container connected to the network.
The two containers can now communicate with each other.
We copy the script to the other nodes
and run the script on them to assign IP address
and connect those containers to their own internal networks.
So we have solved the first part of the challenge.
The pods all get their own unique IP address
and are able to communicate
with each other on their own nodes.
The next part is to enable them
to reach other pods on other nodes.
Say for example, the pod at 10.244.1.2
on node one wants to ping pod 10.244.2.2 on node two.
As of now, the first has no idea
where the address 10.244.2 is
because it is on a different network than its own.
So it routes to node one’s IP as it is set
to be the default gateway.
Node one doesn’t know either since 10.244.2.2
is a private network on node two.
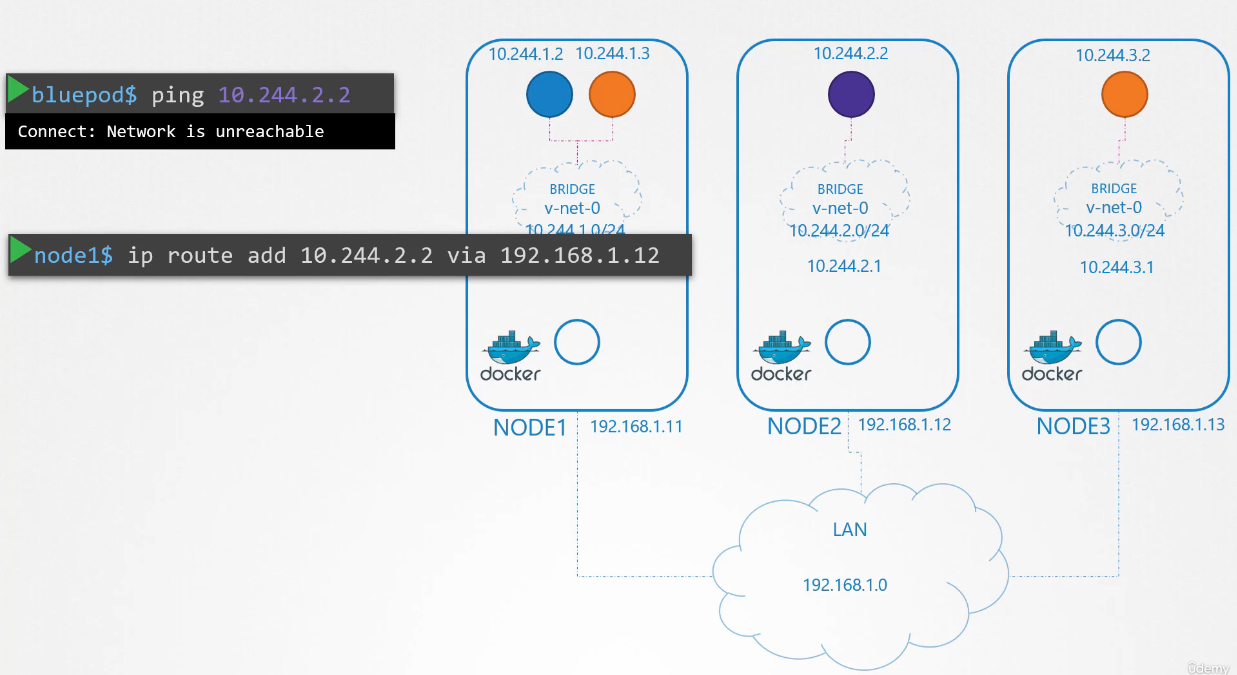 Add a route to node one’s routing table
to route traffic to 10.244.2.2
where the second node’s IP at 192.168.1.12.
Once the route is added,
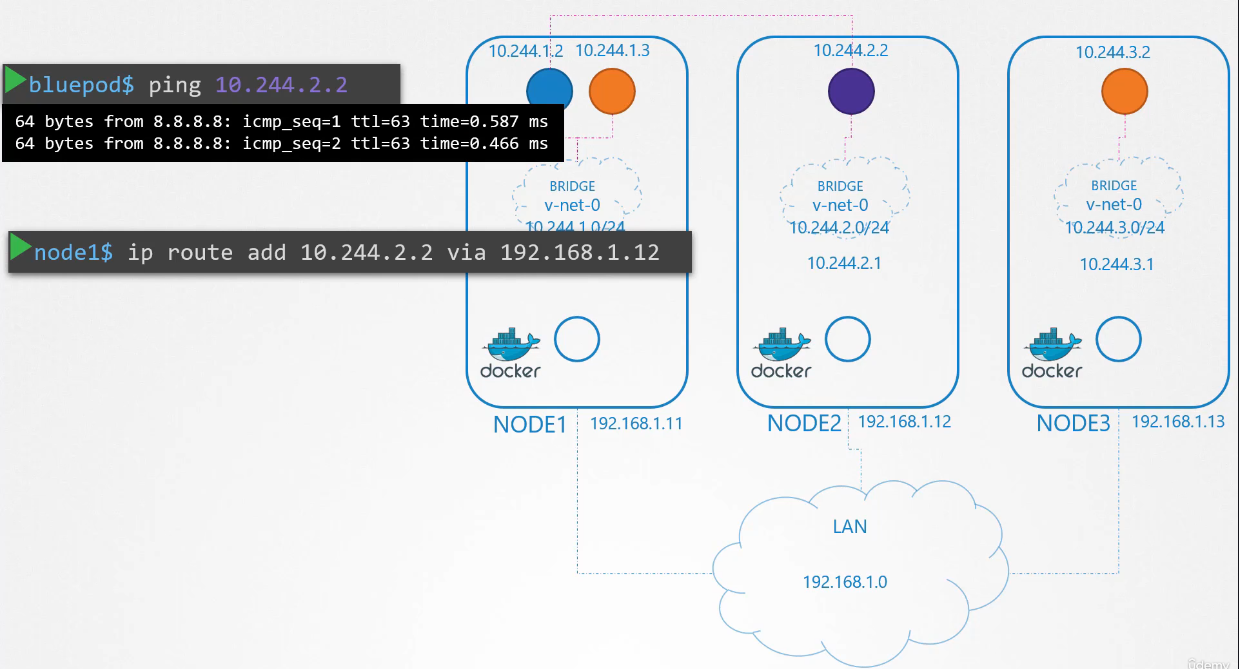 the blue pod is able to pinging across.
Similarly, we configure route on all hosts
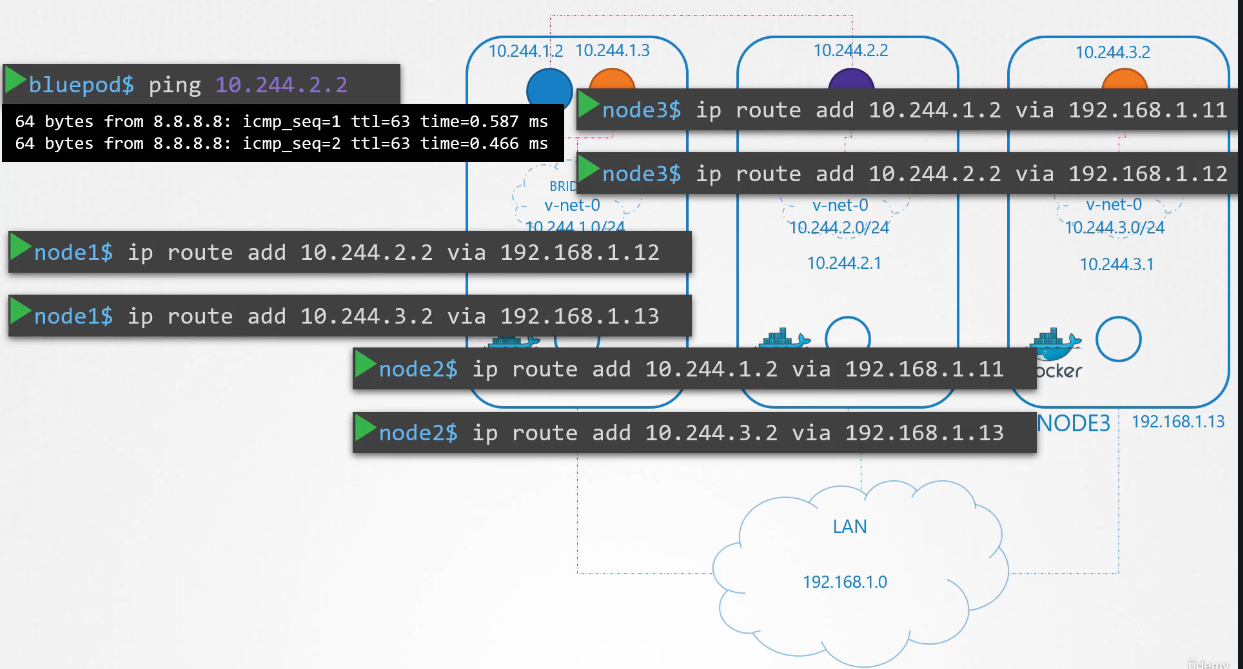 to all the other hosts with information
regarding the respective networks within them.
Now, this works fine in this simple setup,
but this will require a lot more configuration,
as in when your underlying network architecture
gets complicated.
Instead of having to configure routes on each server,
a better solution is to do that on a router
if you have one in your network
 and point all hosts to use that as the default gateway.
That way you can easily manage routes
to all networks in the routing table on the router.
With that, the individual virtual networks we created
with the address 10.244.1.0/24 on each node
now form a single large network
with the address 10.244.0.0/16.
It’s time to tie everything together.
We performed a number of manual steps
to get the environment ready
with the bridge networks and routing tables.
We then wrote a script that can be run for each container
that performs the necessary steps required
to connect each container to the network.
And we executed the script manually.
Of course, we don’t want to do that as in large environments
where thousands of pods are created every minute.
So how do we run the script automatically when a pod
is created on Kubernetes? That’s where CNI comes in acting as the middleman.
 CNI tells Kubernetes
that this is how you should call a script
as soon as you create a container.
And CNI tells us,
“This is how your script should look like.”
So we need to modify the script a little bit
to meet CNI standards.
It should have an add section that will take care
of adding a container to the network
and a delete section that will take care
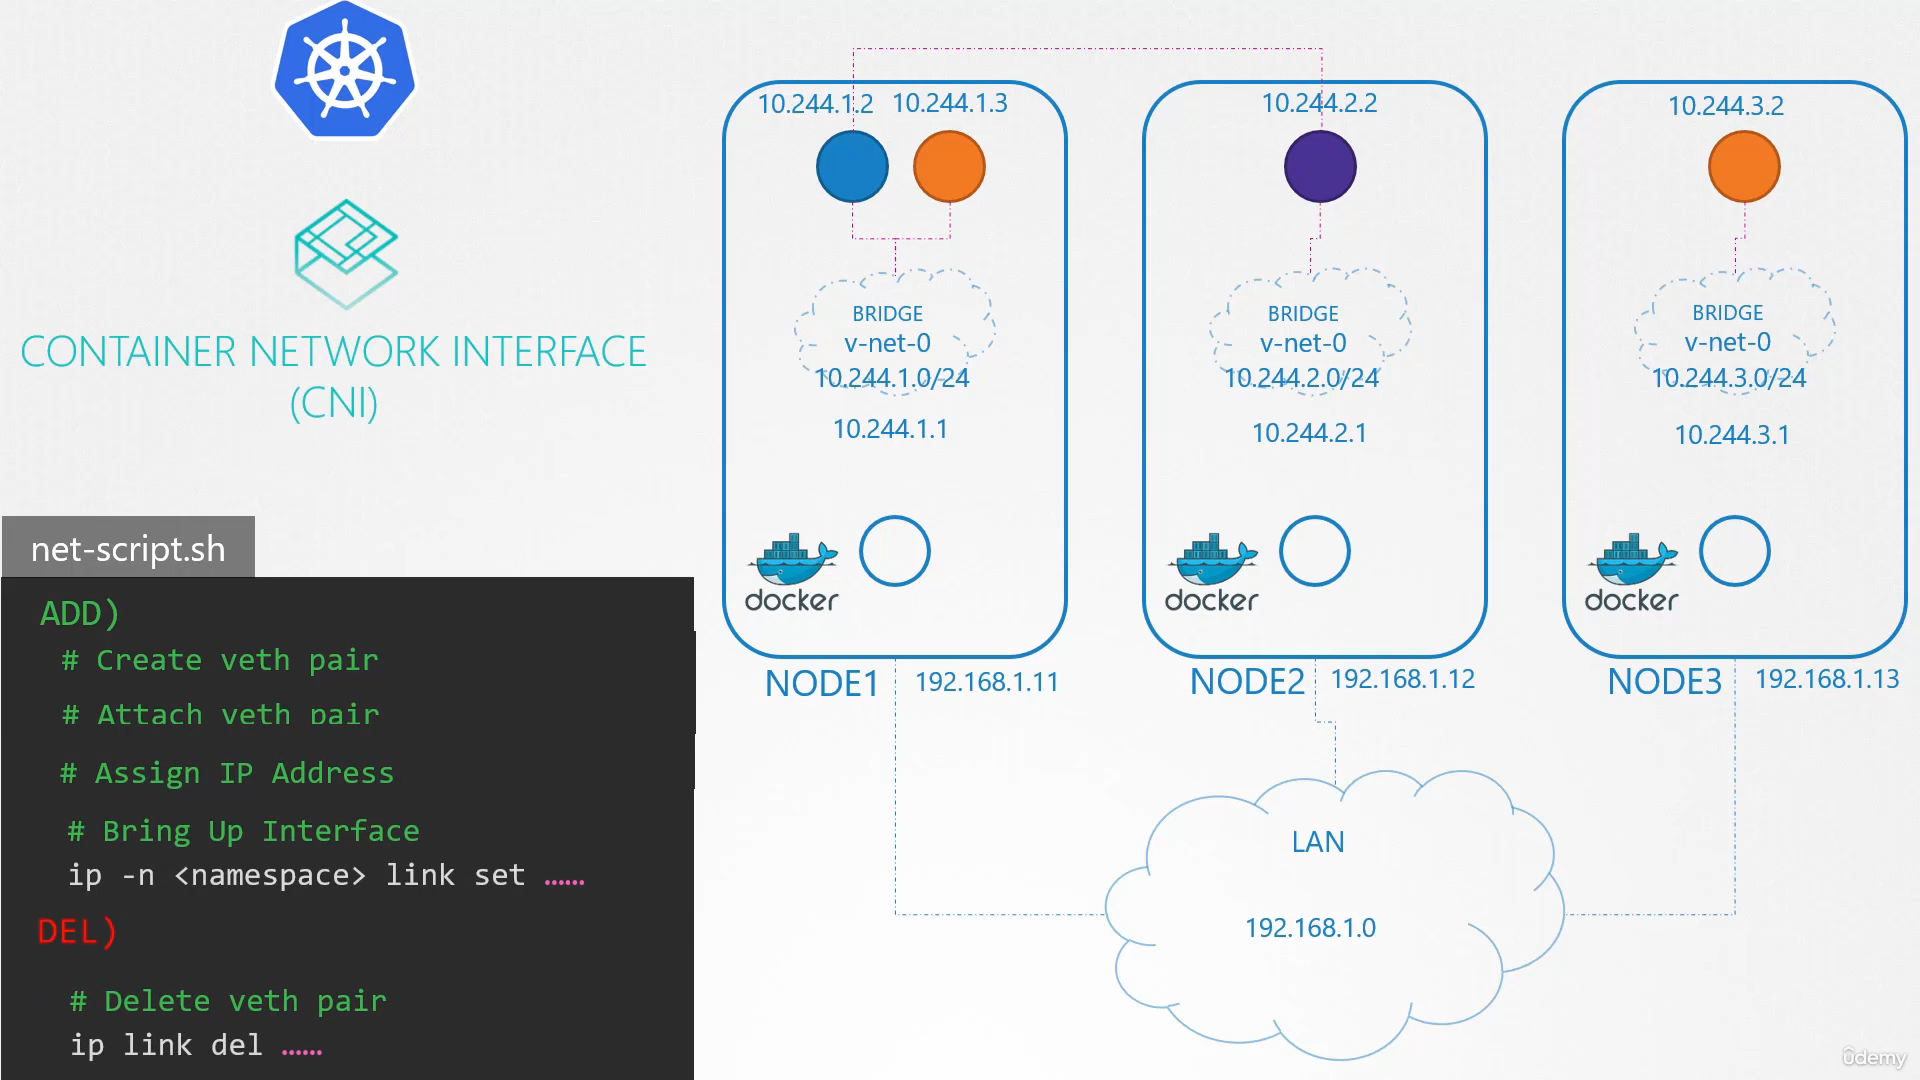 of deleting container interfaces from the network
and freeing the IP address, etc.
So our script is ready.
The container runtime on each node is responsible
for creating containers.
Whenever a container is created,
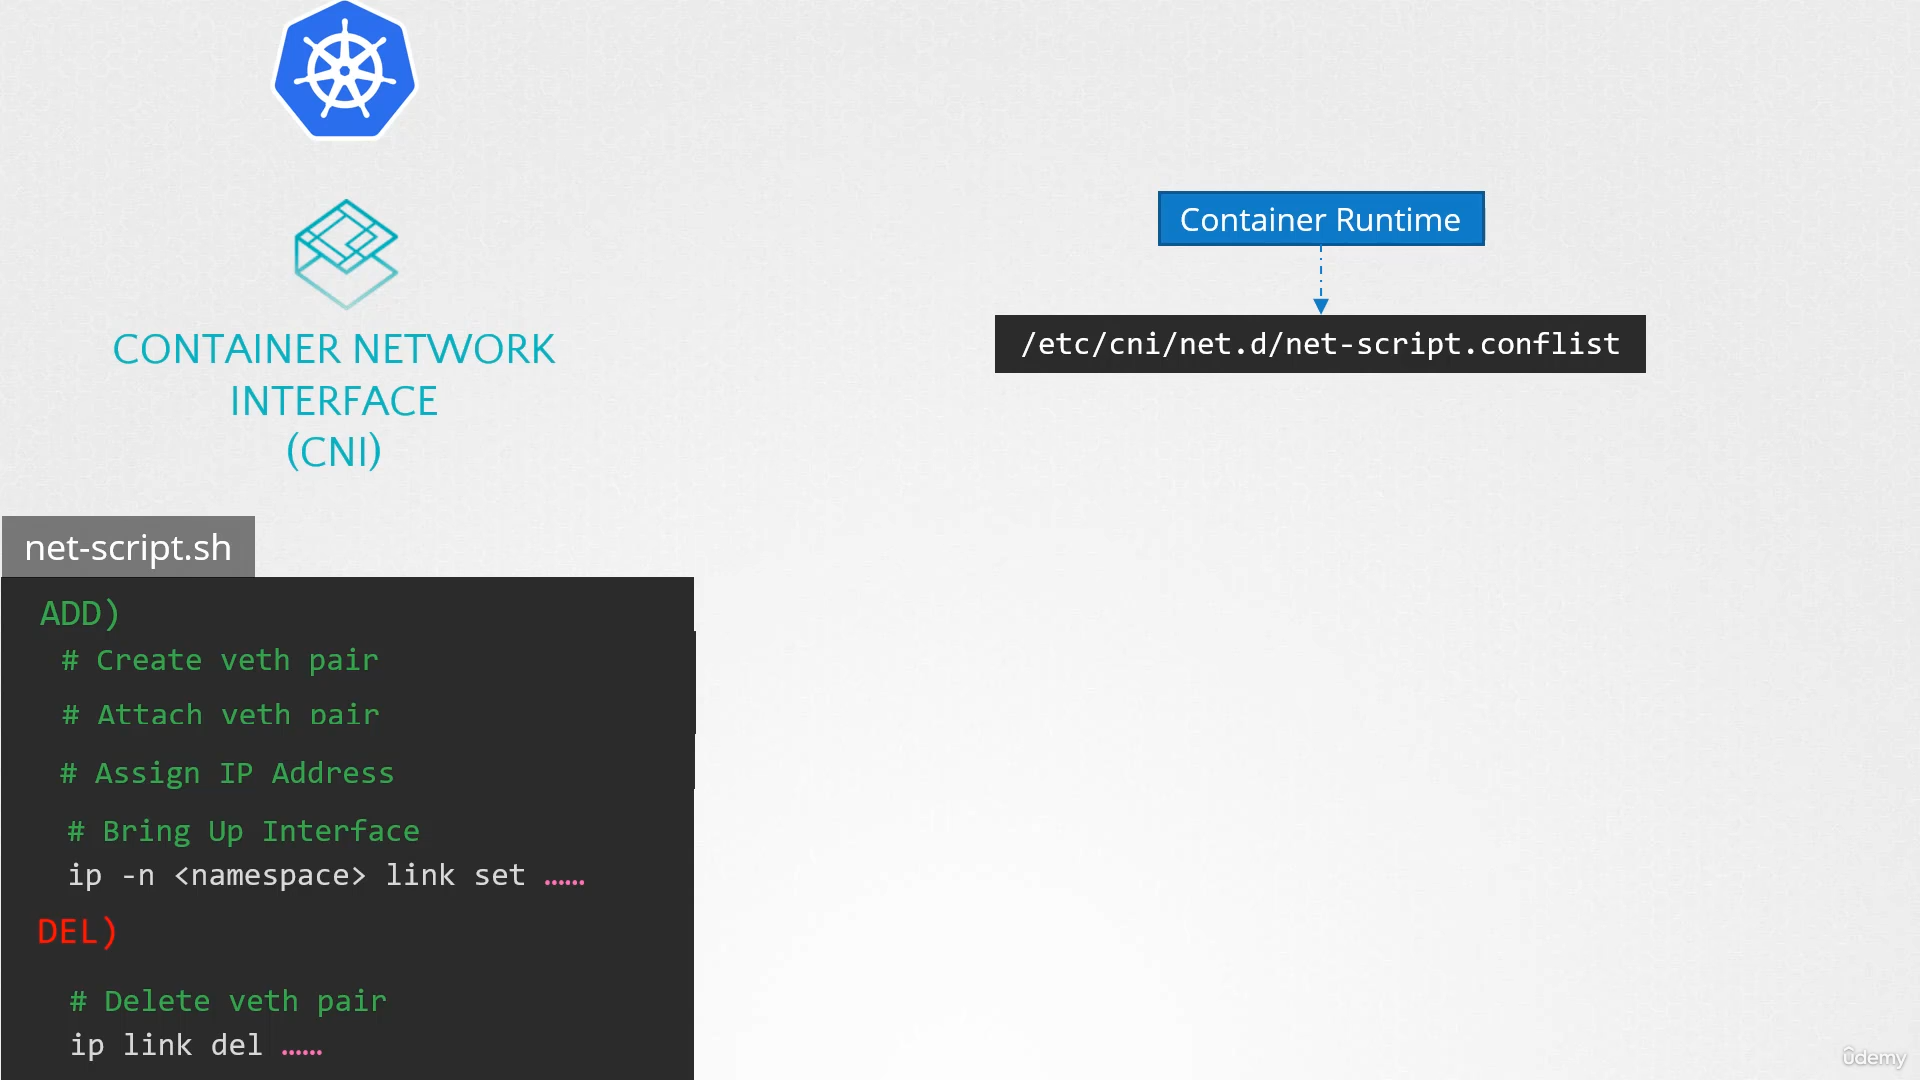 the container runtime looks at the CNI configuration passed
as a command line argument when it was run
and identifies our script’s name.
It then looks in the CNIs bin directory to find our script
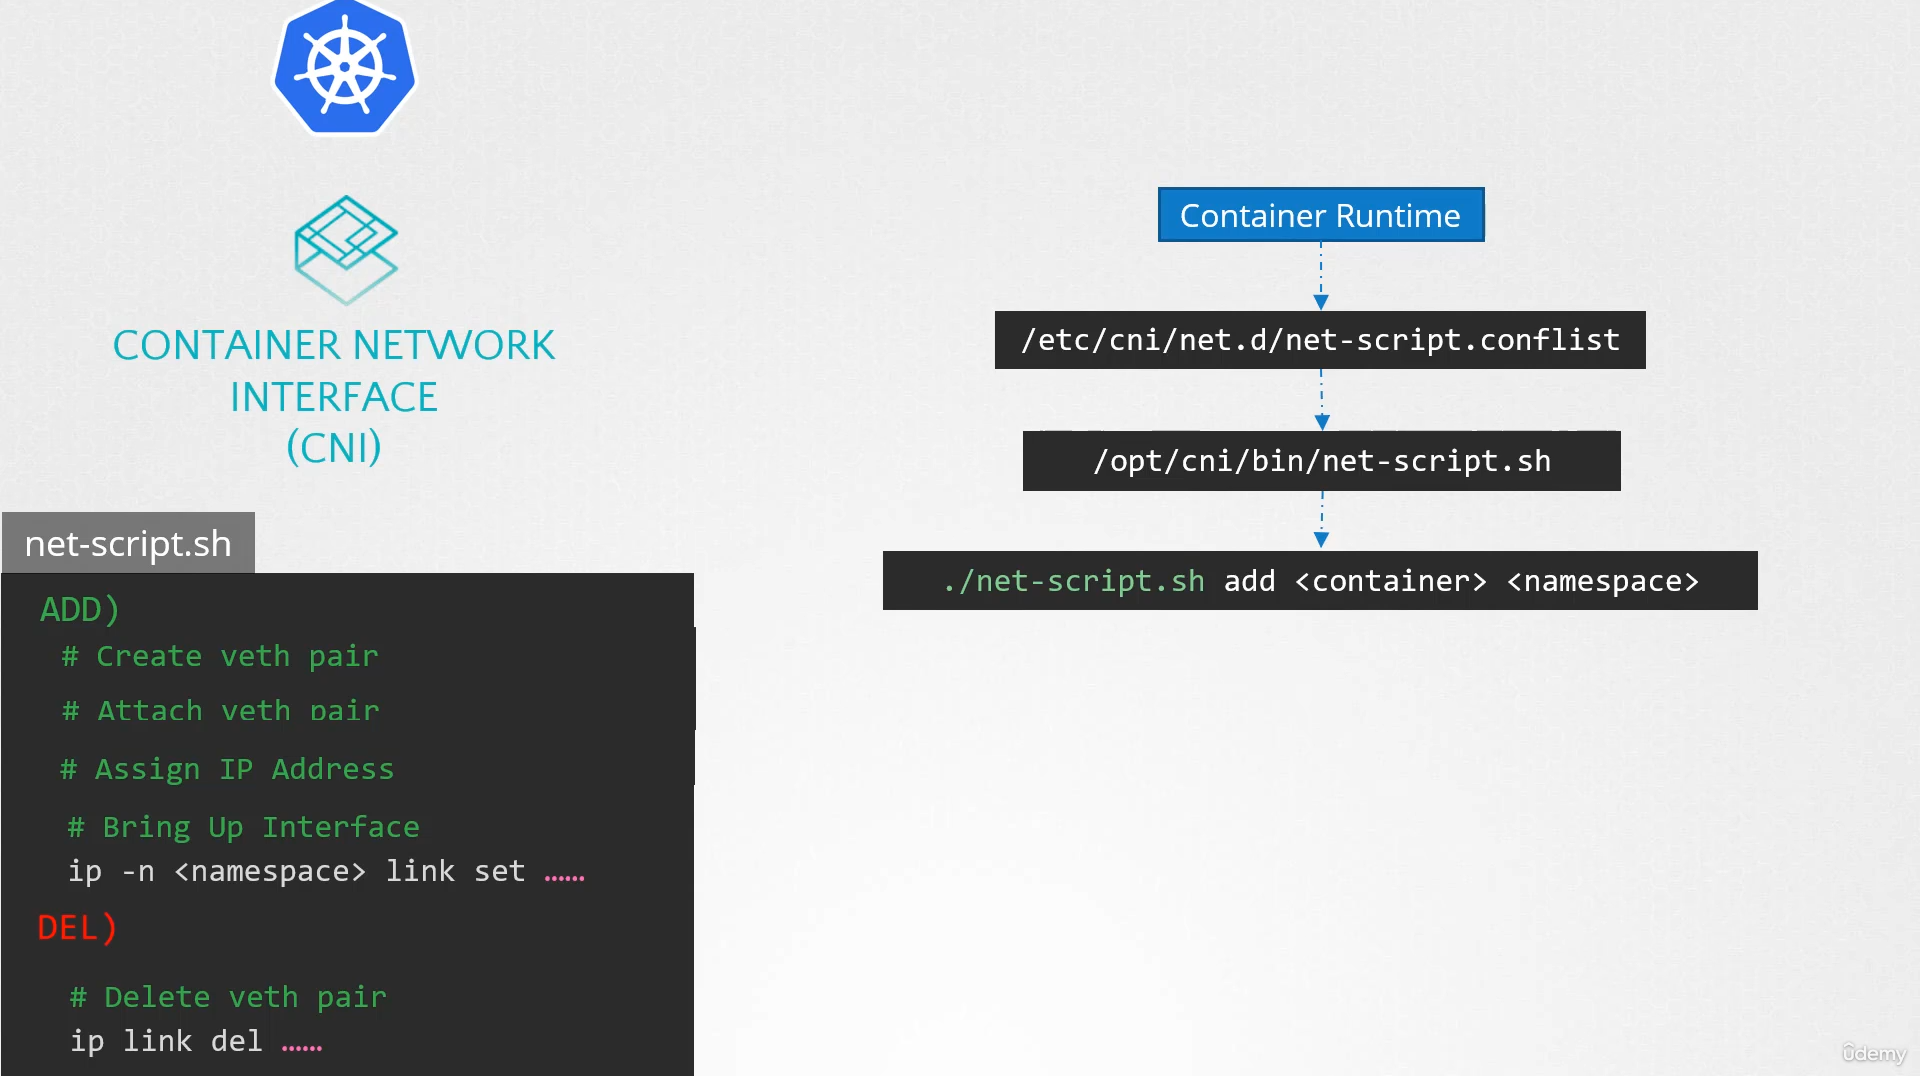 and then executes the script with the add command
and the name and namespace ID of the container,
and then our script takes care of the rest.
We will look at how and where the CNI is configured
in Kubernetes in the next lecture, along with practice tests
for now the state from the pod networking concepts lecture.
Hopefully, that should give you enough knowledge
on inspecting networking within pods
in a Kubernetes cluster.
We will see how other solutions do the same thing
that we did in the upcoming lectures.