sswe’ll look at how to generate the certificates
for the cluster.
To generate certificates,

there are different tools available such as Easy-RSA,
OpenSSL, or CFSSL, et cetera, or many others.
 In this lecture we will use OpenSSL tool
to generate the certificates.
This is where we left off.
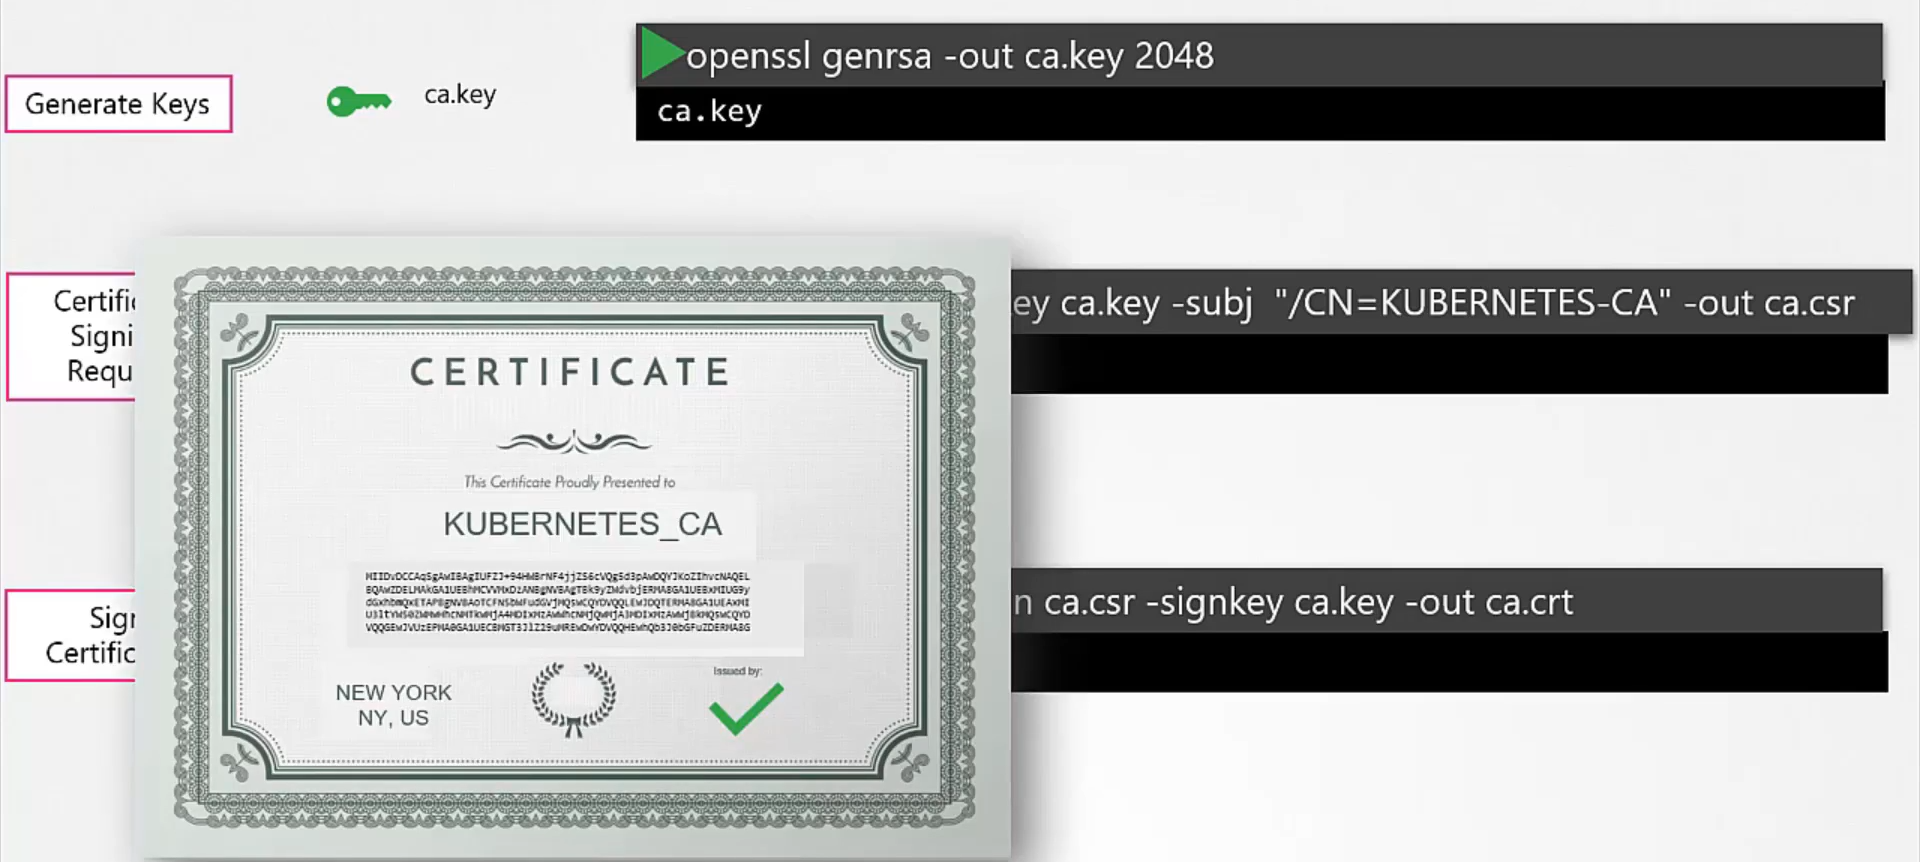
We will start with the CA certificates.

First we create a private key
using the OpenSSL command:
openssl genrsa dash out ca dot key.
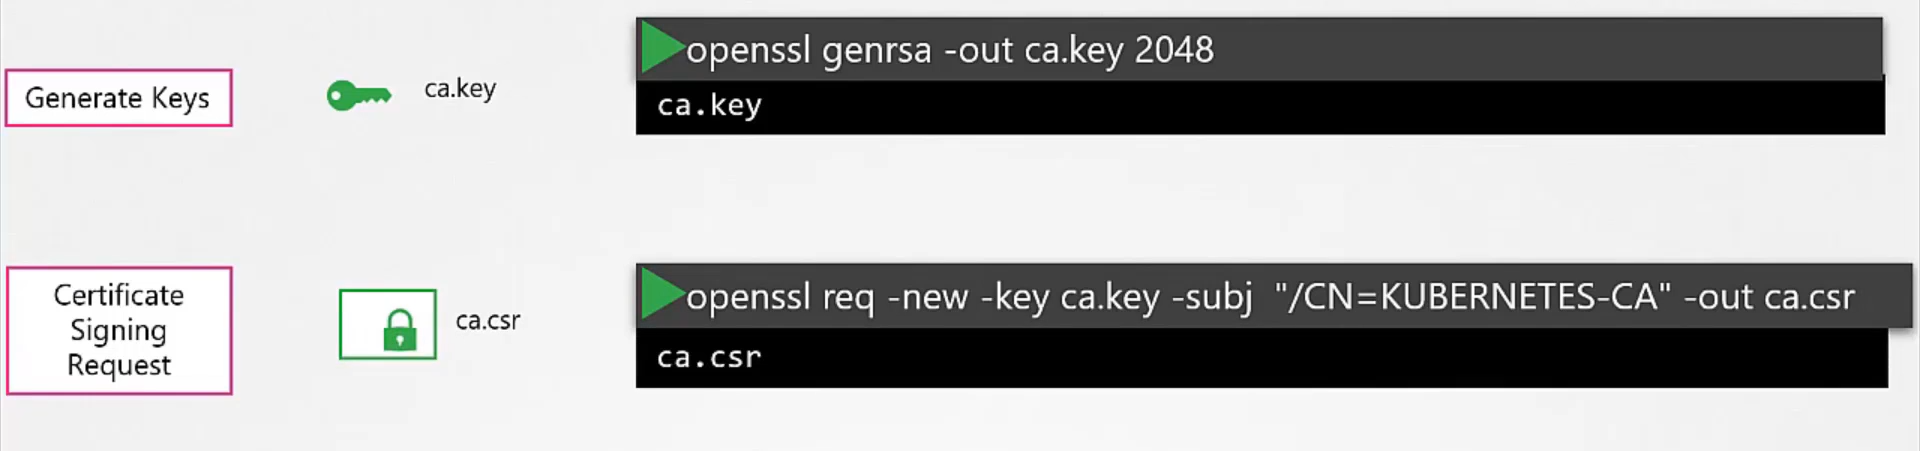 Then we use the OpenSSL Request command along with the key we just created to generate a certificate signing request.
The certificate signing request is like a certificate with all of your details, but with no signature.
In the certificate signing request we specify the name of the component the certificate is for in the Common Name, or CN field.
In this case, since we are creating a certificate for the Kubernetes CA, we name it Kubernetes dash CA.
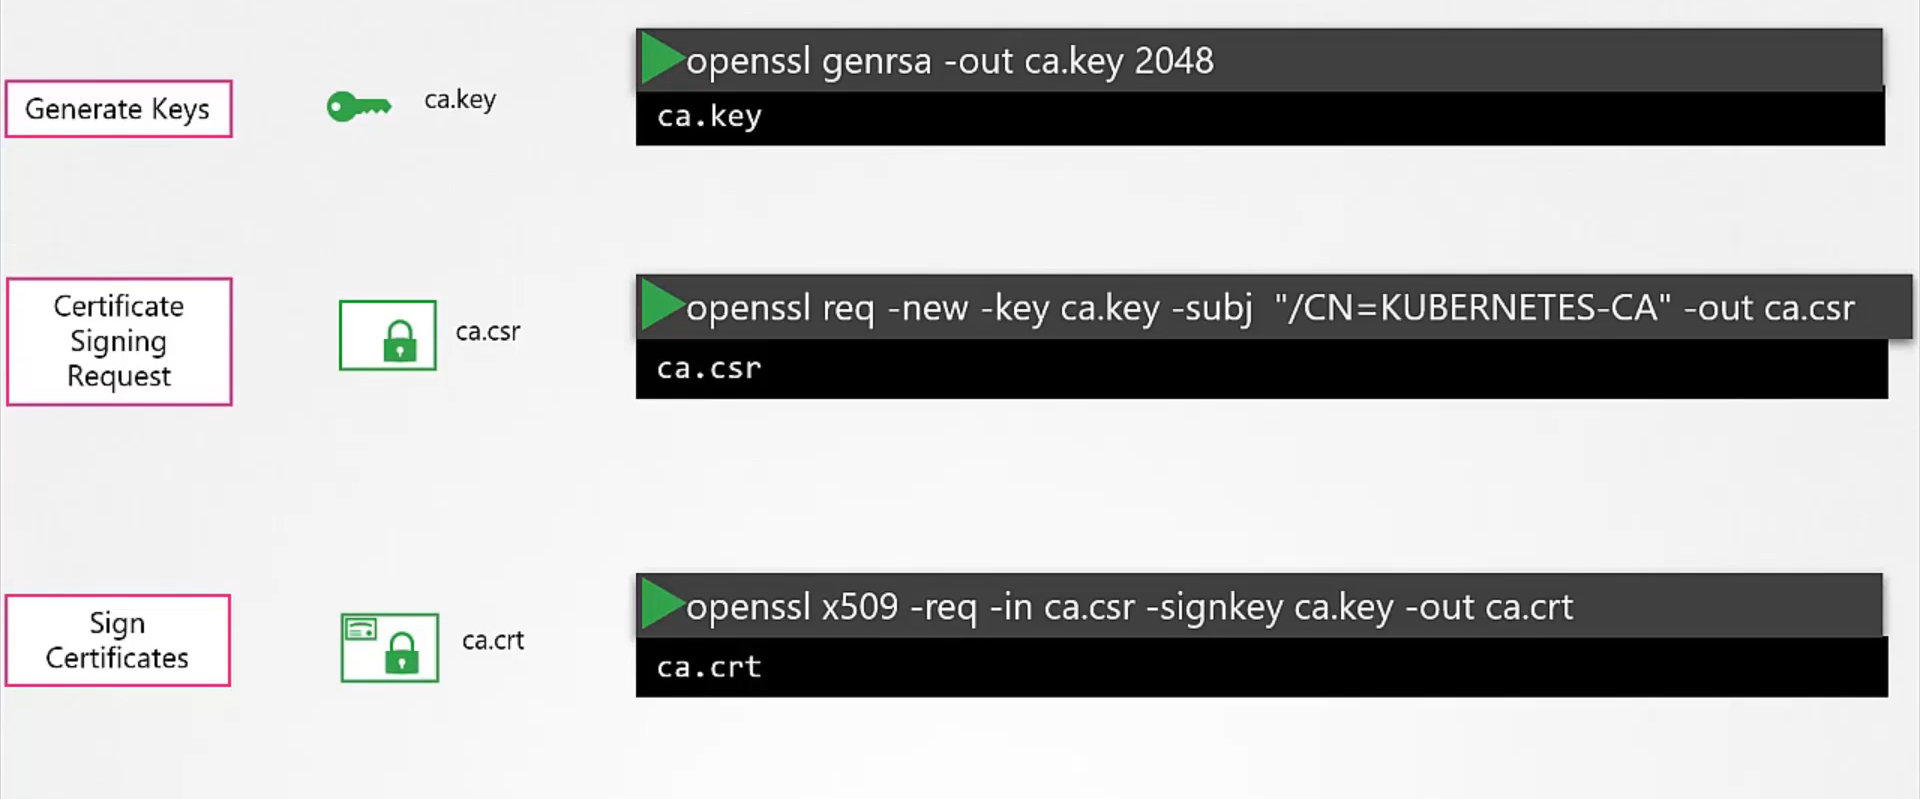 Finally, we sign the certificate using the OpenSSL X five zero nine command, and by specifying the certificate signing request
we generated in the previous command. Since this is for the CA itself it is self-signed by the CA using its own private key that it generated in the first step.
 Going forward for all other certificates we will use the CA key pair to sign them.
The CA now has its private key and route certificate file.
Going forward for all other certificates we will use the CA key pair to sign them.
The CA now has its private key and route certificate file.
Great.
Let’s now look at generating the client certificates.
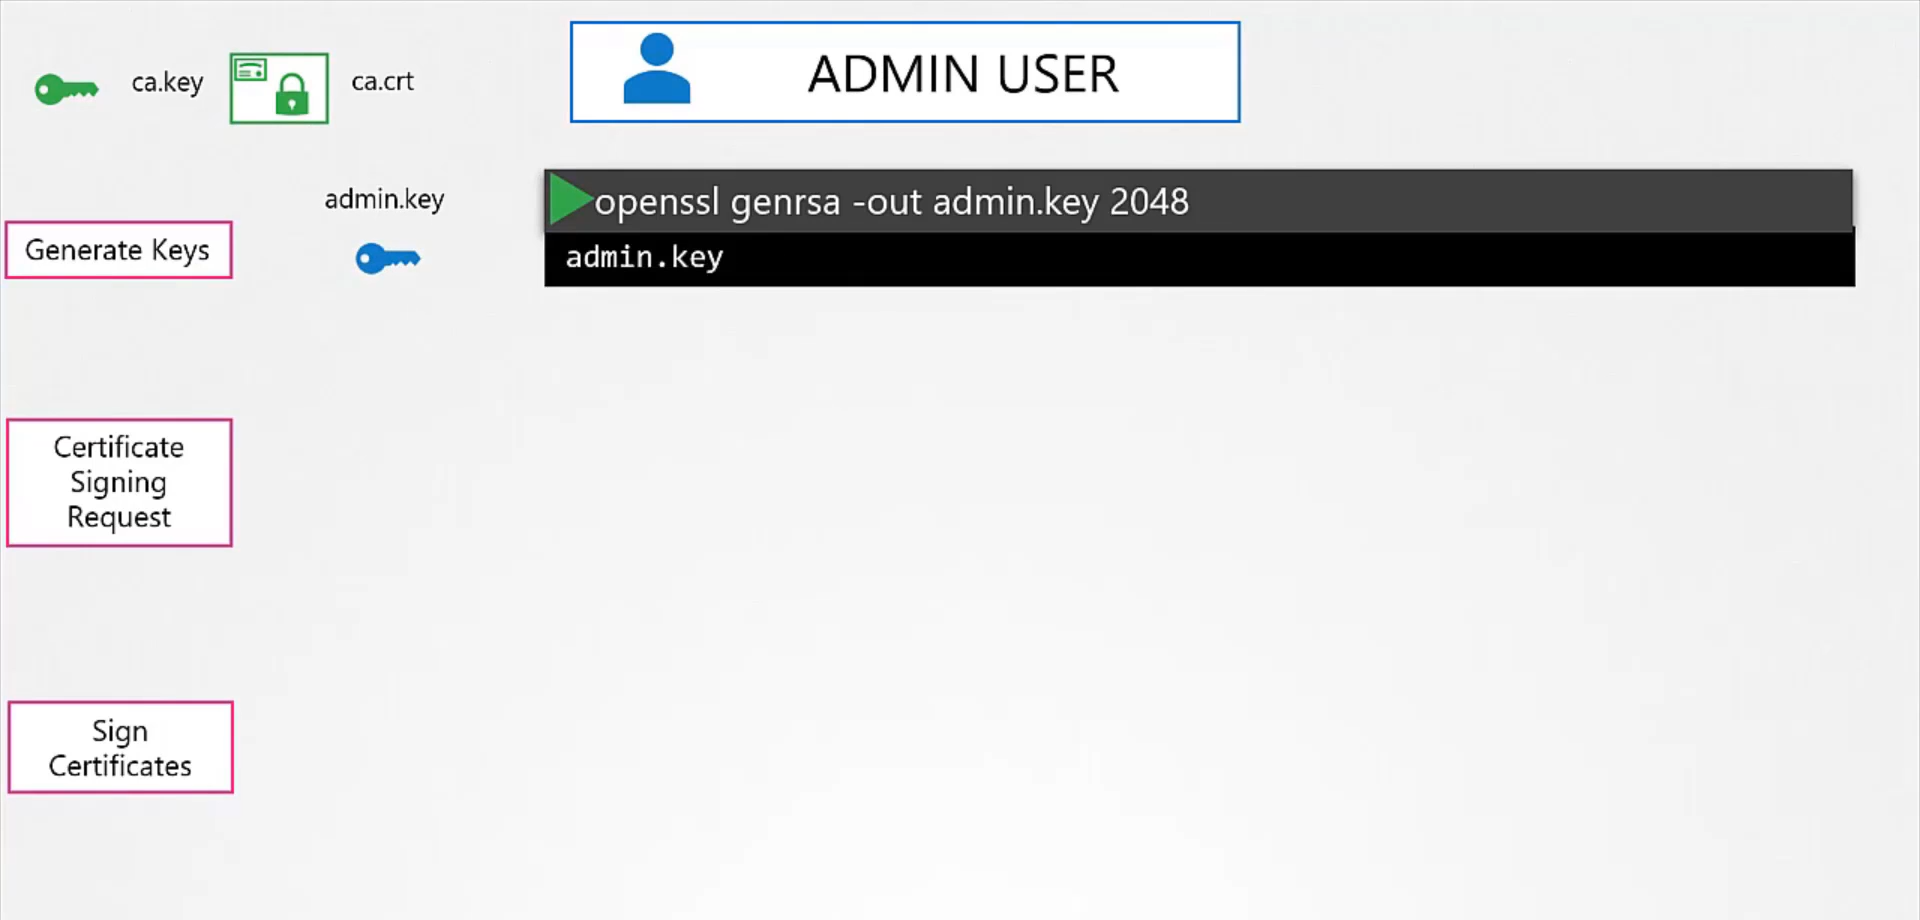 We start with the admin user.
We follow the same process where we create a private key
for the admin user using the OpenSSL command.
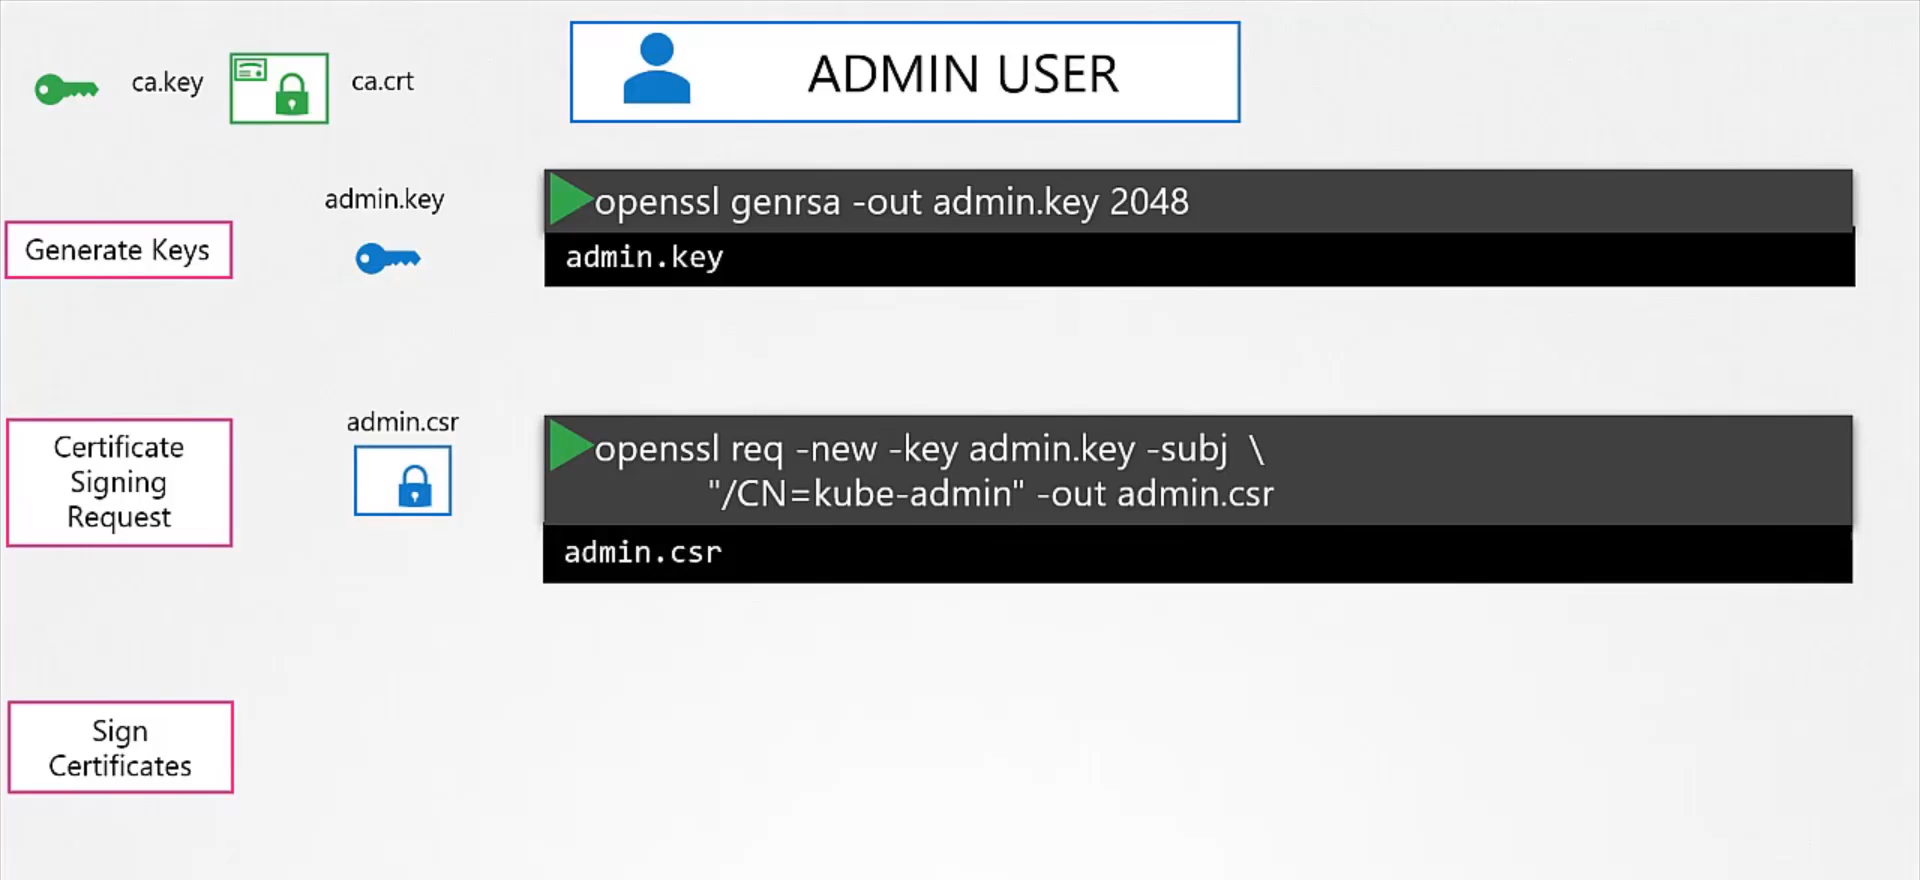 We then generate a CSR and that is where we specify the name of the admin user, which is Kube Admin.
A quick note about the name, it doesn’t really have to be Kube Admin. It could be anything.
but remember, this is the name that Kube Control client authenticates with and when you run the Kube Control command.
So in the audit logs and elsewhere, this is the name that you will see.
So provide a relevant name in this field.
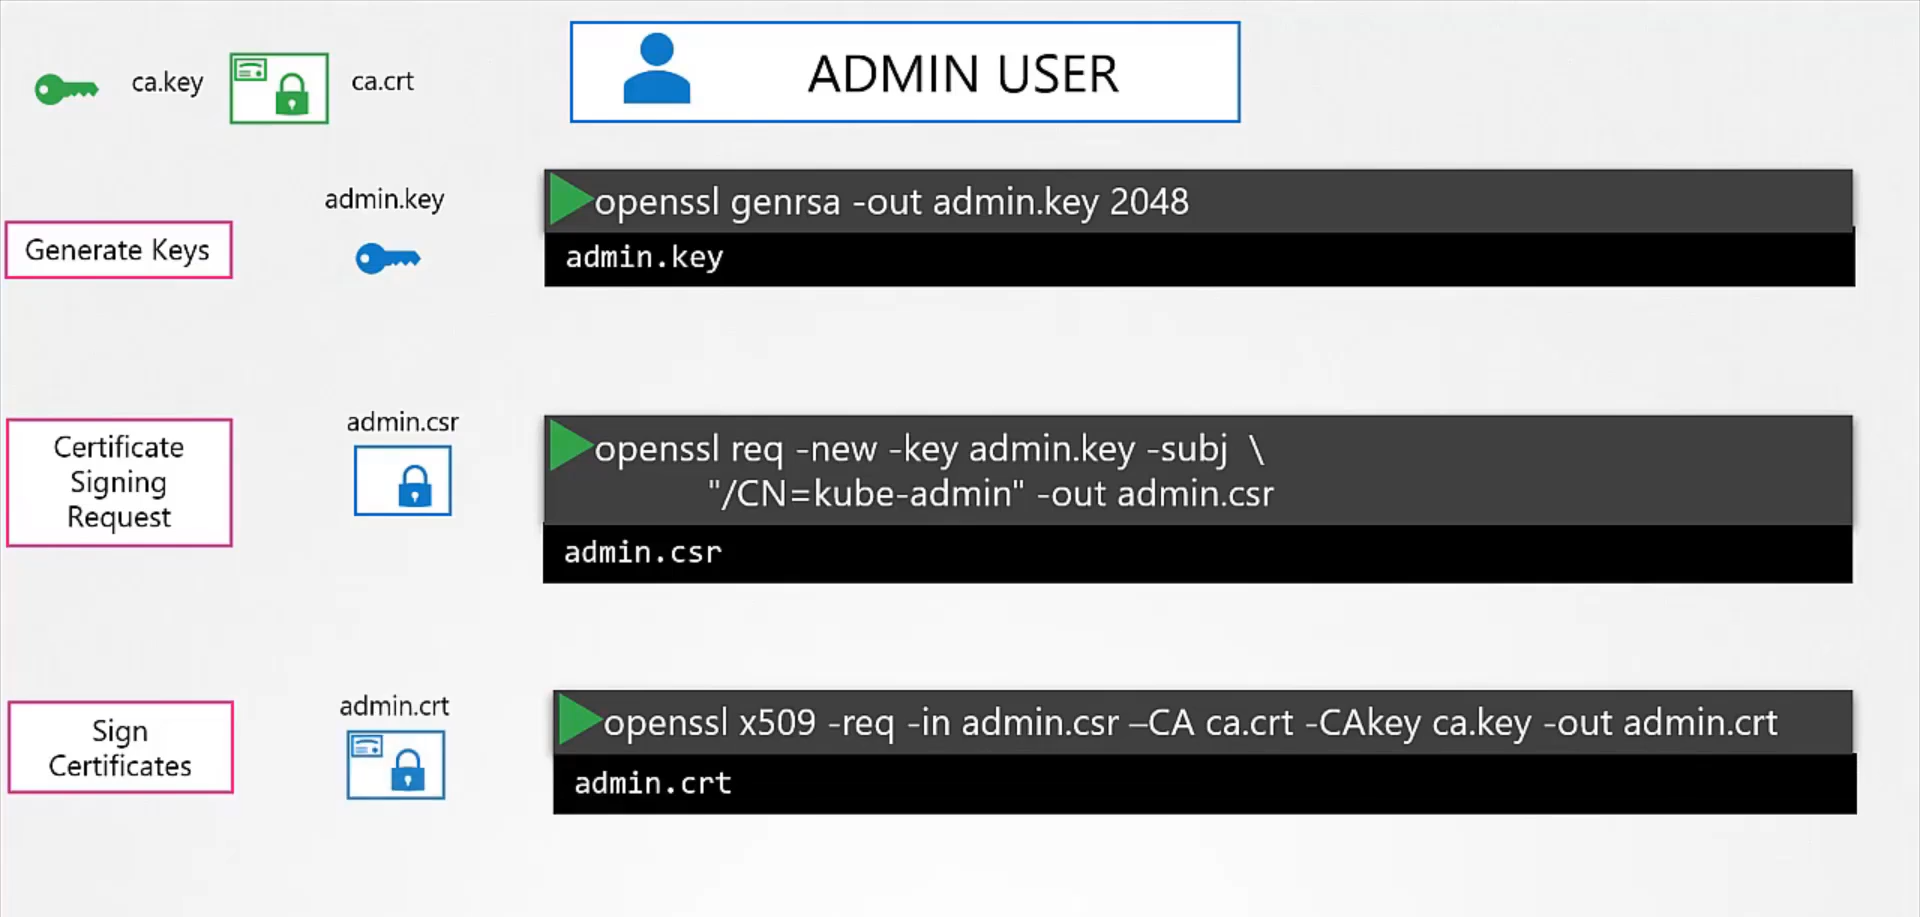 Finally, generate a signed certificate
using the OpenSSL X five zero nine command.
But this time you specify the CA certificate and the CA key.
You’re signing your certificate with the CA key pair.
That makes this a valid certificate within your cluster.
The signed certificate is then output
to admin dot crt file.
That is the certificate that the admin user will use
to authenticate to Kubernetes cluster.
If you look at it,
this whole process of generating a key
and a certificate pair
is similar to creating a user account
for a new user.
The certificate is the validated User ID
and the key is like the password.
It’s just that it’s much more secure
than a simple username and password.
So this is for the admin user.
How do you differentiate this user from any other users?
The user account needs to be identified
as an admin user and not just another basic user.
You do that by adding the group details
for the user in the certificate.
In this case, a group named System Masters exists
on Kubernetes with administrative privileges.
We will discuss about groups later,
but for now it’s important to note
that you must mention this information
in your certificate signing request.
You can do this by adding group details
with the OU parameter
while generating a certificate signing request.
Once it’s signed, we now have our certificate
for the admin user with admin privileges.
We follow the same process to generate client certificates
for all other components that access the Kube API server.
The kube-scheduler.
Now, the kube-scheduler is a system component,
part of the Kubernetes control pane,
so its name must be prefixed with the keyword system.
The same with kube-controller-manager.
It is again a system component so its name must be prefixed
with the keyword system.
And finally, kube-proxy.
So far we have created CA certificates,
then all of the client certificates
including the admin user, scheduler,
controller-manager, and kube-proxy.
We will follow the same procedure
to create the remaining three client certificates
for API servers and kubelets
when we create the server certificates for them.
So we will set them aside for now.
Now, what do you do with these certificates?
Take the admin certificate, for instance,
to manage the cluster.
You can use this certificate instead
of a username and password in a REST API call you make
to the Kube API server.
You specify the key, the certificate,
and the CA certificate as options.
That’s one simple way.
The other way is to move all of these parameters
into a configuration file called kubeconfig.
Within that, specify the API server endpoint details,
the certificates to use, et cetera.
That is what most of the Kubernetes clients use.
We will look at kubeconfig in depth in one
of the upcoming lectures.
Okay, so we are now left with the server site certificates
but before we proceed, one more thing.
Remember in the prerequisite lecture we mentioned that
for clients to validate the certificates sent by the server
and vice versa, they all need a copy
of the certificate authorities public certificate.
The one that we said is already installed within
the user’s browsers in case of a web application.
Similarly in Kubernetes for these various components
to verify each other, they all need a copy
of the CA’s root certificate.
So whenever you configure a server
or a client with certificates,
you will need to specify the CA root certificate as well.
Let’s look at the server-side certificates now.
Let’s start with the ETCD server.
We follow the same procedure as before
to generate a certificate for ETCD.
We will name it ETCD dash server.
ETCD server can be deployed as a cluster
across multiple servers
as in a high availability environment.
In that case, to secure communication
between the different members in the cluster,
we must generate additional peer certificates.
Once the certificates are generated
specify them while starting the ETCD server.
There are key and cert file options where
you specify the ETCD server keys.
There are other options available
for specifying the peer certificates.
And finally, as we discussed earlier,
it requires the CA root certificate
to verify that the clients connecting
to the ETCD server are valid.
Let’s talk about the Kube API server now.
We generate a certificate for the API server like before.
But wait, the API server is the most popular
of all components within the cluster.
Everyone talks to the Kube API server.
Every operation goes through the Kube API server.
Anything moves within the cluster,
the API server knows about it.
You need information,
you talk to the API server.
And so it goes by many names and aliases within the cluster.
It’s real name is Kube API server
but some call it Kubernetes
because for a lot of people who don’t really know
what goes under the hoods of Kubernetes,
the Kube API server is Kubernetes.
Others like to call it Kubernetes dot default.
Well, some refer to it as Kubernetes dot default dot svc
and some like to call it by its full name
Kubernetes dot default dot svc dot cluster dot local.
Finally, it is also referred to
in some places simply by its IP address.
The IP address of the host running the Kube API server
or the pod running it.
So all of these names must be present
in the certificate generated for the Kube API server.
Only then those referring to the Kube API server
by these names will be able to establish a valid connection.
So we use the same set of commands as earlier
to generate a key.
In the certificate signing request you specify
the name Kube API server.
But how do you specify all the alternate names?
For that, you must create an OpenSSL config file.
Create an OpenSSL dot CNF file
and specify the alternate names
in the Alt Name section of the file.
Include all the DNS names the API server goes by
as well as the IP address.
Pass this config file as an option
while generating the certificate signing request.
Finally, sign the certificate
using the CA certificate end key.
You then have the Kube API server certificate.
It is time to look
at where we are going to specify these keys.
Remember to consider the API client certificates
that are used by the API server
while communicating as a client
to the ETCD and kubelet servers.
The location of these certificates are passed
in to the Kube API servers executable
or service configuration file.
First, the CA file needs to be passed in,
to remember every component needs the CA certificate
to verify its clients.
Then we provide the API server certificates
under the TLS cert options.
We then specify the client certificates
used by Kube API server to connect
to the ETCD server again with the CA file.
And finally, the Kube API server client certificates
to connect to the kubelets.
Next comes the kubelets server.
The kubelets server is an ACTPS API server
that runs on each node,
responsible for managing the node.
That’s who the API server talks to
to monitor the node
as well as send information regarding what pods
to schedule on this node.
As such, you need a key certificate pair
for each node in the cluster.
Now, what do you name these certificates?
Are they all going to be named kubelets?
No.
They will be named after their nodes.
Node zero one, node zero two, and node zero three.
Once the certificates are created,
use them in the kubelet config file.
As always, you specify the root CS certificate
and then provide the kubelet node certificates.
You must do this for each node in the cluster.
We also talked about a set
of client certificates that will be used
by the kubelet to communicate with the Kube API server.
These are used by the kubelet to authenticate
into the Kube API server.
They need to be generated as well.
What do you name these certificates?
The API server needs to know which node is authenticating
and give it the right set of permissions
so it requires the nodes to have the right names
in the right formats.
Since the nodes are system components
like the kube-scheduler
and the controller-manager we talked about earlier,
the format starts with the system keyword,
followed by node, and then the node name.
In this case, node zero one to node zero three.
And how would the API server give it the right set
of permissions?
Remember we specified a group name for the admin user
so the admin user gets administrative privileges?
Similarly, the nodes must be added
to a group named System Nodes.
Once the certificates are generated,
they go into the kubeconfig files as we discussed earlier.
Well, that’s it for this lecture.
In the next lecture
we will see how you can view certificate information
and how certificates are configured by the Kubeadm tool.