A certificate is used to guarantee trust
between two parties during a transaction.
For example, when a user tries to access a web server,
TLS certificates ensure that the communication
between the user and the server is encrypted
and the server is who it says it is.
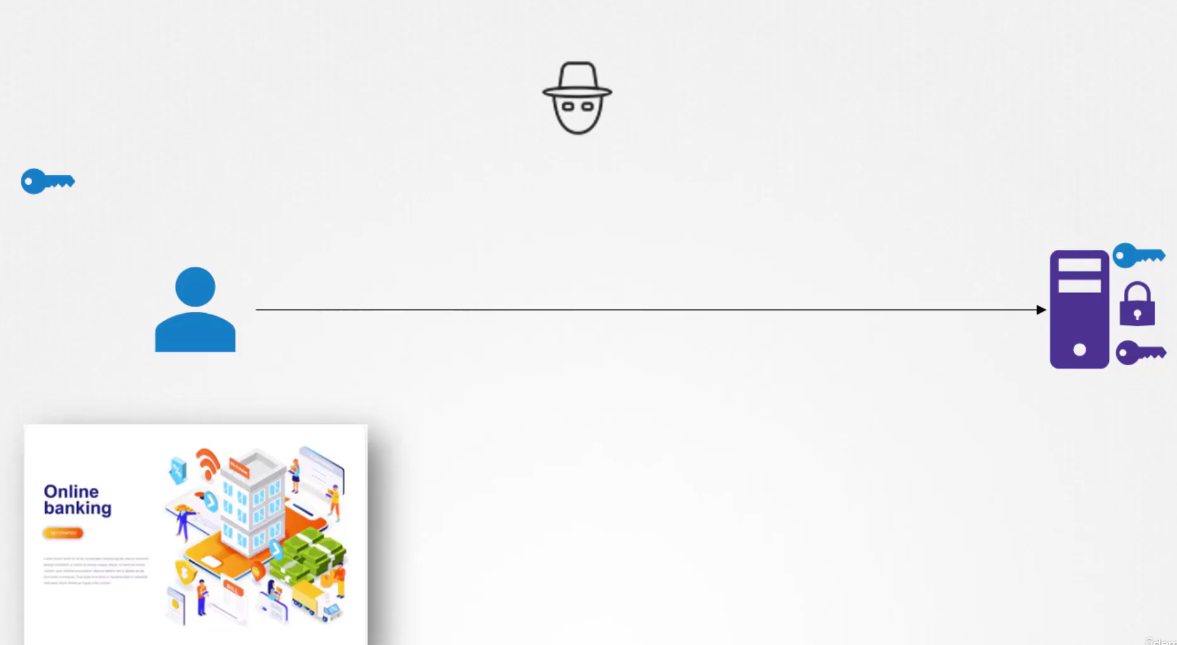
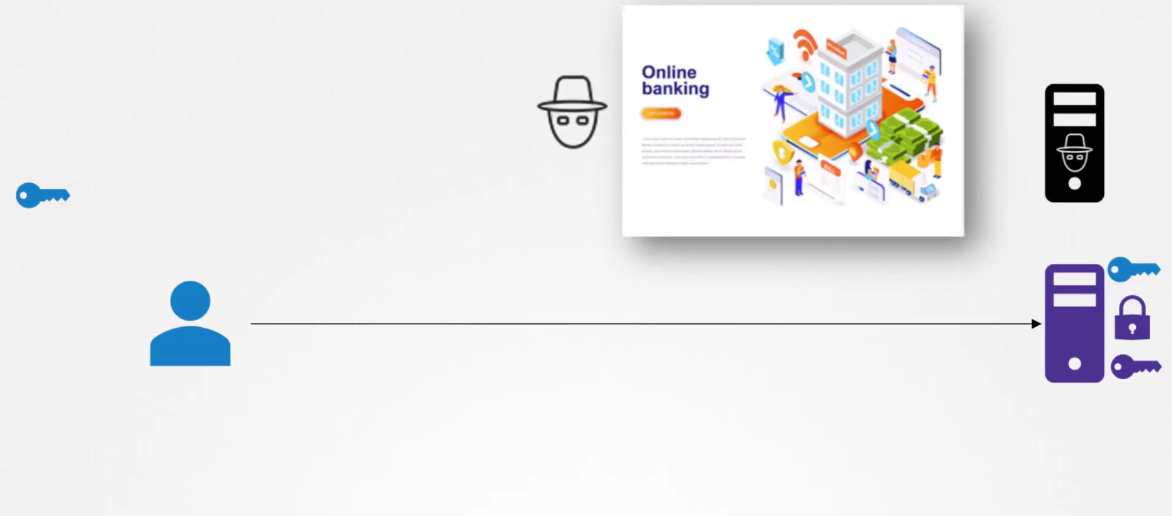
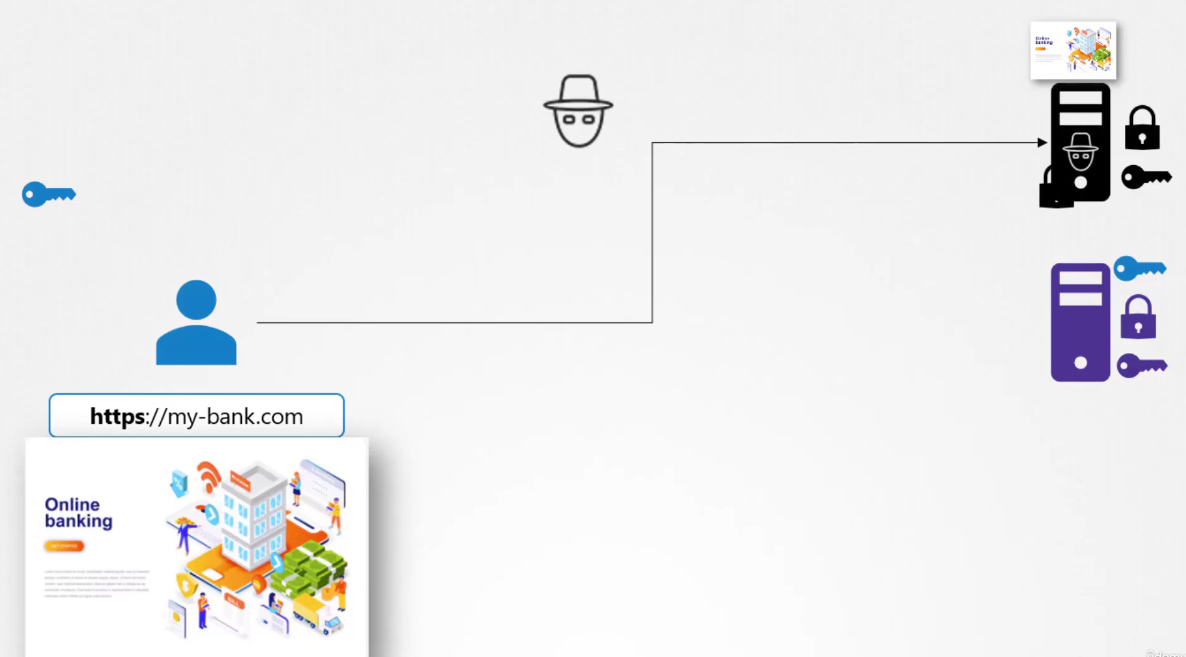
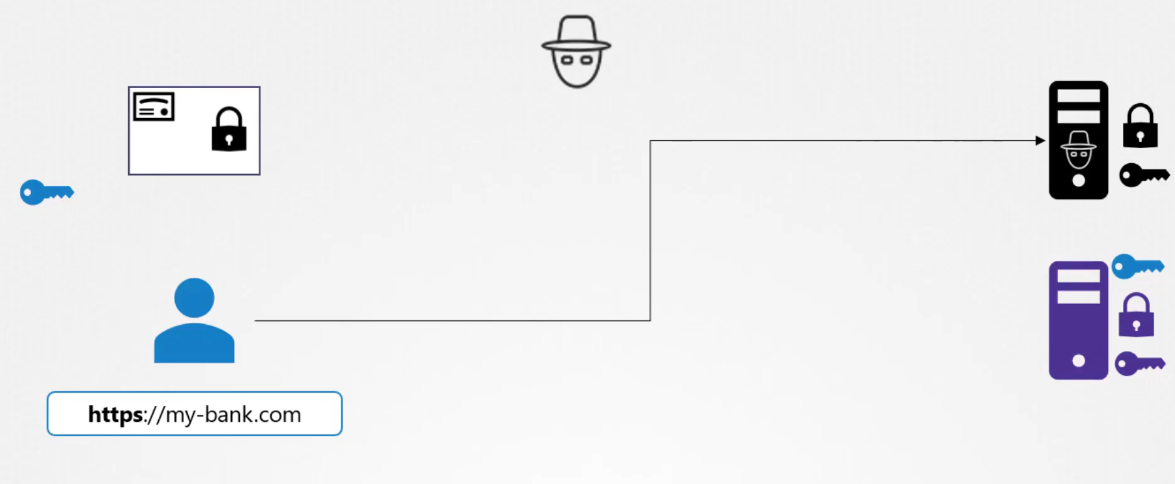
Let’s take a look at a scenario.
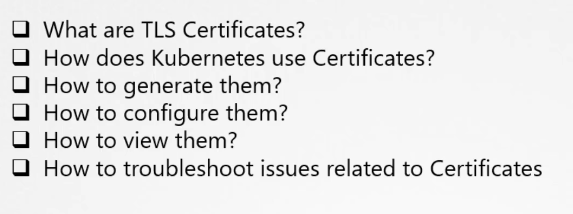
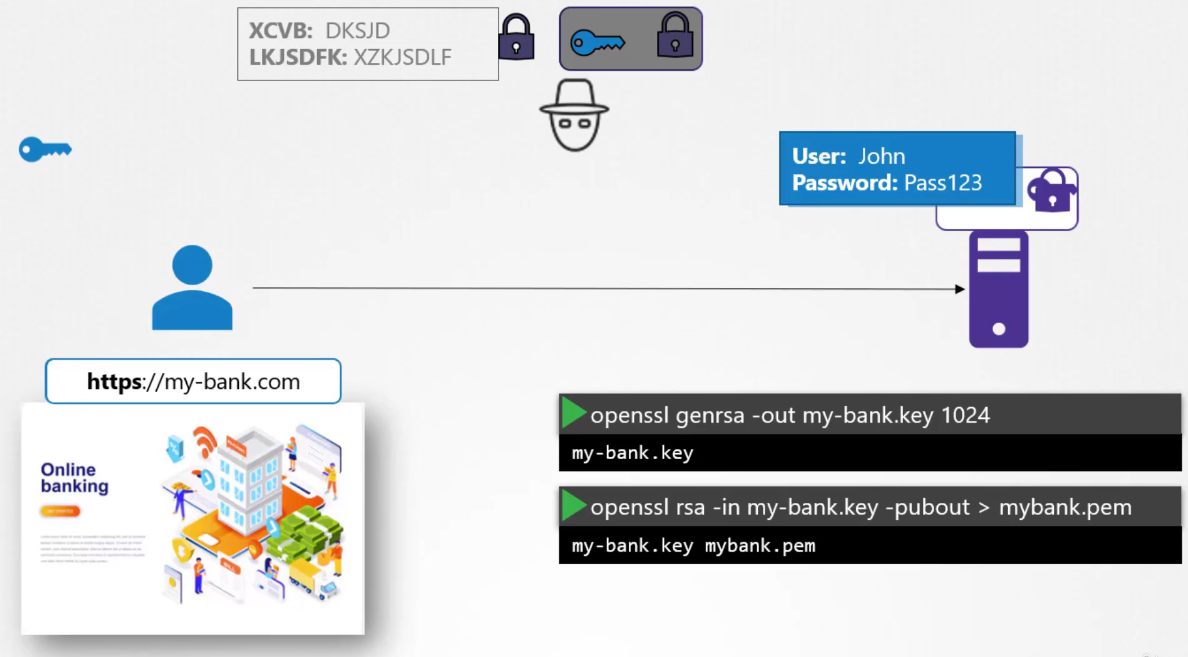
Without secure connectivity,
if a user were to access his online banking application,
the credentials he types in
would be sent in a plain text format.
The hacker sniffing network traffic
could easily retrieve the credentials
and use it to hack into the user’s bank account.
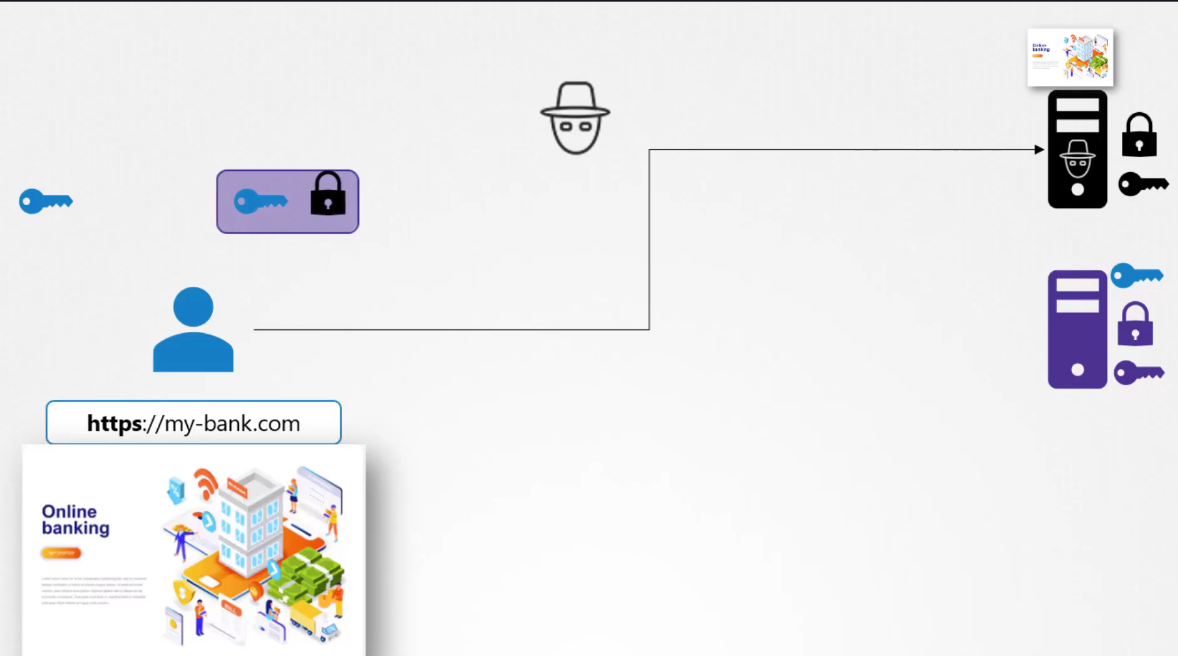
Well, that’s obviously not safe,
so you must encrypt the data being transferred
using encryption keys.
The data is encrypted using a key,
which is basically a set of random numbers and alphabets.
You add the random number to your data
and you encrypt it into a format that cannot be recognized.
The data is then sent to the server.
The hacker sniffing the network gets the data,
but can’t do anything with it.
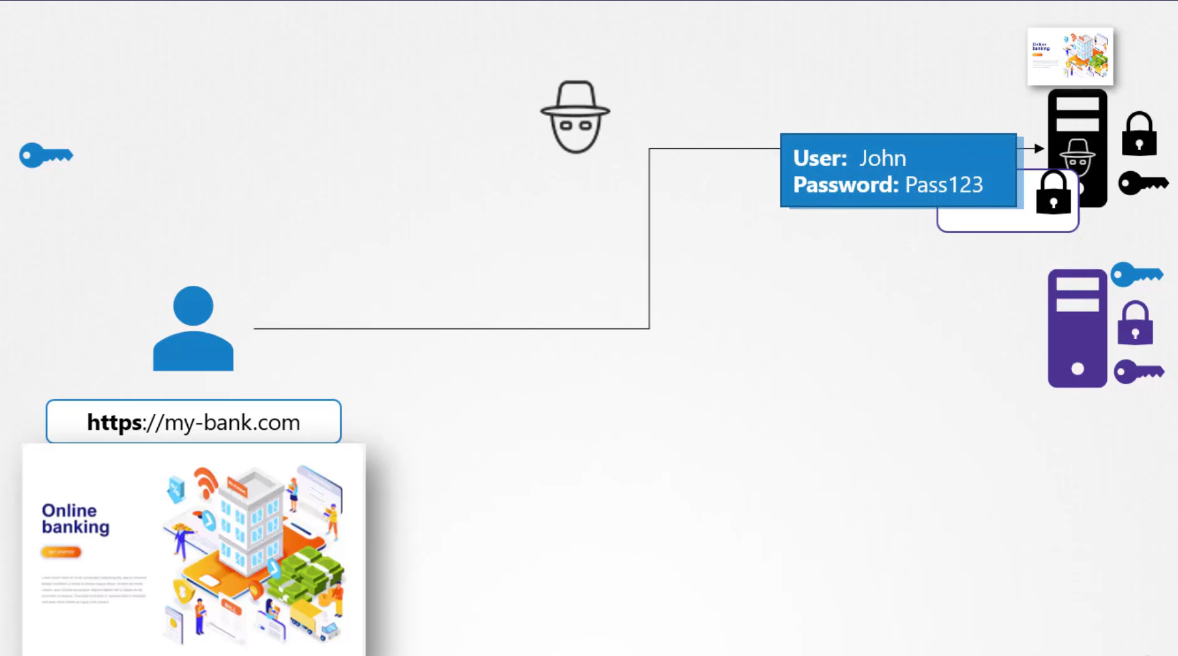
However, the same is the case
with the server receiving the data.
It cannot decrypt the data without the key,
so a copy of the key must also be sent
to the server so that the server can decrypt
and read the message.
Since the key is also sent over the same network,
the attacker can sniff that as well
and decrypt the data with it.
This is known as symmetric encryption.
It is a secure way of encryption,
but since it uses the same key to encrypt
and decrypt the data, and since the key has to be exchanged
between the and the receiver,
there is a risk of a hacker gaining access to the key
and decrypting the data,
and that’s where asymmetric encryption comes in.
Instead of using a single key to encrypt and decrypt data,
asymmetric encryption uses a pair of keys,
a private key and a public key.
Well, they are private and public keys,
but for the sake of this example,
we will call it a private key and a public lock.
We will get back to that at the end,
but for now think of it as a key and a lock pair.
A key, which is only with me, so it’s private,
a lock that anyone can access, so it’s public.
The trick here is, if you encrypt or lock the data
with your lock, you can only open it
with the associated key.
So your key must always be secure with you
and not be shared with anyone else, it’s private,
but the lock is public and maybe shared with others,
but they can only lock something with it.
No matter what is locked using the public lock,
it can only be unlocked by your private key.
Before we go back to our web server example,
let’s look at an even simpler use case
of securing SSH access to servers using key pairs.
You have a server in your environment
that you need access to.
You don’t want to use passwords as they’re too risky
so you decide to use key pairs.
You generate a public and private key pair.
You can do this by running the SSH keys and command.
It creates two files, ID_RSA is the private key
and ID_RSA.pub is the public key.
Well, not a public key, a public lock.
You then secure your server
by locking down all access to it,
except through a door that is locked using your public lock.
It’s usually done by adding an entry with your public key
into the server’s SSH authorized_keys file.
So you see the lock is public
and anyone can attempt to break through.
But as long as no one gets their hands on your private key,
which is safe with you on your laptop,
no one can gain access to the server.
When you try to SSH, you specify the location
of your private key in your SSH command.
What if you have other servers in your environment?
How do you secure more than one server with your key pair?
Well, you can create copies of your public lock
and place them on as many servers as you want.
You can use the same private key
to SSH into all of your servers securely.
What if other users need access to your servers?
Well, they can do the same thing.
They can generate their own public and private key pairs.
As the only person who has access to those servers,
you can create an additional door for them
and lock it with their public locks,
copy their public locks to all the servers,
and now other users can access the servers
using their private keys.
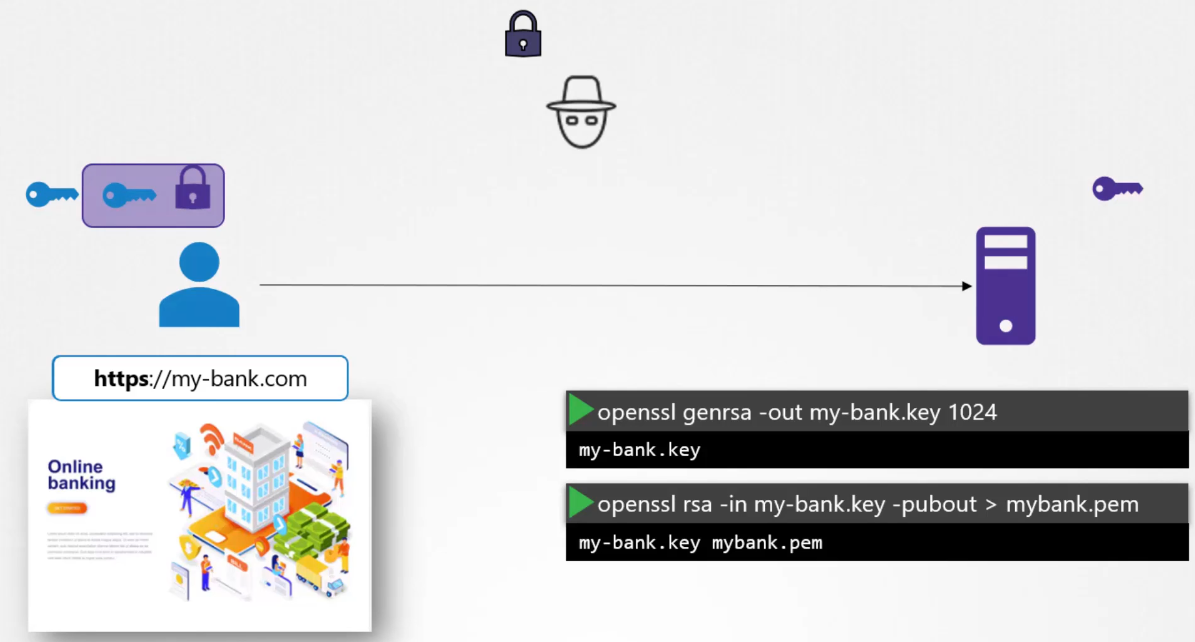
Let’s go back to our web server example.
You see, the problem we had earlier
with symmetric encryption was that the key used
to encrypt data had to be sent to the server
over the network along with the encrypted data,
and so there is a risk of the hacker getting the key
to decrypt the data.
What if we could somehow get the key to the server safely?
Once the key is safely made available to the server,
the server and client can safely continue communication
with each other using symmetric encryption.
To securely transfer the symmetric key
from the client to the server,
we use asymmetric encryption.
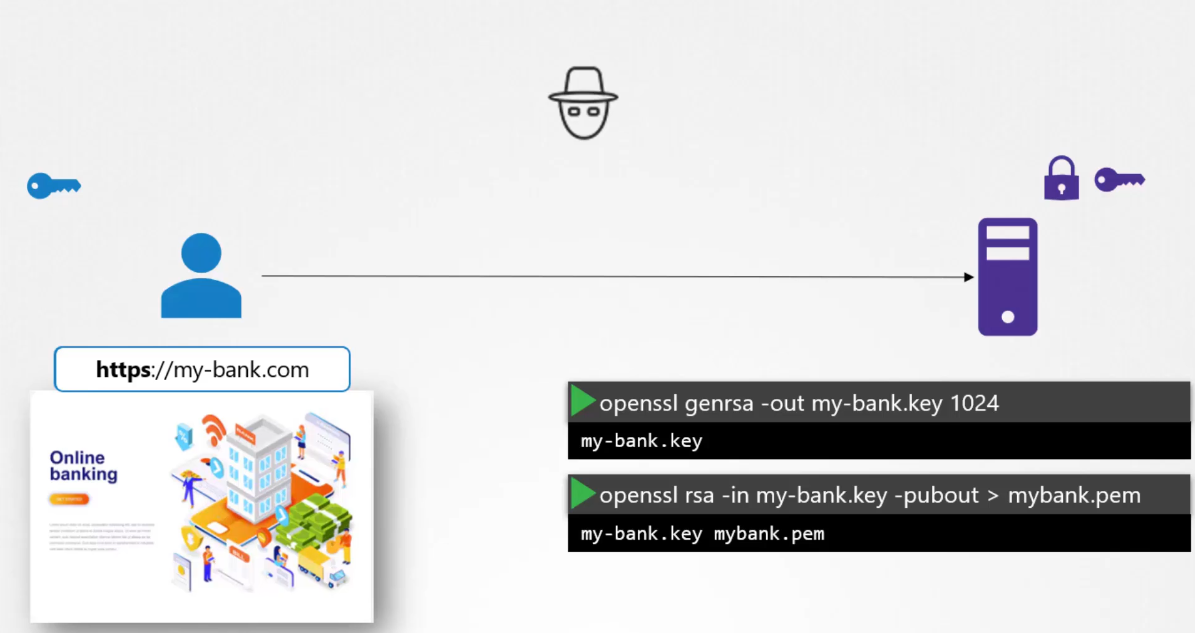
So we generate a public and private key pair on the server.
We’re going to refer to the public log
as public key going forward
now that you have got the idea.
The SSH key gen command was used earlier
to create a pair of keys for SSH purposes,
so the format is a bit different.
Here we use the open SSL command
to generate a private and public key pair,
and that’s how they look.
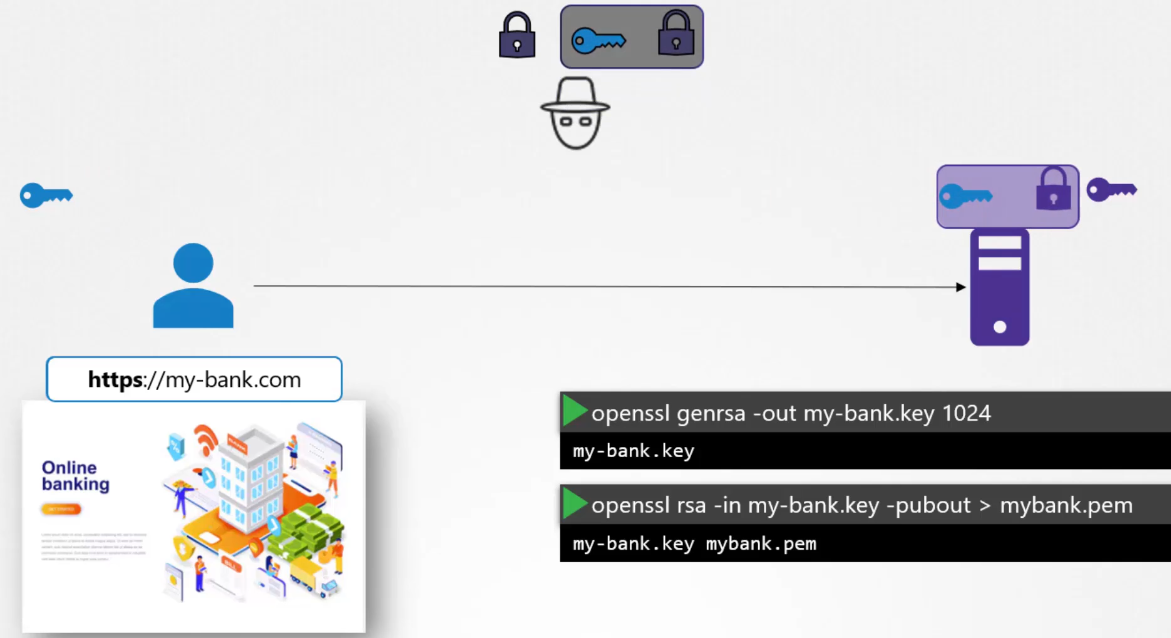
 When the user first accesses the web server using STTPS,
he gets the public key from the server.
Since the hacker is sniffing all traffic,
let us assume he too gets a copy of the public key.
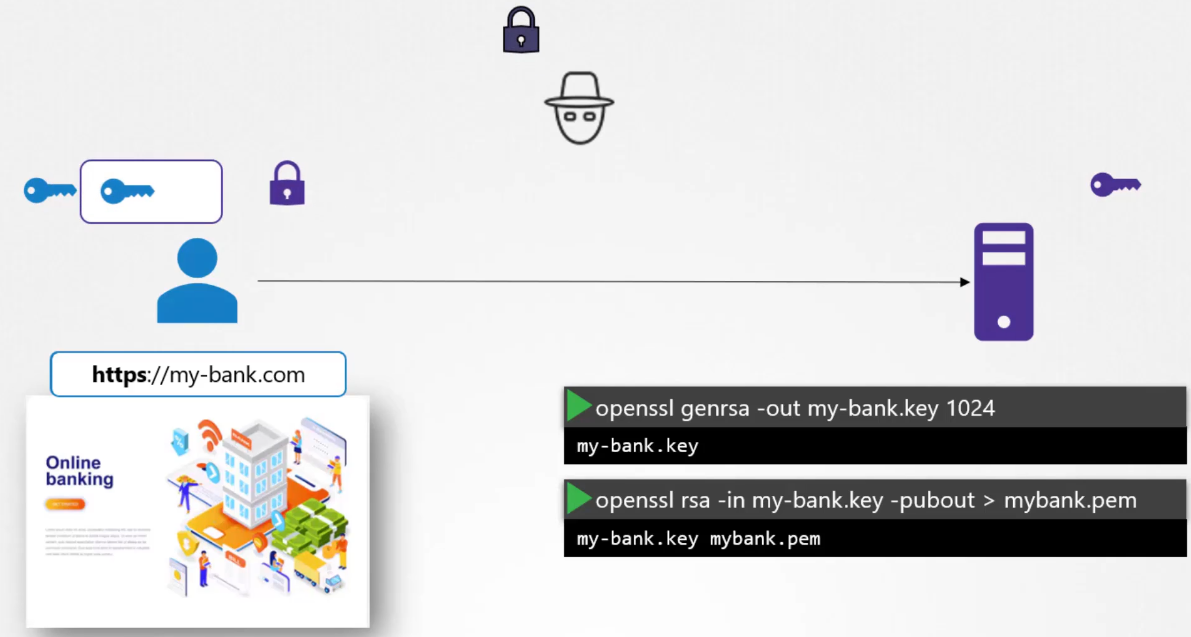
We’ll see what he can do with it.
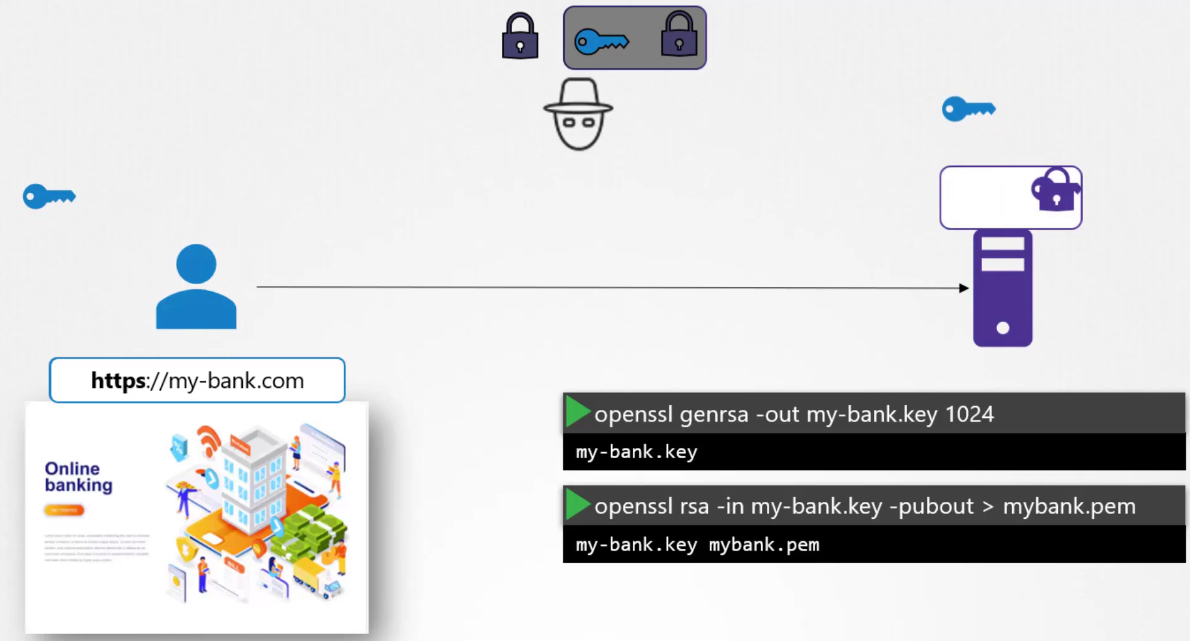
The user, in fact, the user’s browser
then encrypts the symmetric key
using the public key provided by the server.
The symmetric key is now secure.
The user then sends this to the server.
 The hacker also gets a copy.
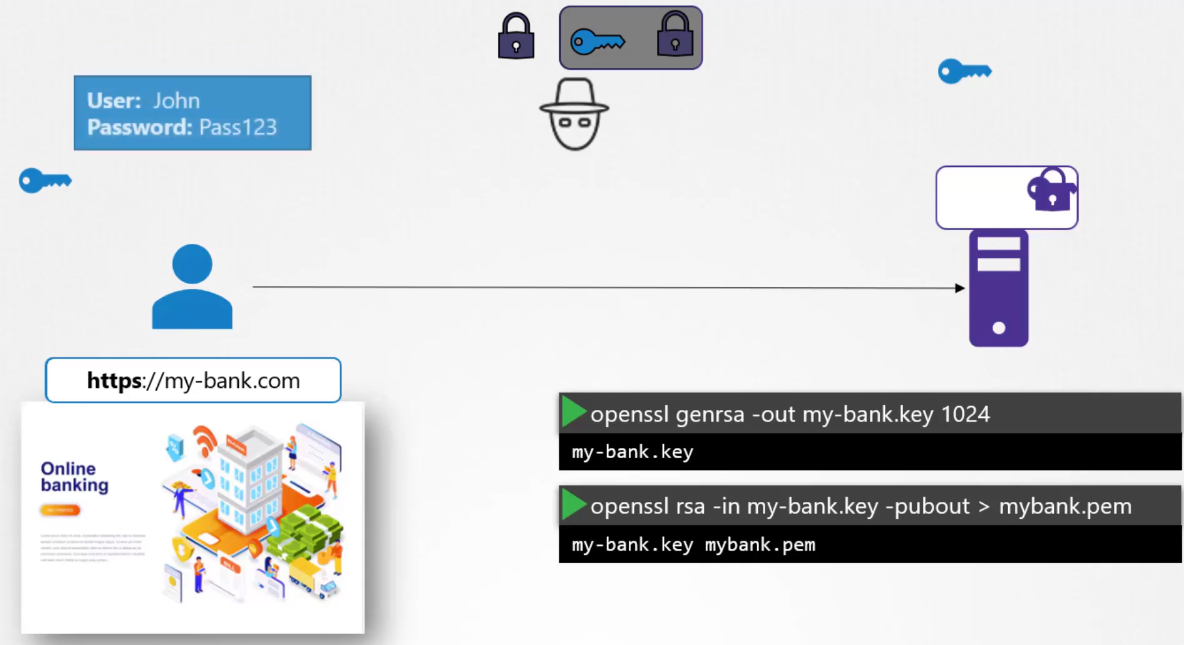
The server uses the private key to decrypt the message
 and retrieve the symmetry key from it.
However, the hacker does not have the private key
to decrypt and retrieve the symmetric key
from the message it received.
The hacker only has the public key
with which he can only lock or encrypt a message
and not decrypt the message.
The symmetric key is now safely available only
to the user and the server.
 They can now use the symmetric key
to encrypt data and send to each other.
The receiver can use the same symmetric key
 to decrypt data and retrieve information.
The hacker is left with the encrypted messages
and public keys with which he can’t decrypt any data.
With asymmetric encryption,
we have successfully transferred the symmetric keys
from the user to the server,
and with symmetric encryption
we have secured all future communication between them.
Perfect.
 The hacker now looks for new ways to hack into your account,
and so he realizes that the only way he can get your credential is by getting you
to type it into a form he presents.
So he creates a website that looks exactly
like your bank’s website.
The design is the same, the graphics are the same,
the website is a replica of the actual bank’s website.
 He hosts the website on his own server.
He wants you to think it’s secure too,
 so he generates his own set of public
and private key pairs and configures them on his web server.
And finally, he somehow manages to tweak your environment
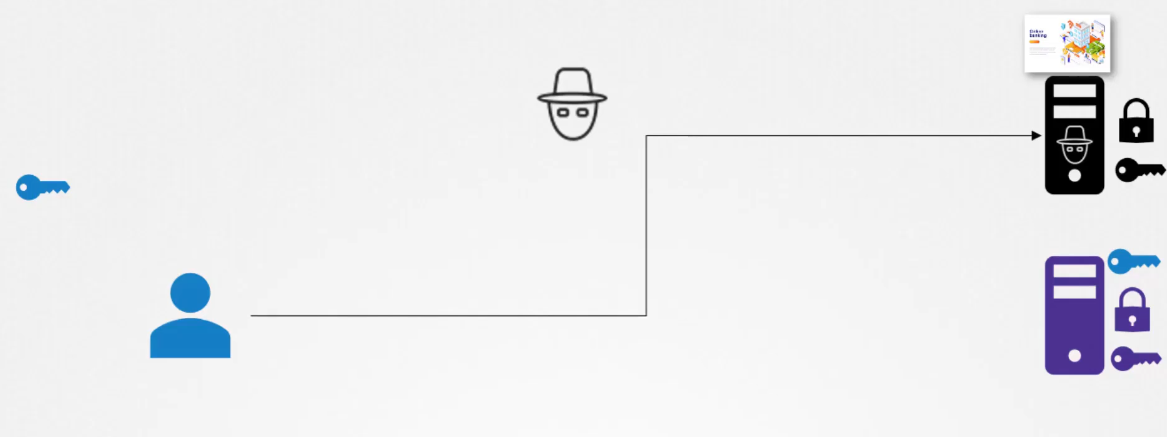 or your network to route your request going
to your bank’s website to his servers.
When you open up your browser
and type the website address in,
 you see a very familiar page,
the same logging page of your bank
that you are used to seeing,
so you go ahead and type in the username and password.
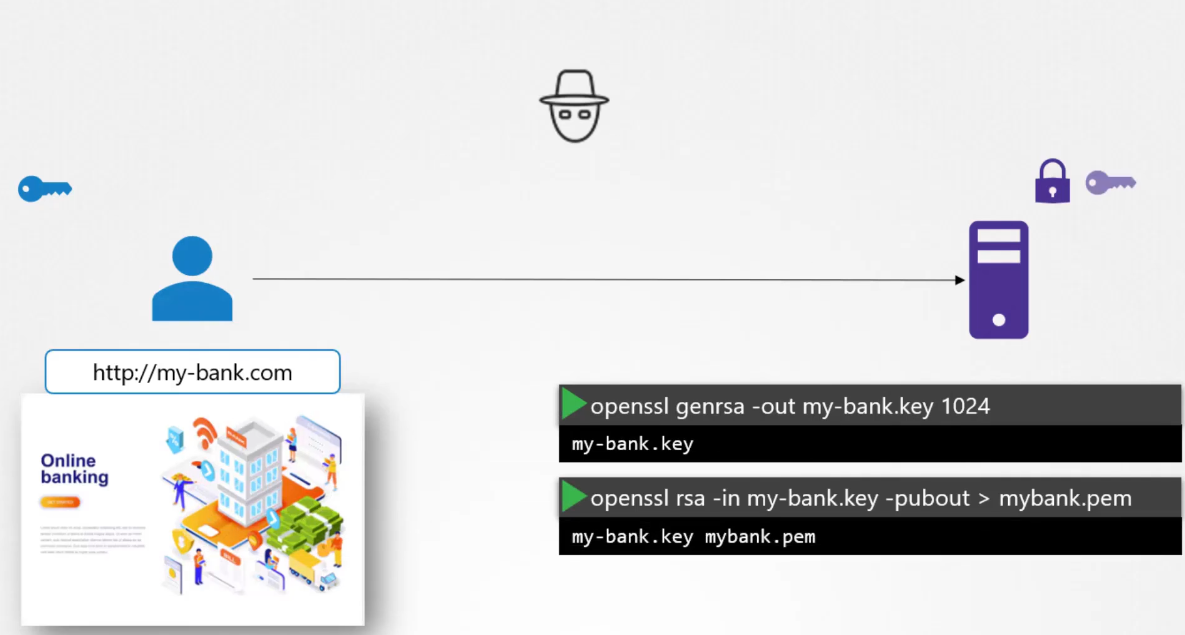
You make sure you type in STPS in the URL
to make sure the communication is secure and encrypted.
Your browser receives a key,
 you send encrypted symmetric key
and then you send your credentials encrypted with the key
and the receiver decrypts the credentials
 with the same symmetric key.
You’ve been communicating securely in an encrypted manner,
but with the hacker’s server.
As soon as you send in your credentials,
 you see a dashboard that doesn’t look very much
like your bank’s dashboard.
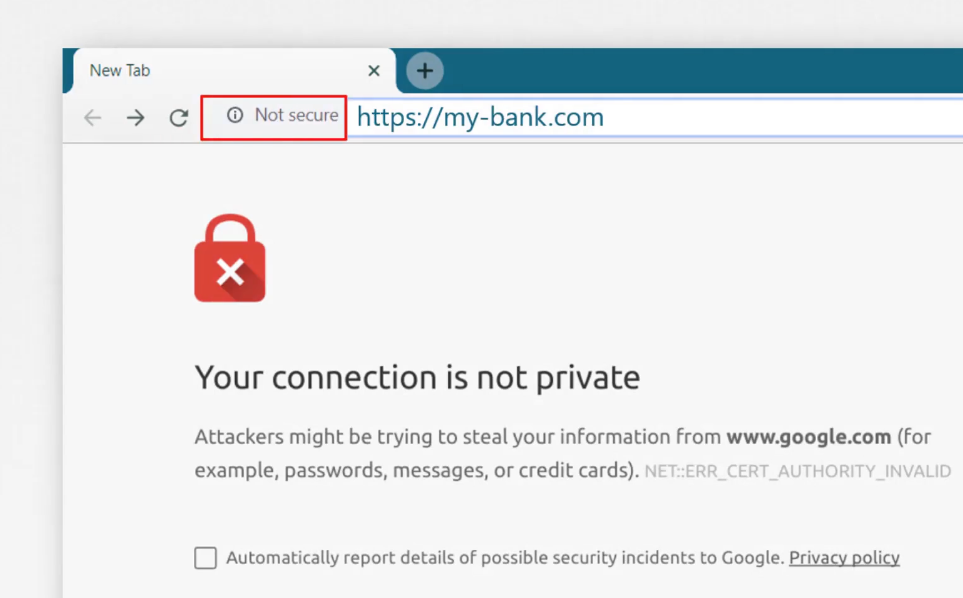
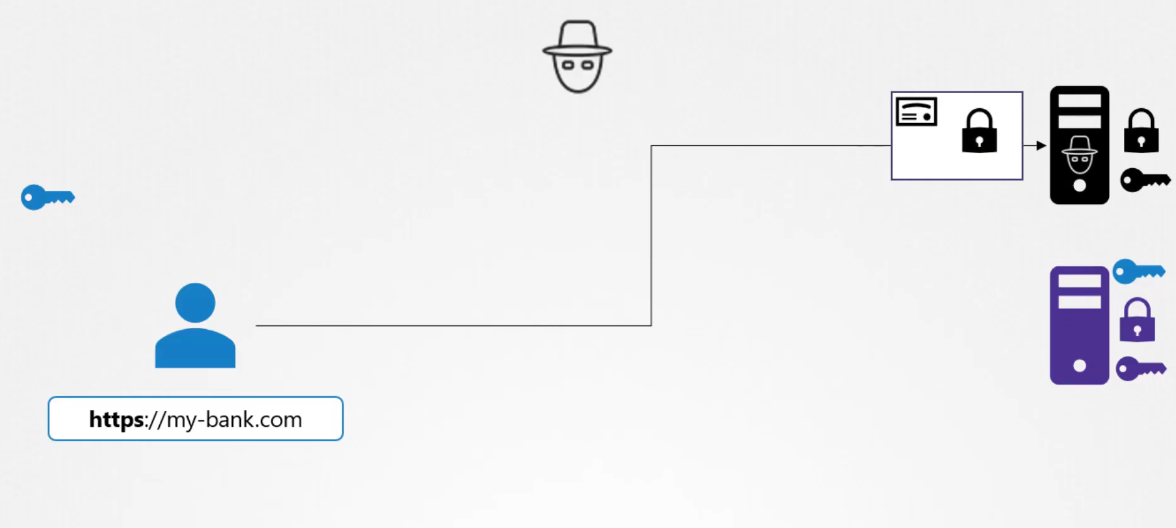 What if you could look at the key you received
from the server and say if it is a legitimate key
from the real bank server?
When the server sends the key,
 it does not send the key along,
it sends a certificate that has the key in it.
If you take a closer look at the certificate,
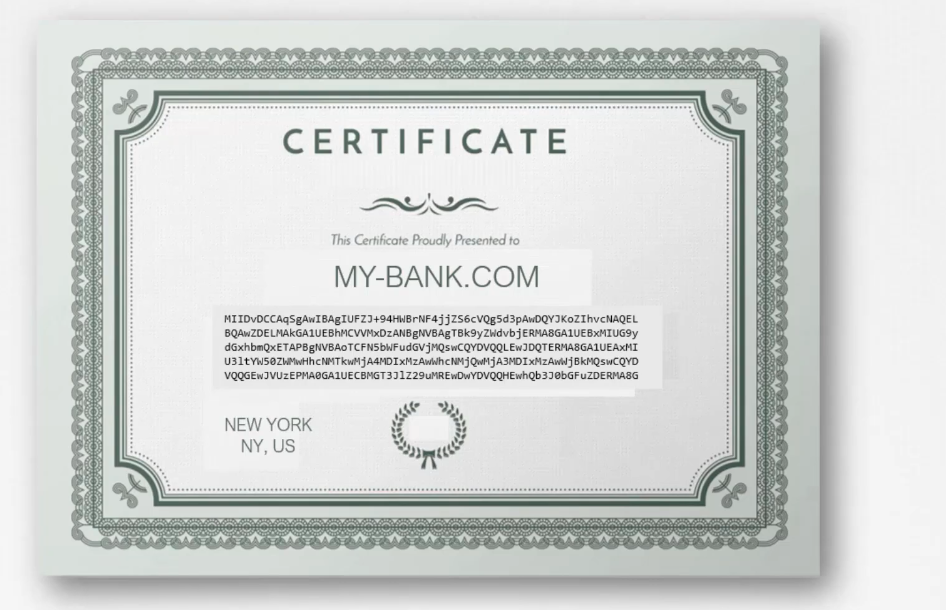 you will see that it is like an actual certificate
but in a digital format.
It has information about who the certificate is issued to,
the public key of that server,
the location of that server, et cetera.
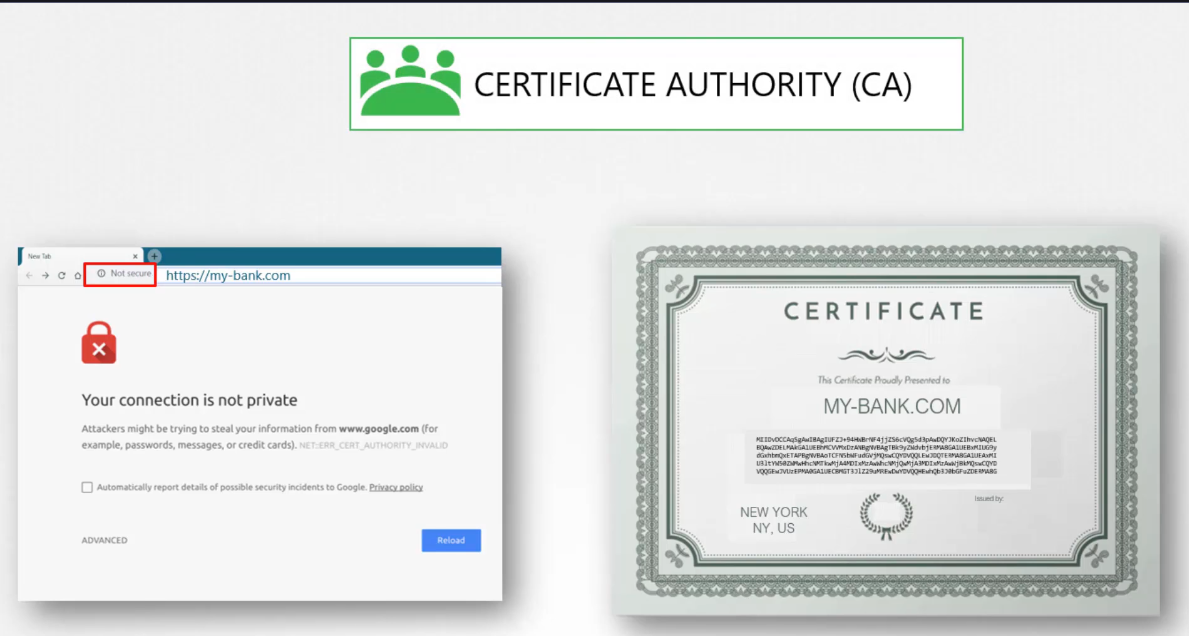
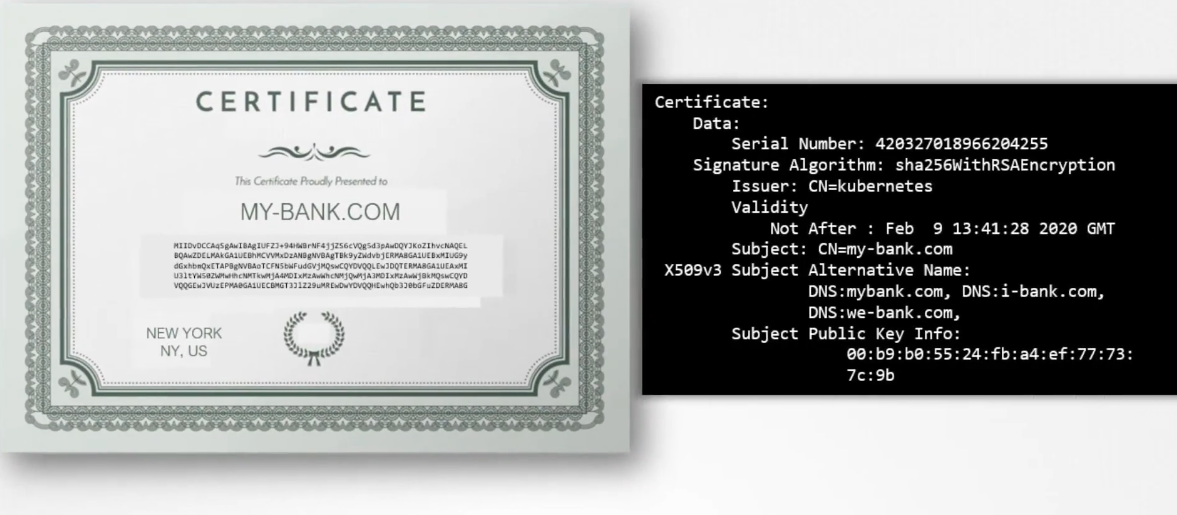 On the right, you see the output of an actual certificate.
Every certificate has a name on it,
the person or subject to whom the certificate
is issued to that is very important
as that is the field that helps you validate their identity.
If this is for a web server,
this must match what the user types in
in the URL on his browser.
If the bank is known by any other names,
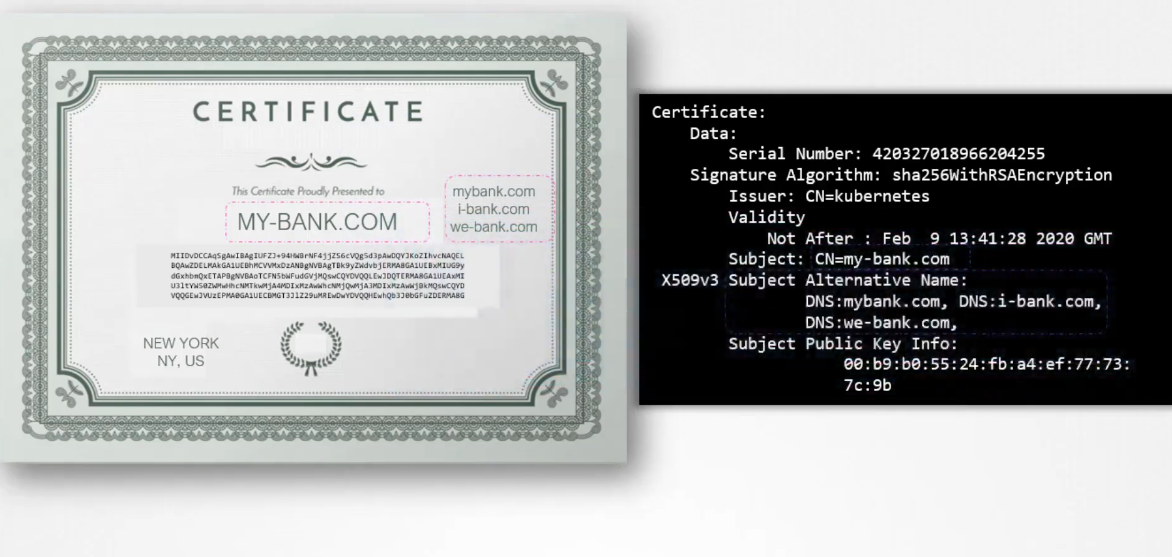 and if they’d like their users to access their application
with the other names as well,
then all those names should be specified in this certificate
under the subject as native name section.
But you see, anyone can generate a certificate like this.
You could generate one for yourself saying you’re Google,
and that’s what the hacker did in this case.
He generated a certificate saying he is your bank’s website.
So how do you look at a certificate and verify
if it is legit?
That is where the most important part
of the certificate comes into play.
 s
Who signed and issued the certificate?
s
Who signed and issued the certificate?
If you generated a certificate
then you’ll have to sign it by yourself.
That is known as a self-signed certificate.
Anyone looking at the certificate you generated
will immediately know that it is not a safe certificate,
because you have signed it.
If you looked at the certificate you received
from the hacker closely,
you would’ve noticed that it was a fake certificate
that was signed by the hacker himself.
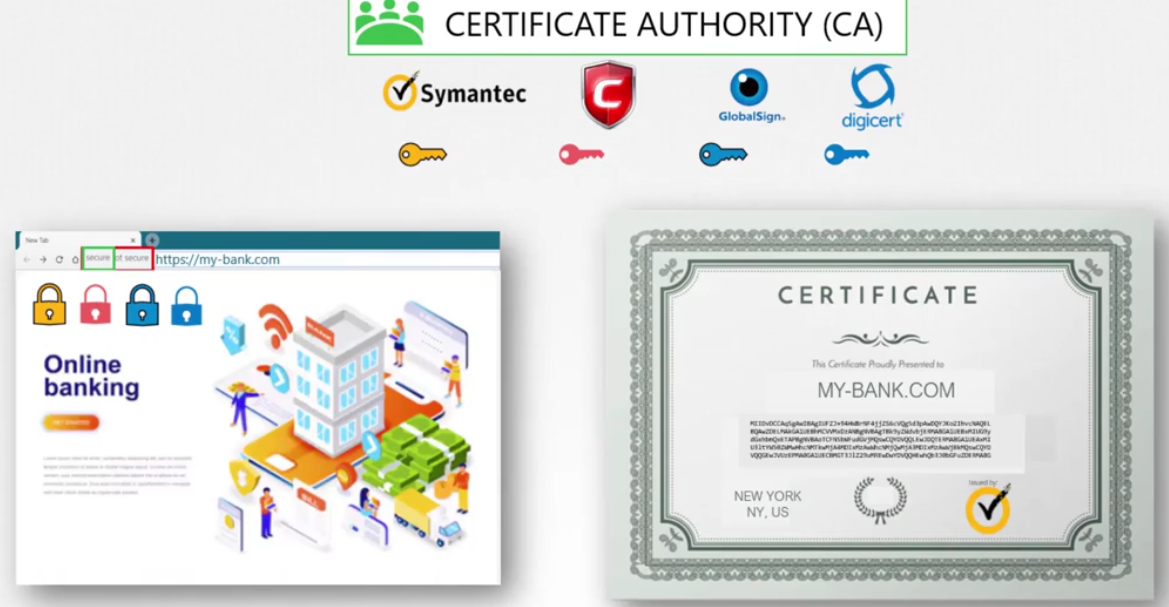
As a matter of fact, your browser does that for you.
 All of the web browsers are built in
with a certificate validation mechanism
while in the browser text the certificate received
from the server and validates it
to make sure it is legitimate.
If it identifies it to be a fixed certificate,
then it actually warns you.
So then how do you create a legitimate certificate
for your web servers that the web browsers will trust?
How do you get your certificates signed
by someone with authority?
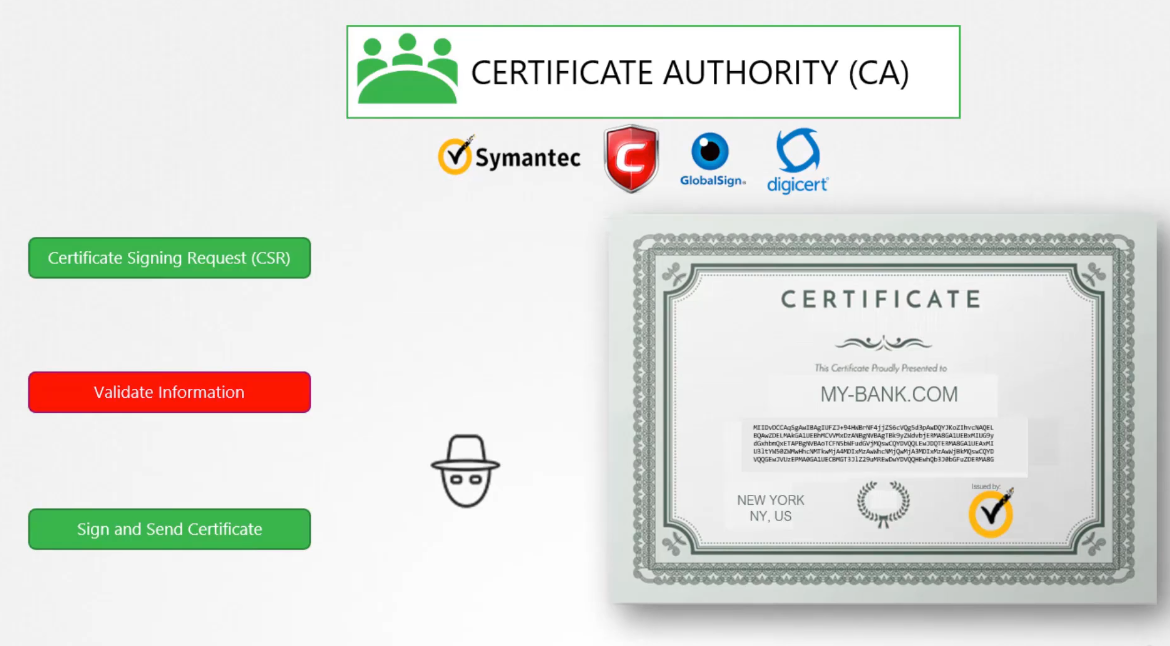
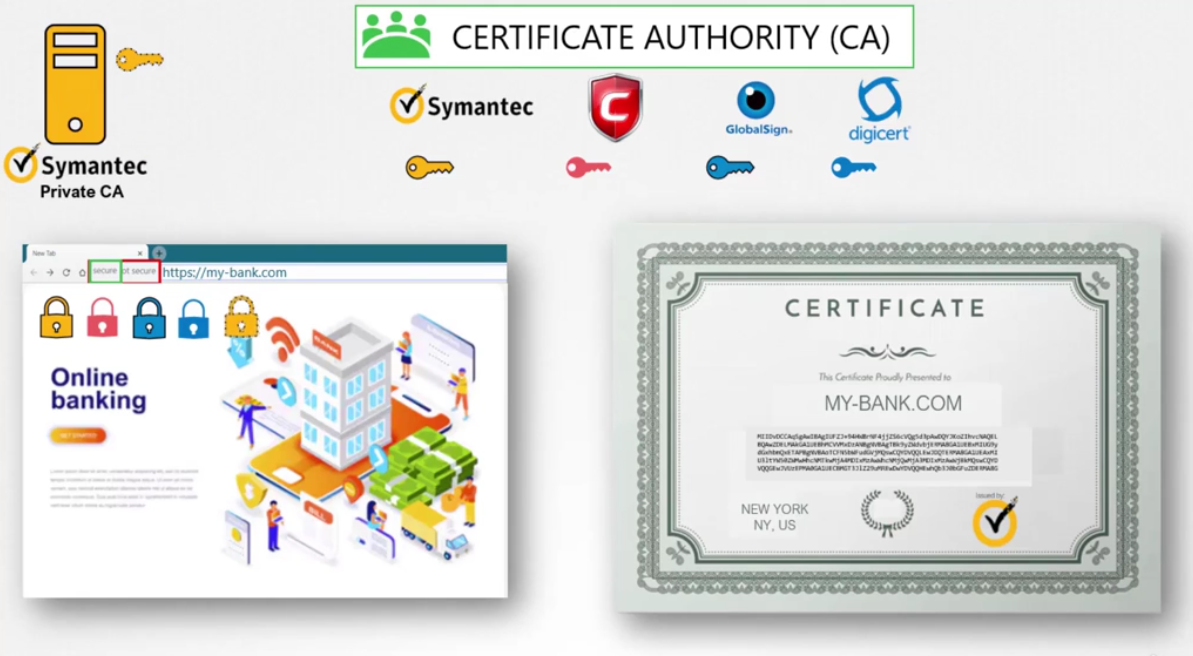
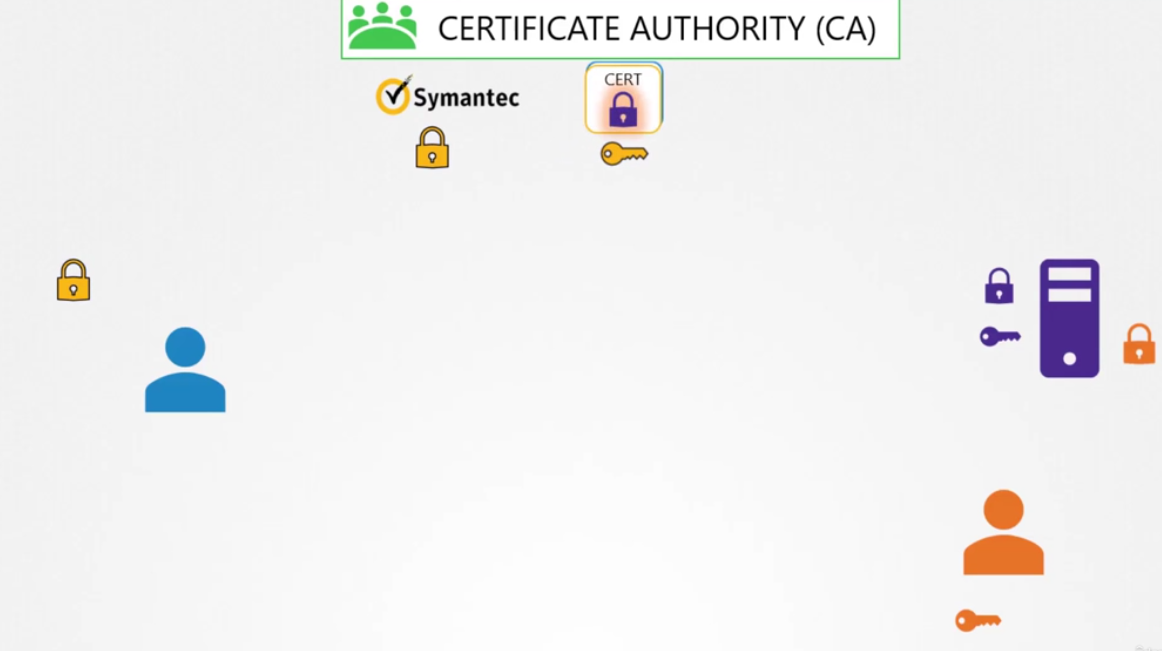
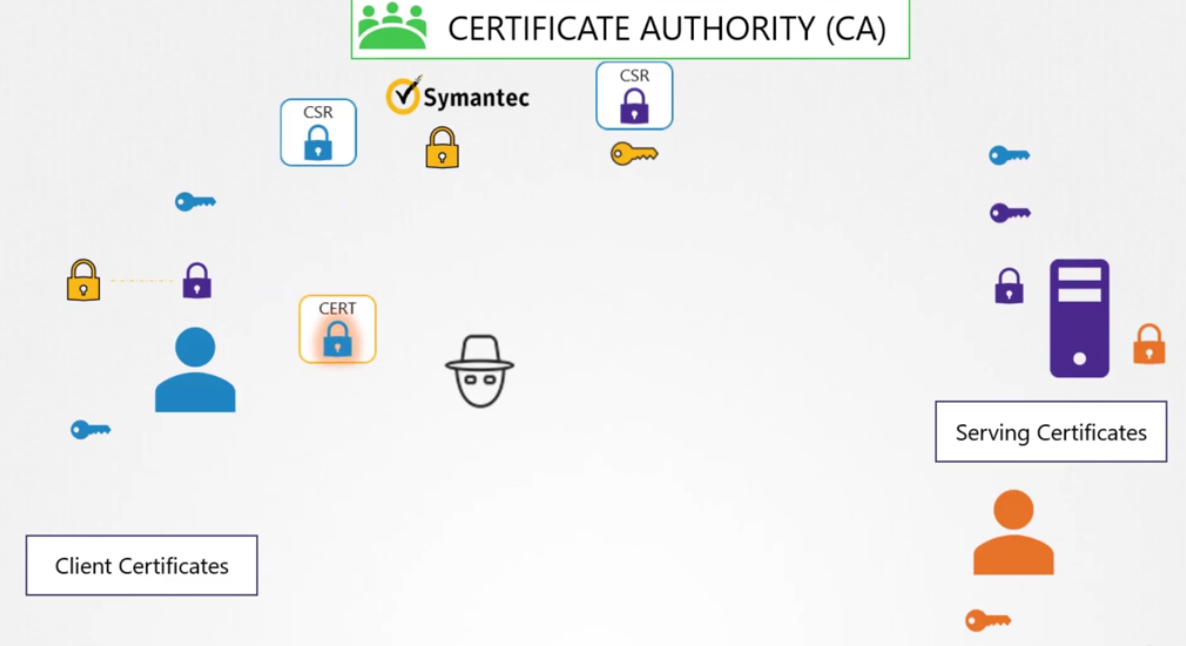
 That’s where certificate authorities or CAs comes in.
They’re well known organizations
that can sign and validate your certificates for you.
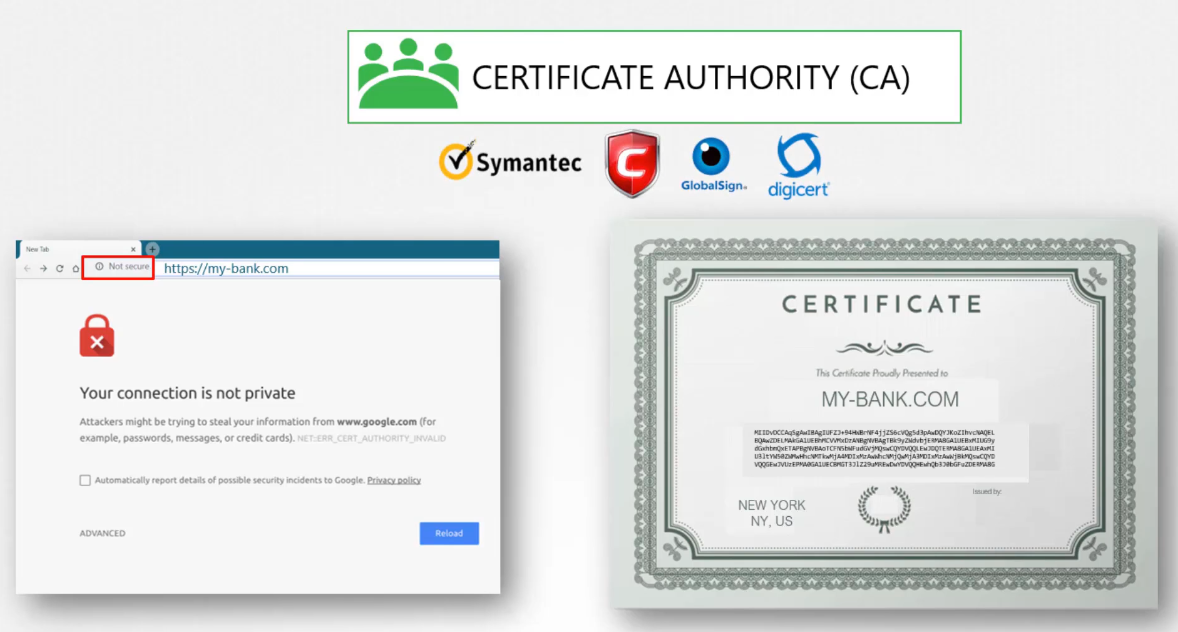 Some of the popular ones are Symantec, DigiCert, Comodo,
GlobalSign, et cetera.
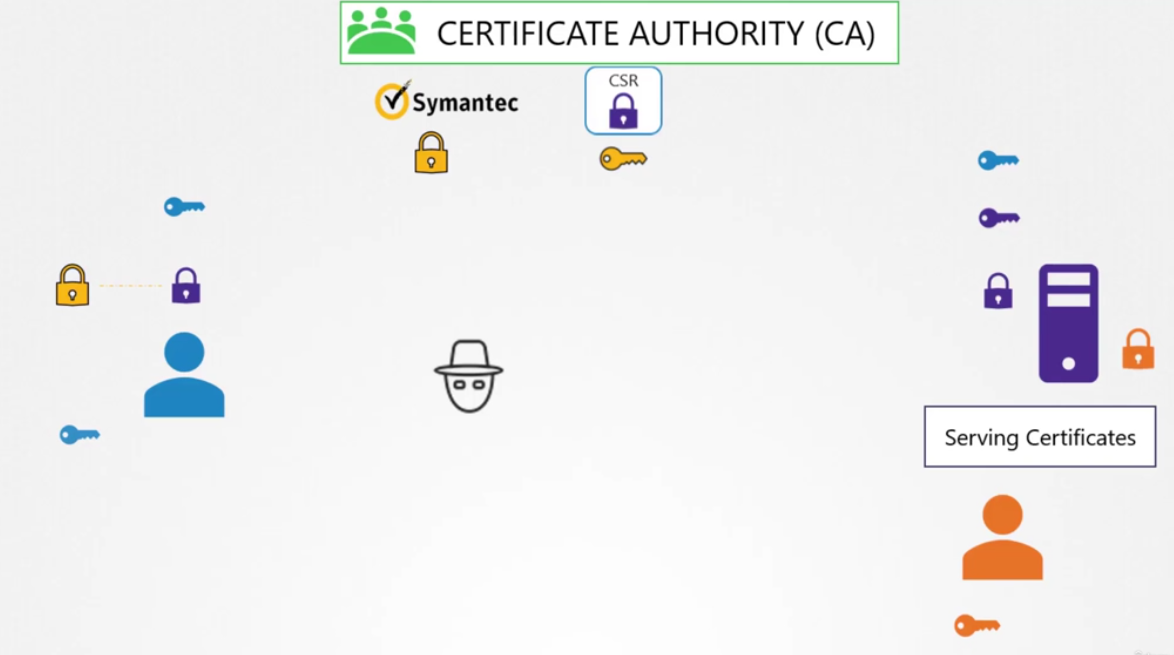
The way this works is,
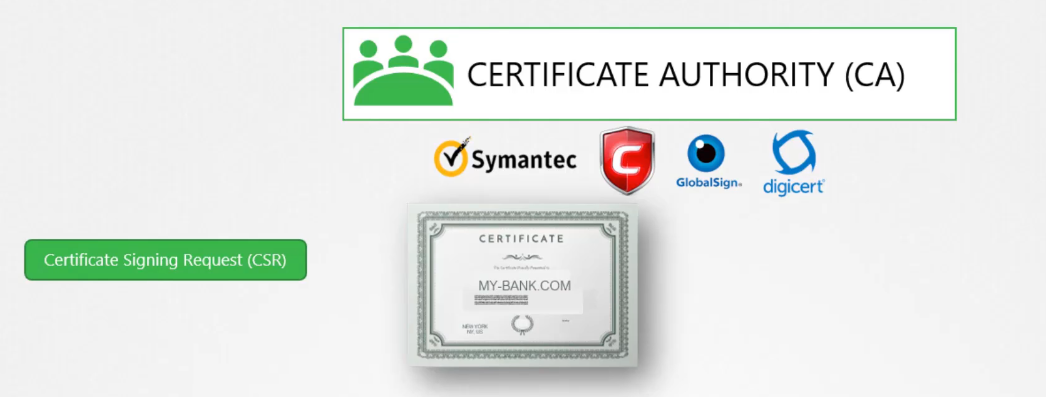 you generate a certificate signing a request or CSR
using the key you generated earlier
and the domain name of your website.
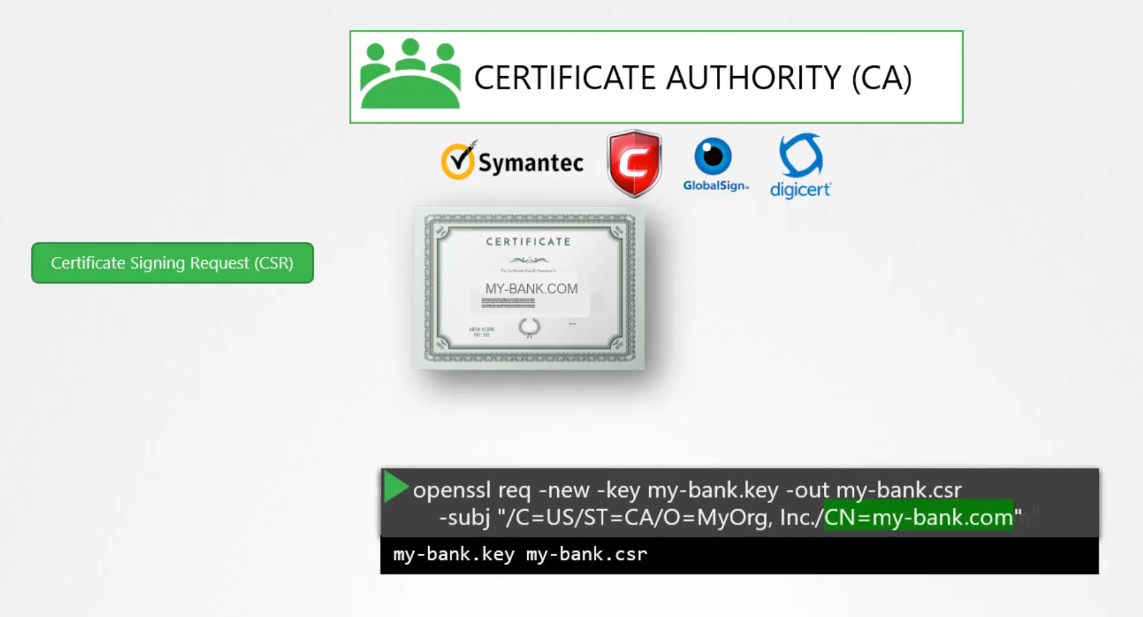 You can do this again using the open SSL command.
This generates a My-Bank.CSR file,
which is the certificate signing request
that should be sent to the CA for signing.
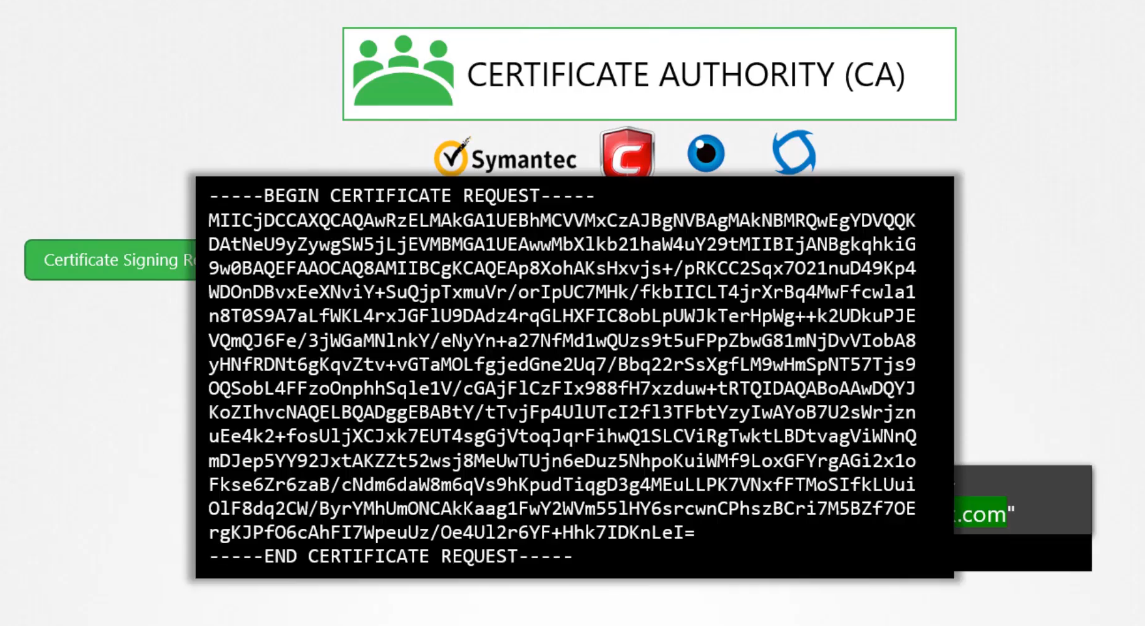 It looks like this.
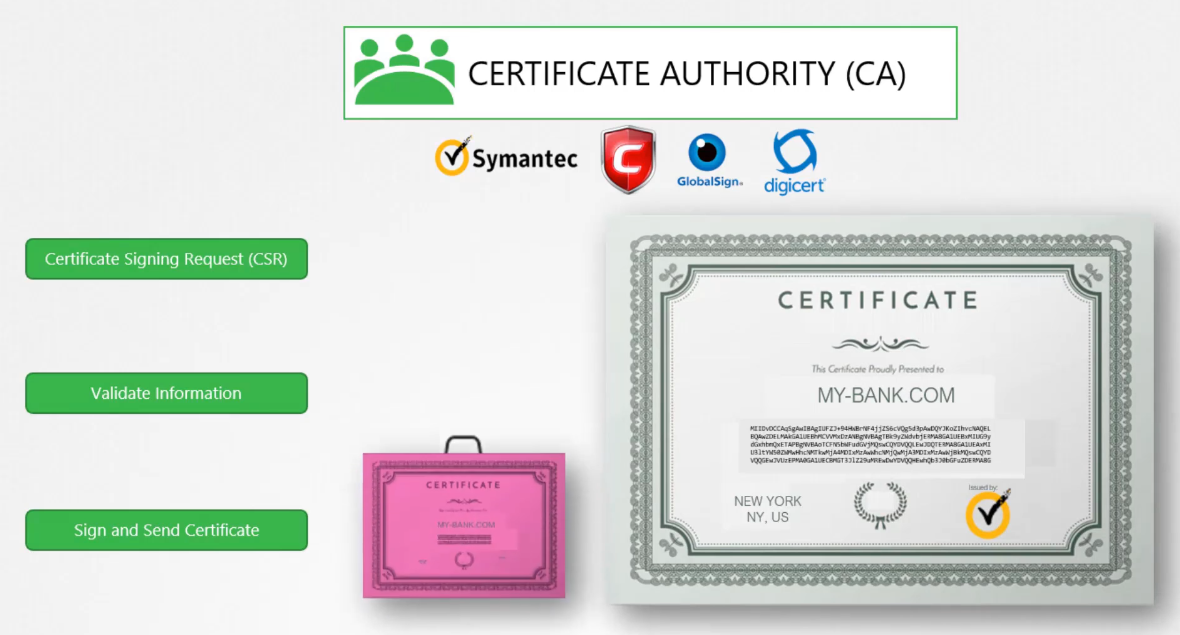
The certificate authorities verify your details
and once it checks out,
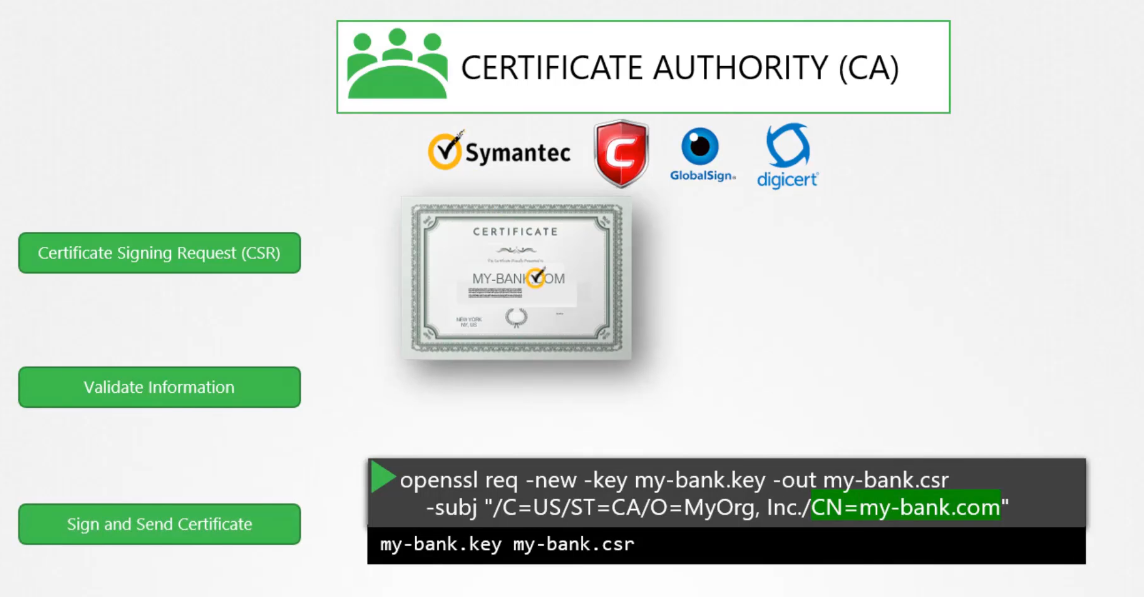 they sign the certificate and send it back to you.
You now have a certificate signed by a CA
that the browsers trust.
If hacker tried to get his certificate signed the same way,
 he would fail during the validation phase
and his certificate would be rejected by the CA.
 So the website that he’s hosting
won’t have a valid certificate.
The CAs use different techniques
to make sure that you are the actual owner of that domain.
 You now have a certificate signed by a CA
that the browsers trust.
But how do the browsers know that the CA itself
was legitimate?
For example, one if the certificate was signed by a fake CA,
in this case, our certificate was signed by Symantec.
How would the browser know Symantec is a valid CA
and that the certificate was in fact signed by Symantec
and not by someone who says they are Symantec?
How CA authenticate
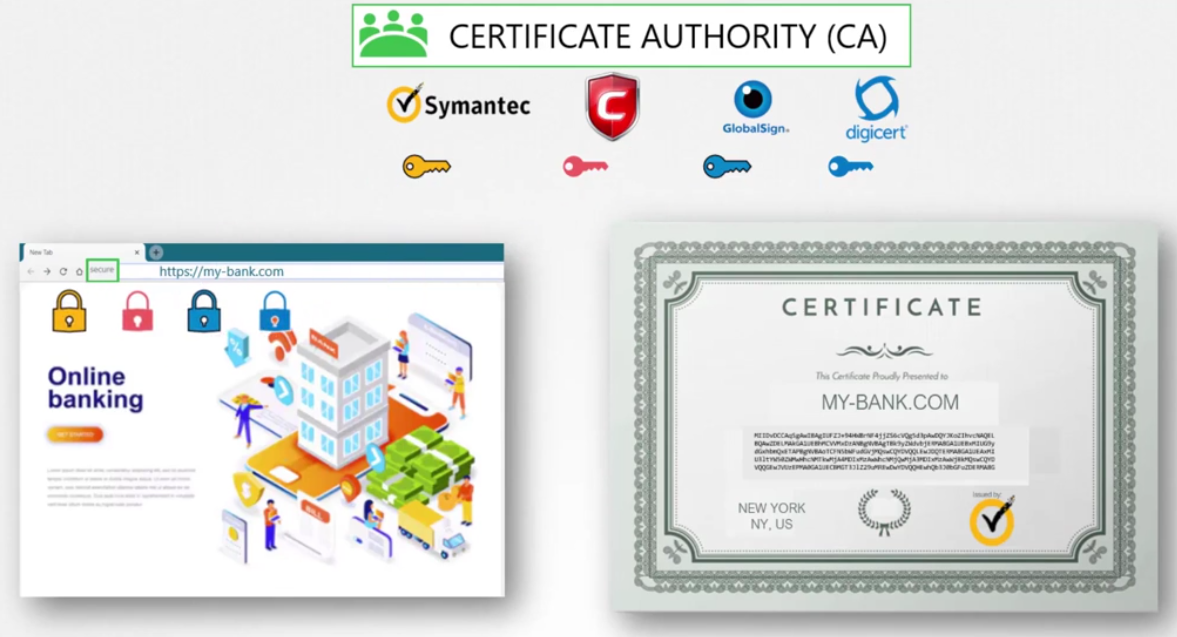 The CAs themselves have a set of public
and private key pairs.
The CAs use their private keys to sign the certificates.
The public keys of all the CAs are built in to the browsers.
The browser uses the public key of the CA
to validate that the certificate was actually signed
by the CA themselves.
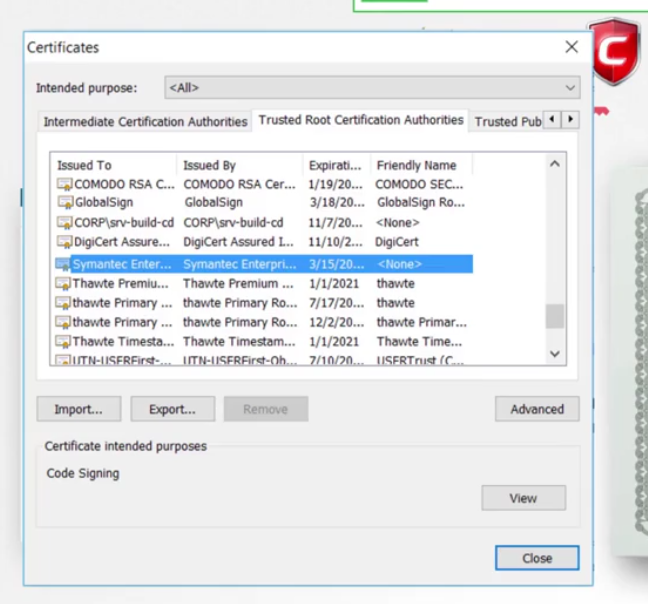 You can actually see them in the settings
of your web browser under certificates,
they’re under trusted CAs tab.
 Now, these are public CAs
that help us ensure the public websites we visit,
like our banks, emails, et cetera, are legitimate.
However, they don’t help you validate sites
hosted privately, say within your organization.
For example, for accessing your payroll
or internal email applications.
 For that, you can host your own private CAs.
Most of these companies listed here
have a private offering of their services,
a CA server that you can deploy internally
within your company.
 You can then have the public key
of your internal CAs server installed
on all your employees browsers
and establish secure connectivity within your organization.
summary
So let’s summarize real quick.
 We have seen why you may want to encrypt messages
being sent over a network.
To encrypt messages, we use asymmetric encryption
with a pair of public and private keys.
An admin uses a pair of keys
to secure SSH connectivity to the servers.
The server uses a pair of keys to secure a STPS traffic.
But for this, the server first sends
a certificate signing request to a CA,
the CA uses its private key to sign the CSR.
Remember, all users have a copy of the CAs public key.
The signed certificate is then sent back to the server.
The server configures the web application
with the signed certificate.
Whenever a user accesses the web application,
the server first sends the certificate with its public key.
The user, or rather the user’s browser reads the certificate
and uses the CAs public key
to validate and retrieve the server’s public key.
It then generates a symmetric key
that it wishes to use going forward for all communication.
The symmetric key is encrypted using the server’s public key
and sent back to the server.
The server uses its private key to decrypt the message
and retrieve the symmetric key.
The symmetric key is used for communication going forward.
So the administrator generates a key pair for securing SSH.
The web server generates a key pair
for securing the website with STTPS.
The certificate authority generates its own set
of keeper to sign certificates.
The end user though only generates a single symmetric key.
Once he establishes trust with the website,
he uses his username and password
to authenticate to the web server.
But the server’s keepers, the client was able to validate
that the server is who they say they are,
but the server does not for sure know
if the client is who they say they are.
It could be a hacker impersonating a user
by somehow gaining access to his credentials,
not over the network for sure,
as we have secured it already with TLS,
maybe by some other means.
 Anyway, so what can the server do to validate
that the client is who they say they are?
For this, as part of the initial trust building exercise,
the server can request a certificate from the client.
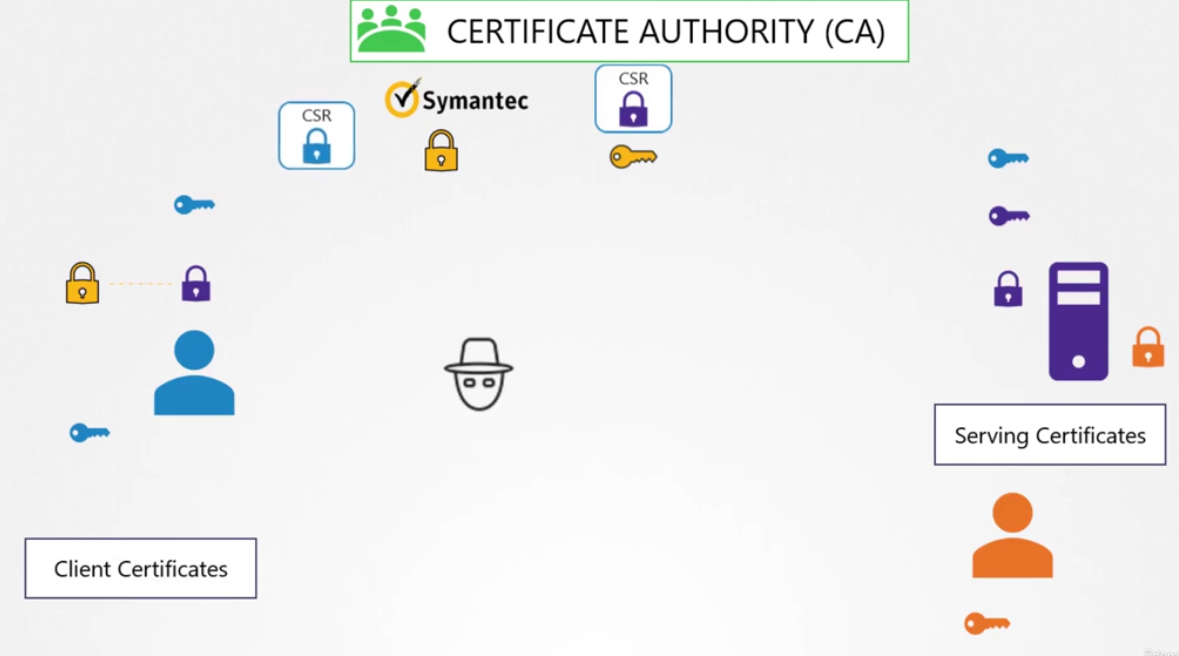 And so the client must generate a pair of keys
 and a signed certificate from a valid CA.
The client then sends the certificate to the server
 for it to verify that the client is who they say they are.
Now, you must be thinking,
you have never generated a client certificate
to access a website.
Well, that’s because TLS client certificates
are not generally implemented on web servers.
Even if they are, it’s all implemented under the hosts.
So a normal user don’t have to generate
and manage certificates manually.
So that was the final piece about client certificates.
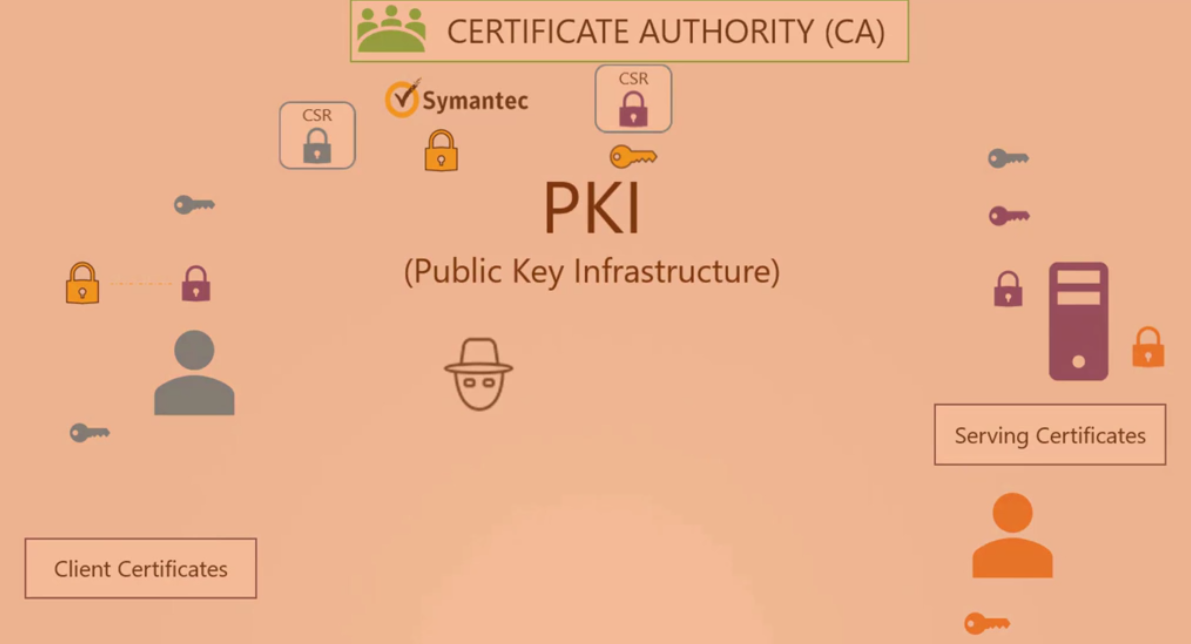 This whole infrastructure, including the CA,
the servers, the people, and the process
of generating, distributing and maintaining
digital certificates is known as public key infrastructure
or PKI.
Finally, let me clear up something before you leave.
I been using the analogy of a key and lock
for private and public keys.
If I give you the impression that only the lock
or the public key can encrypt data,
then please forgive me as it’s not true.
These are, in fact, two related or paired keys.
You can encrypt data with any one of them
and only decrypt data with the other.
You cannot encrypt data with one and decrypt with the same.
So you must be careful what you encrypt your data with.
If you encrypt your data with your private key,
then remember anyone with your public key,
which could really be anyone out there,
will be able to decrypt and read your message.
Finally, a quick note on naming convention.
Usually certificates with public key
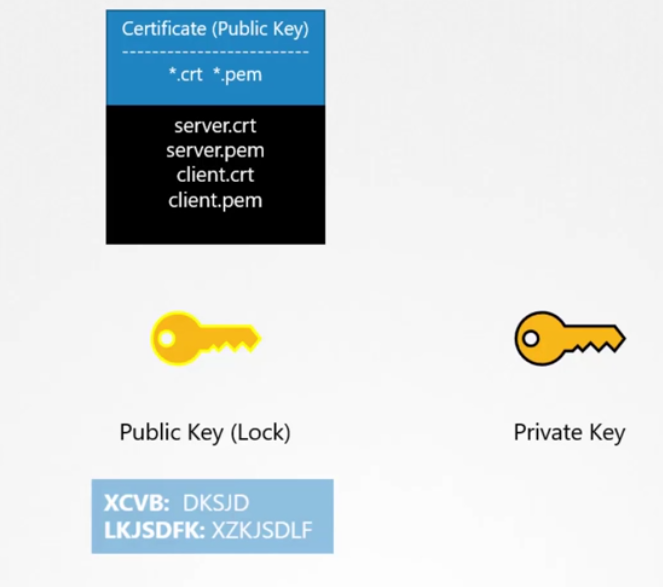 are named crt or pem extension,
so that’s server.crt, server.pem
for server certificates or client.crt,
or client.pem for client certificates.
And private keys are usually with extension .key
or -key.pem.
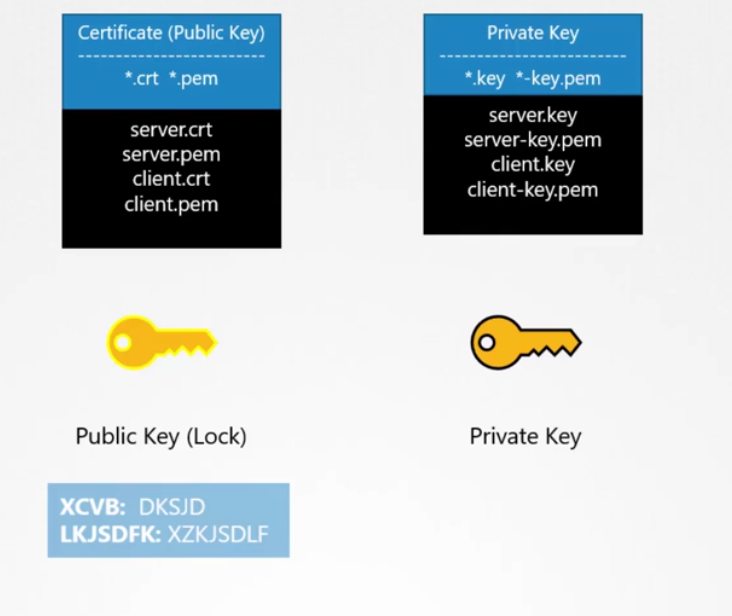 For example, server.key or server-key.pem.
So Just remember private keys have the word key
in them usually, either as an extension
or in the name of the certificate.
And one that doesn’t have the word key in them
is usually a public key or certificate.
Well, that’s it for this lecture.
Thank you for watching.
I will see you in the next lecture.