So far, we have seen how to generate a certificate for a user.
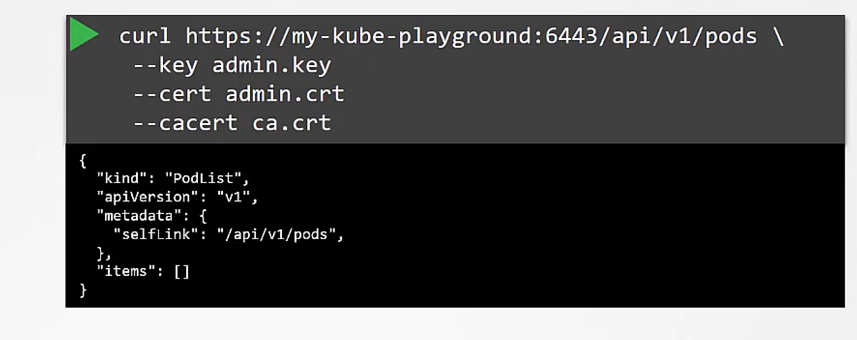
You’ve seen how a client uses the certificate file and key to query the Kubernetes REST API for a list of pods using cURL.
In this case, my cluster is called my kube playground,
so send a cURL request to the address of the kube-apiserver while passing in the bearer files, along with the CA certificate as options.
This is then validated by the API server to authenticate the user.
Now, how do you do that while using the kubectl command?
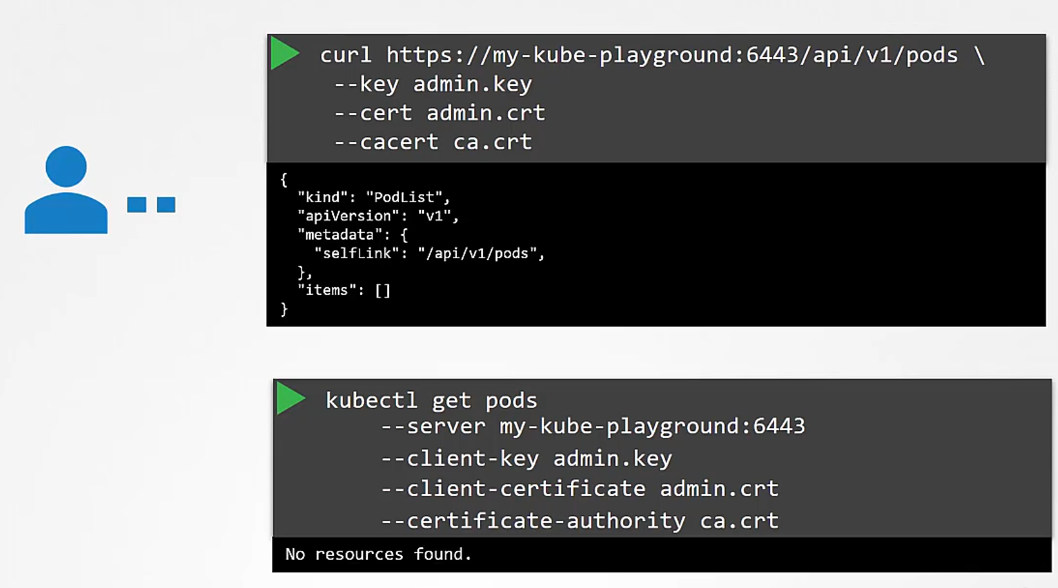 You can specify the same information using the options server, client key, client certificate, and certificate authority with the kubectl utility.
Obviously, typing those in every time is a tedious task, so you move this information to a configuration file called as kubeconfig.
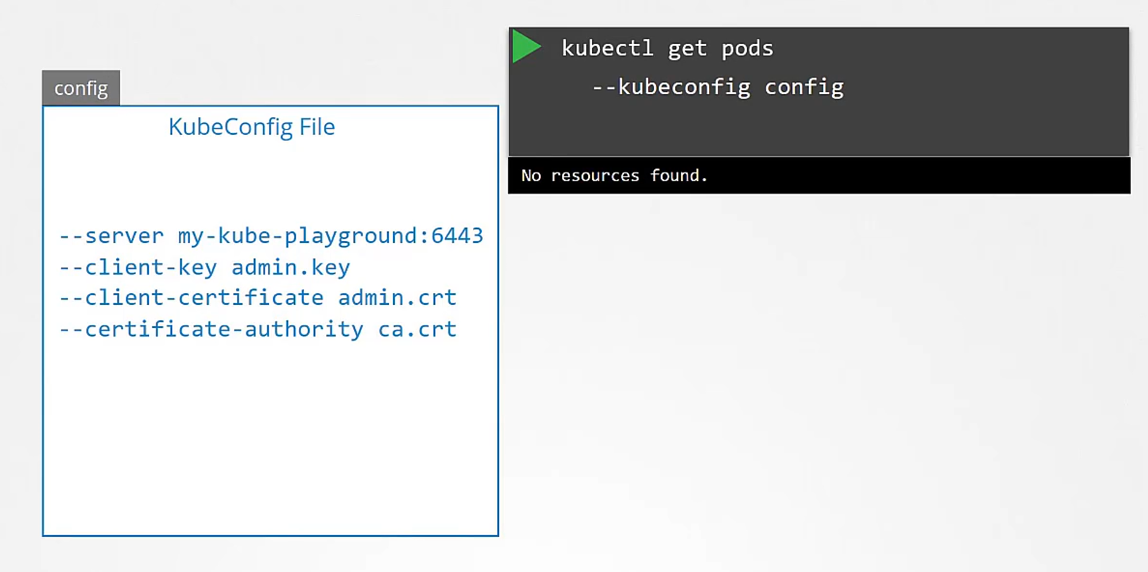
And then specify this file as the kubeconfig option in your command.
By default, the kubectl tool looks for a file named config
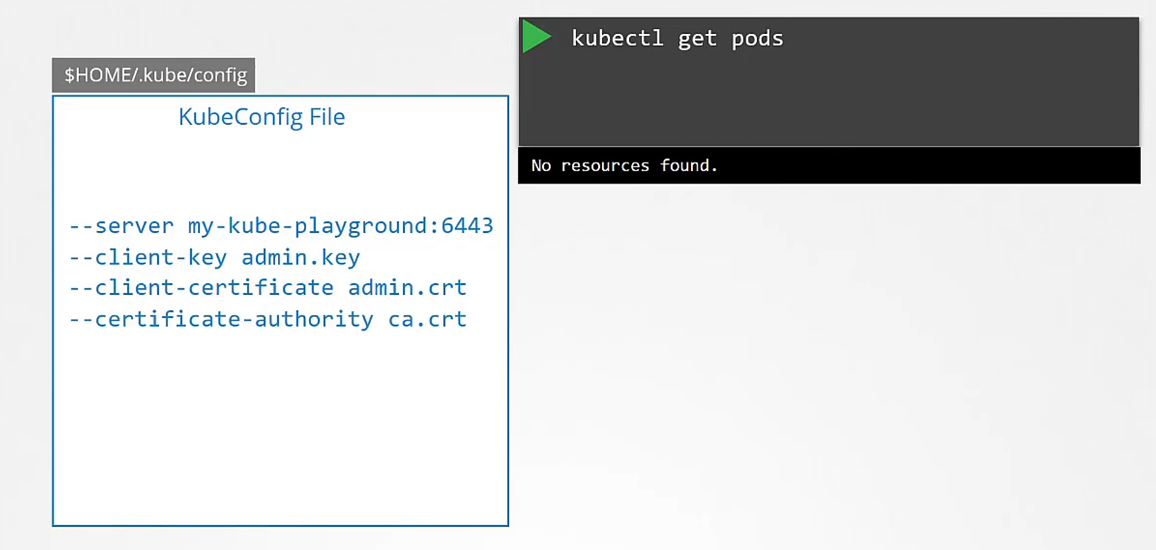 under a directory.kube under the user’s home directory.
So if you clear the kubeconfig file there,
you don’t have to specify the path to the file explicitly
in the kubectl command.
That’s the reason you haven’t been specifying any options
for your kubectl commands so far.
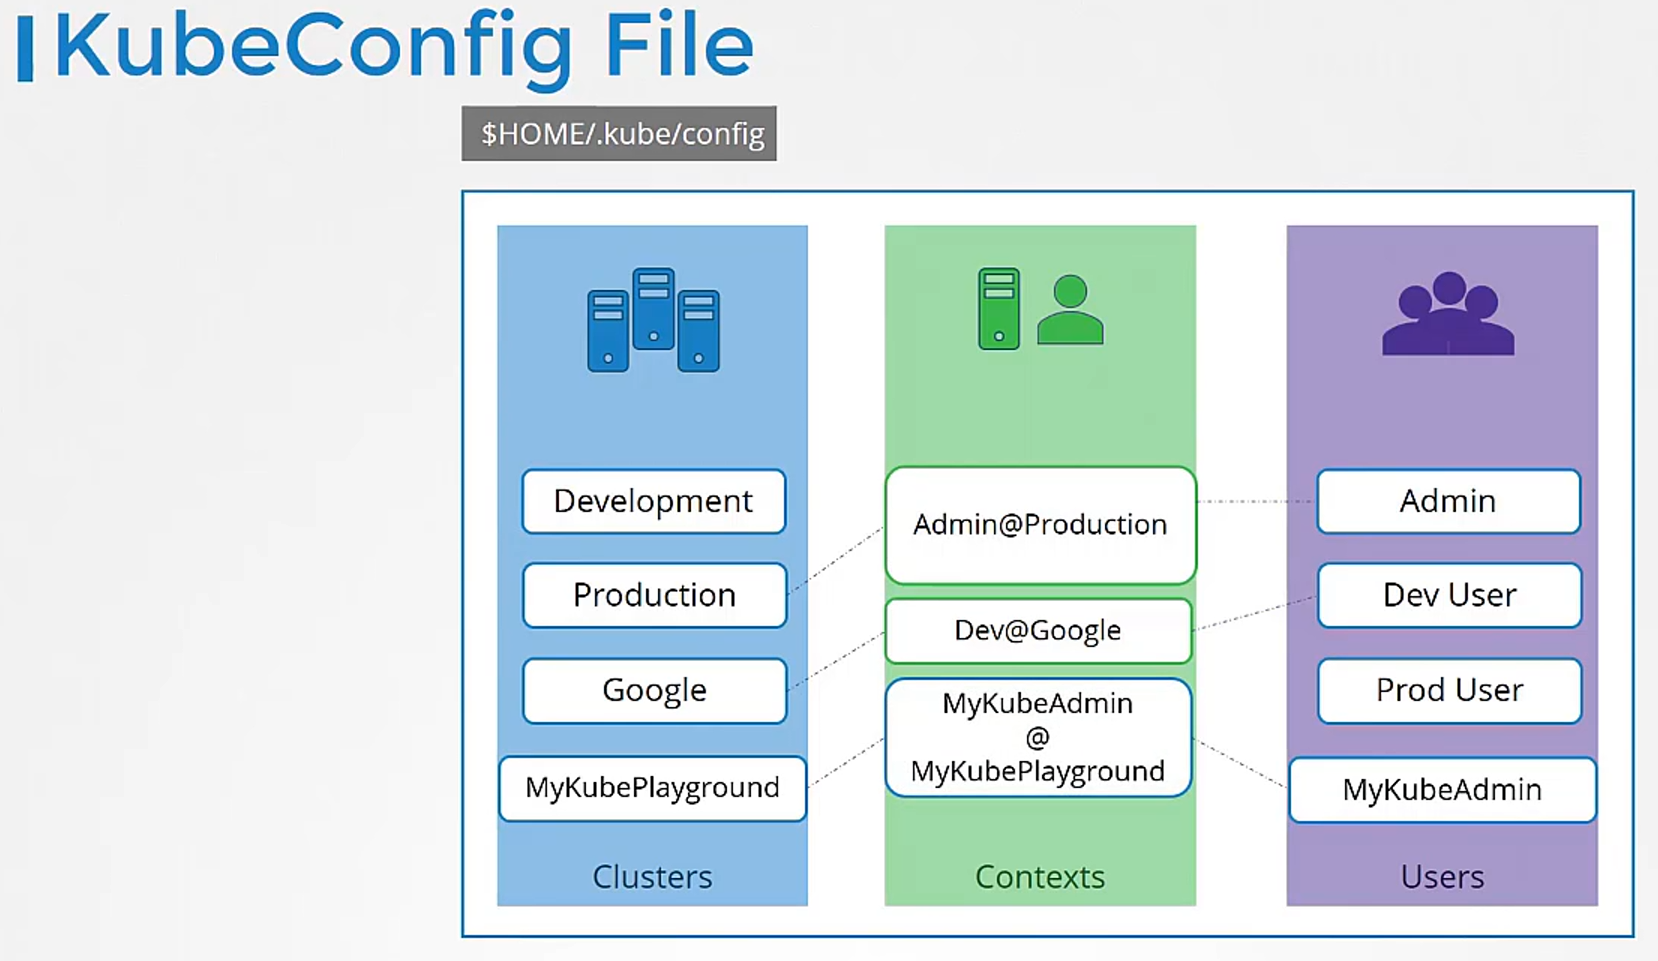
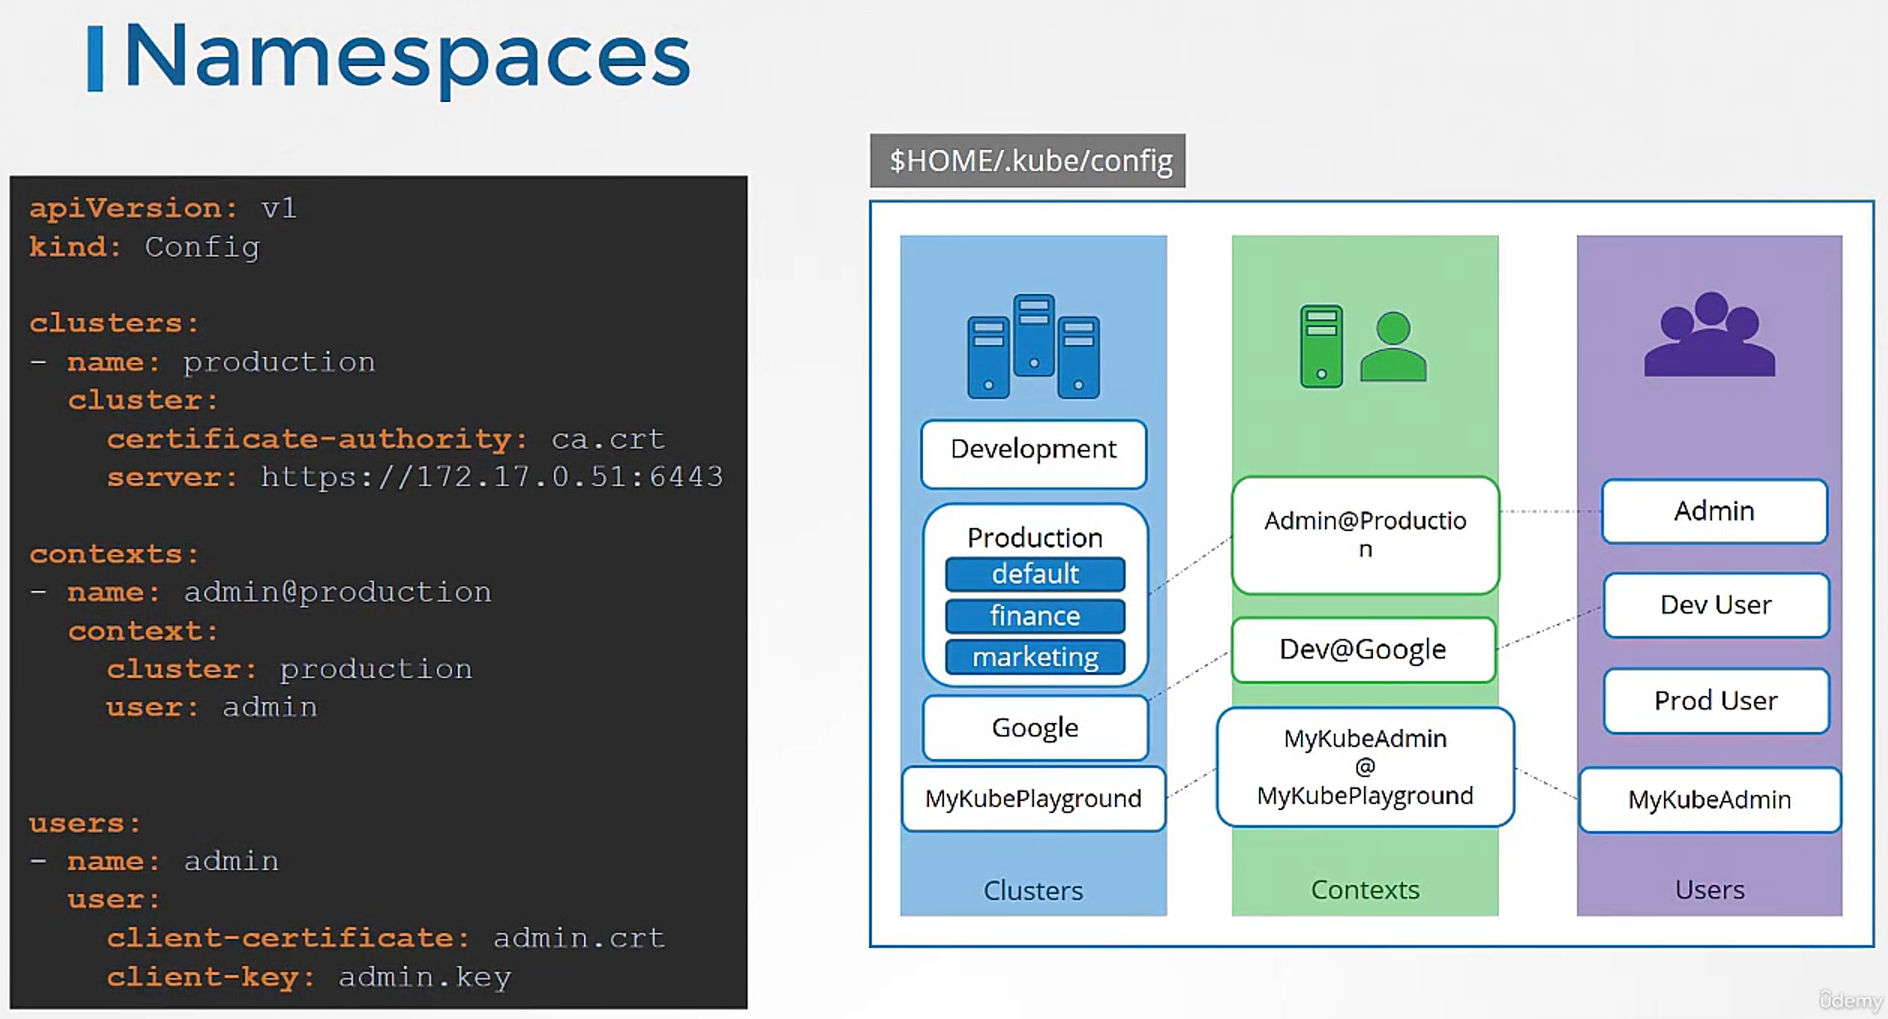
The kubeconfig file is in a specific format.
Let’s take a look at that.
The config file has three sections:
 clusters, users, and contexts.
Clusters are the various Kubernetes clusters
that you need access to.
Say you have multiple clusters for development environment
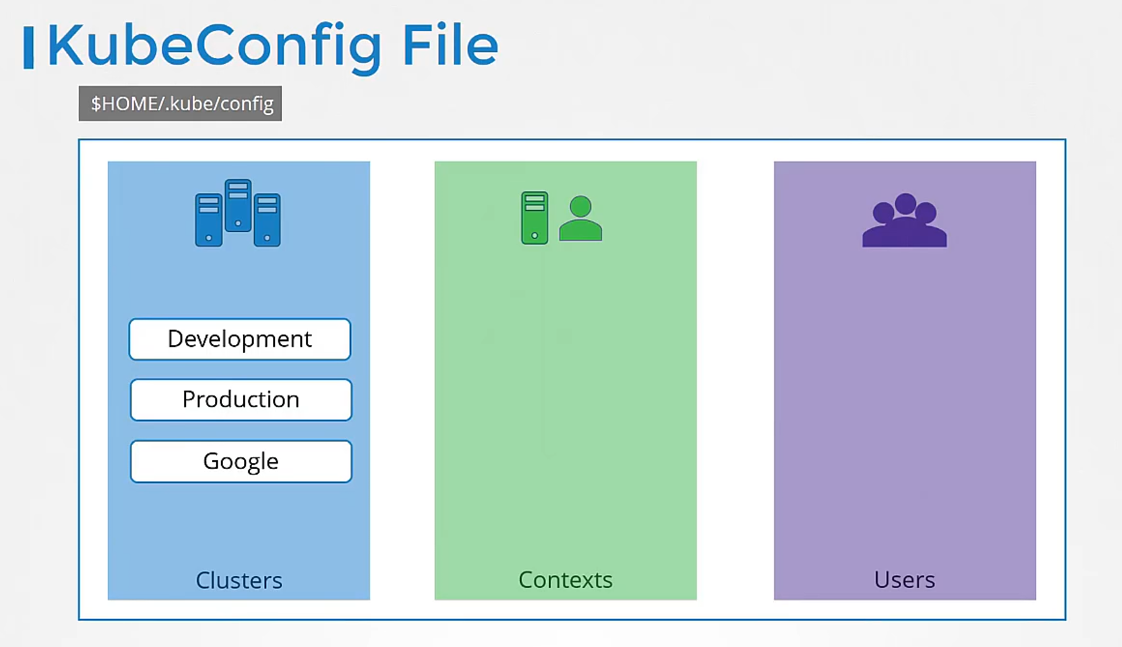 or testing environment or prod
or for different organizations
or on different cloud providers, et cetera.
All those go there.
Users are the user accounts
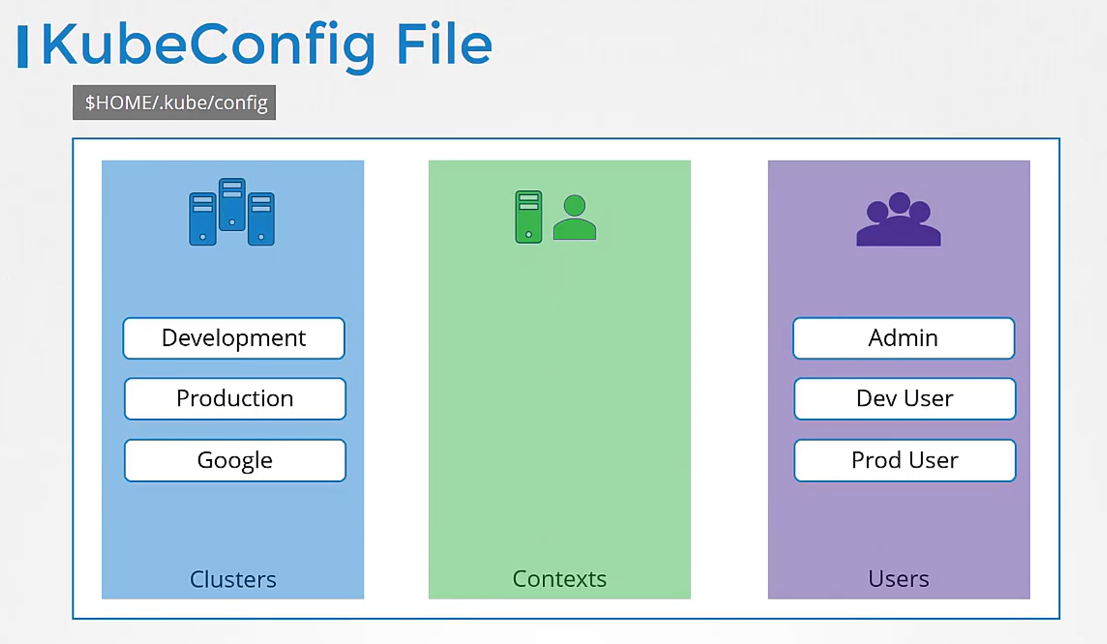 with which you have access to these clusters.
For example, the admin user, a dev user,
a prod user, et cetera.
These users may have different privileges
on different clusters.
Finally, contexts marry these together.
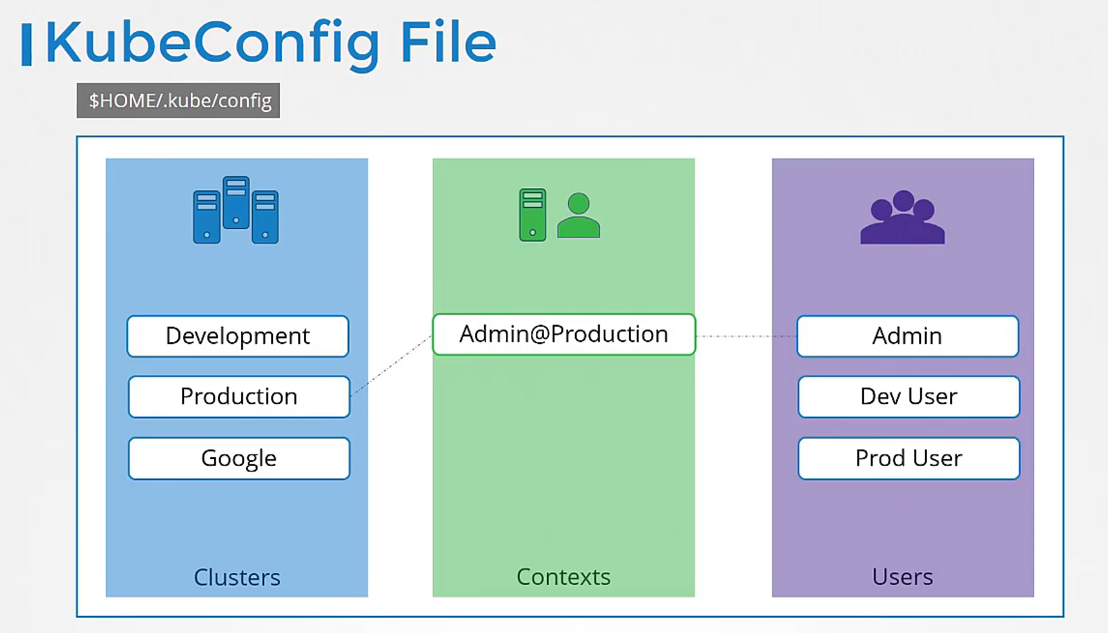 Contexts define which user account will be used
to access which cluster.
For example, you could create a context
named admin at production
that will use the admin account
to access a production cluster.
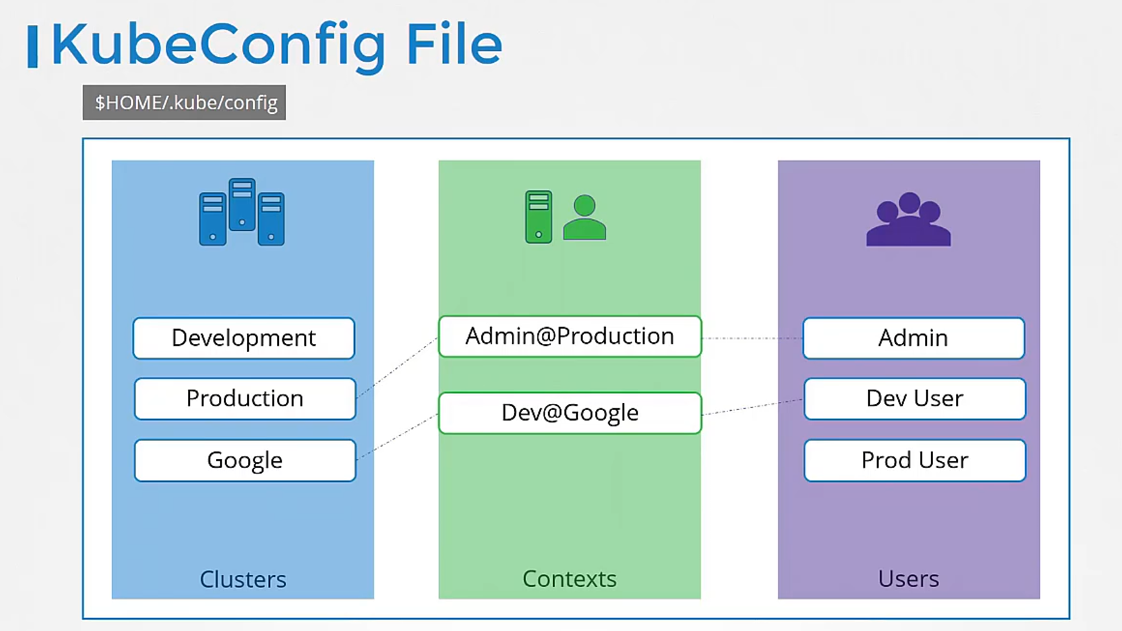 Or I may want to access the cluster I have set up on Google
with the dev user’s credentials
to test deploying the application I built.
Remember, you’re not creating any new users
or configuring any kind of user access
or authorization in the cluster with this process.
You’re using existing users
with their existing privileges
and defining what user you’re going to use
to access what cluster.
That way you don’t have to specify the user certificates
and server address in each
and every kubectl command you run.
So how does it fit into our example
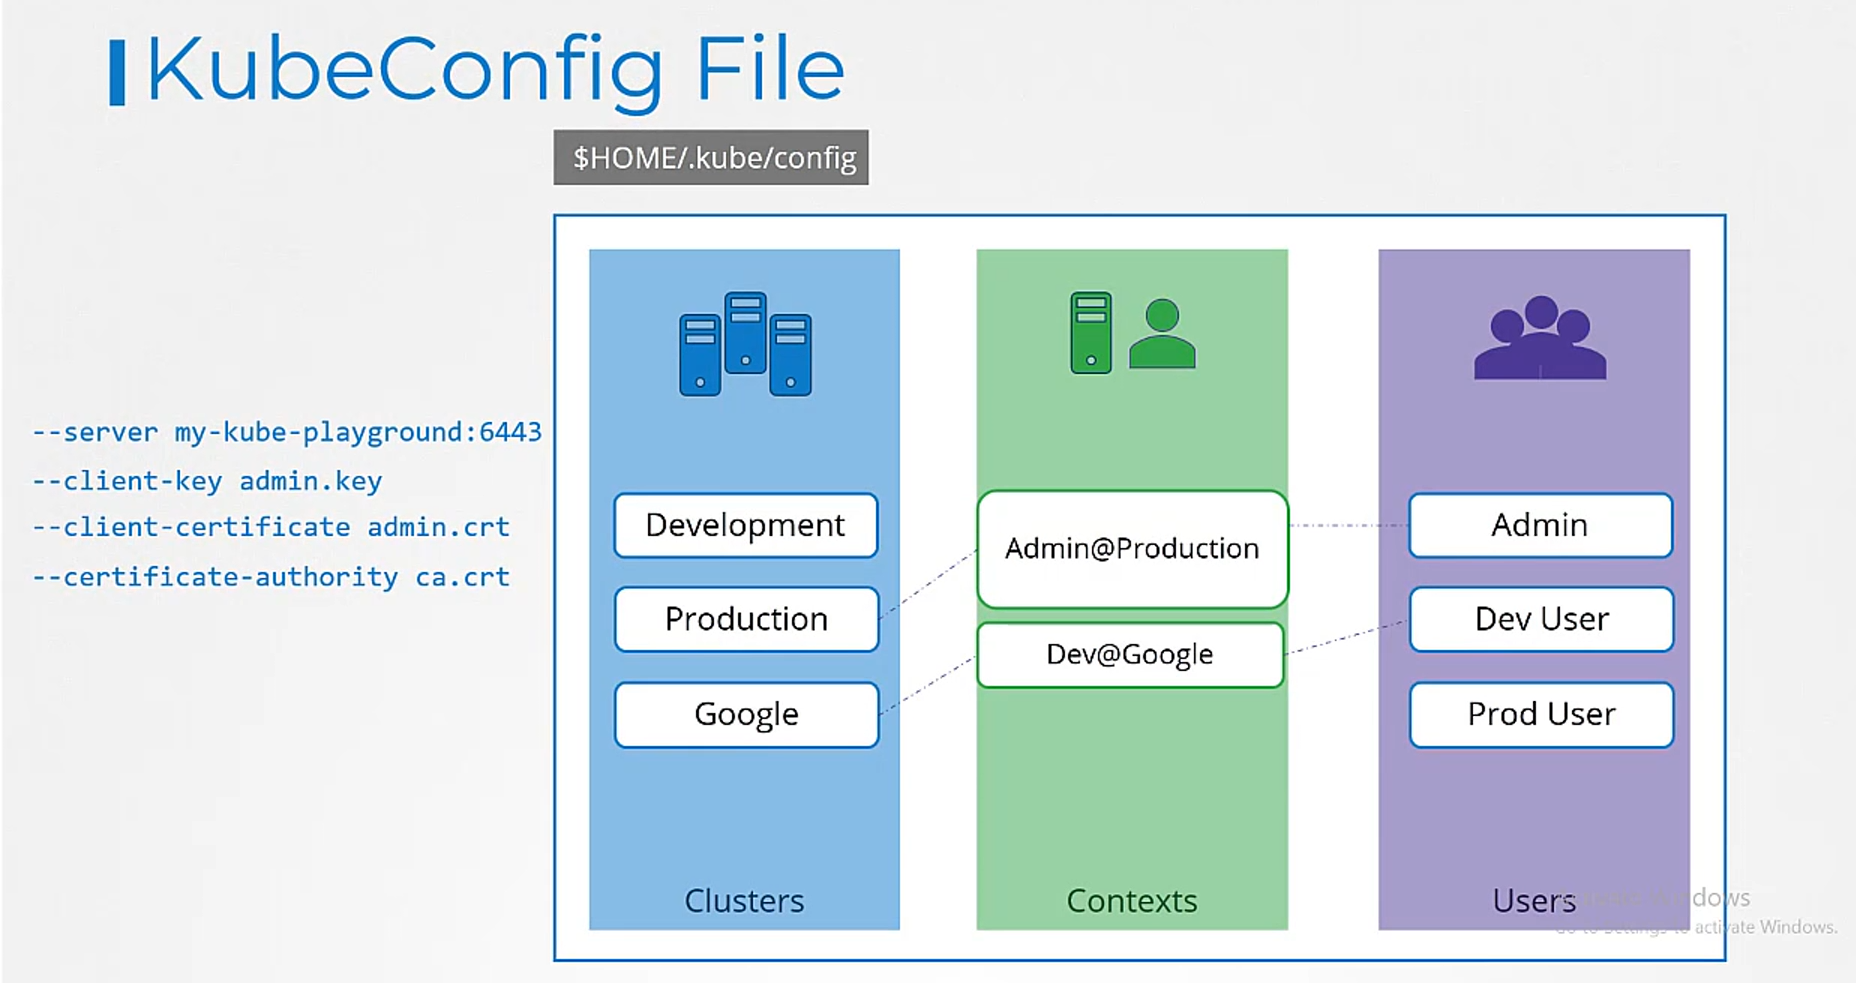 The server specification in our command goes
 into the cluster section.
The admin user’s keys and certificates goes
 into the user section.
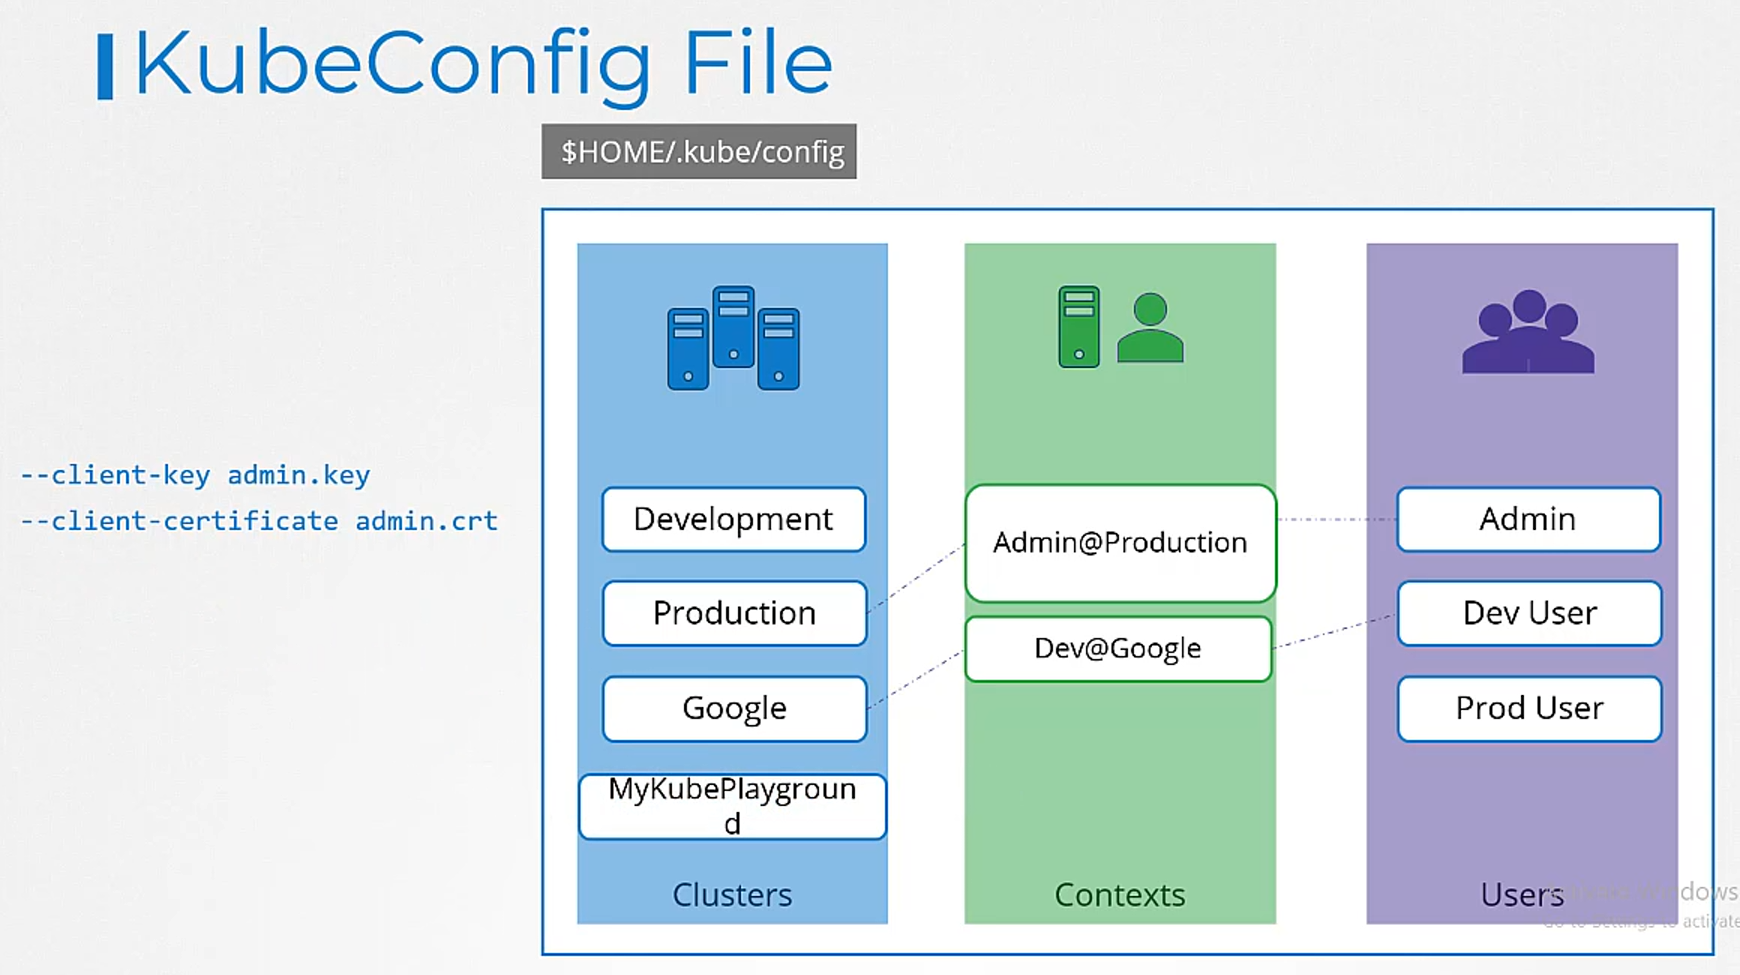
You then create a context
 that specifies to use the my kube admin user
to access the my kube playground cluster.
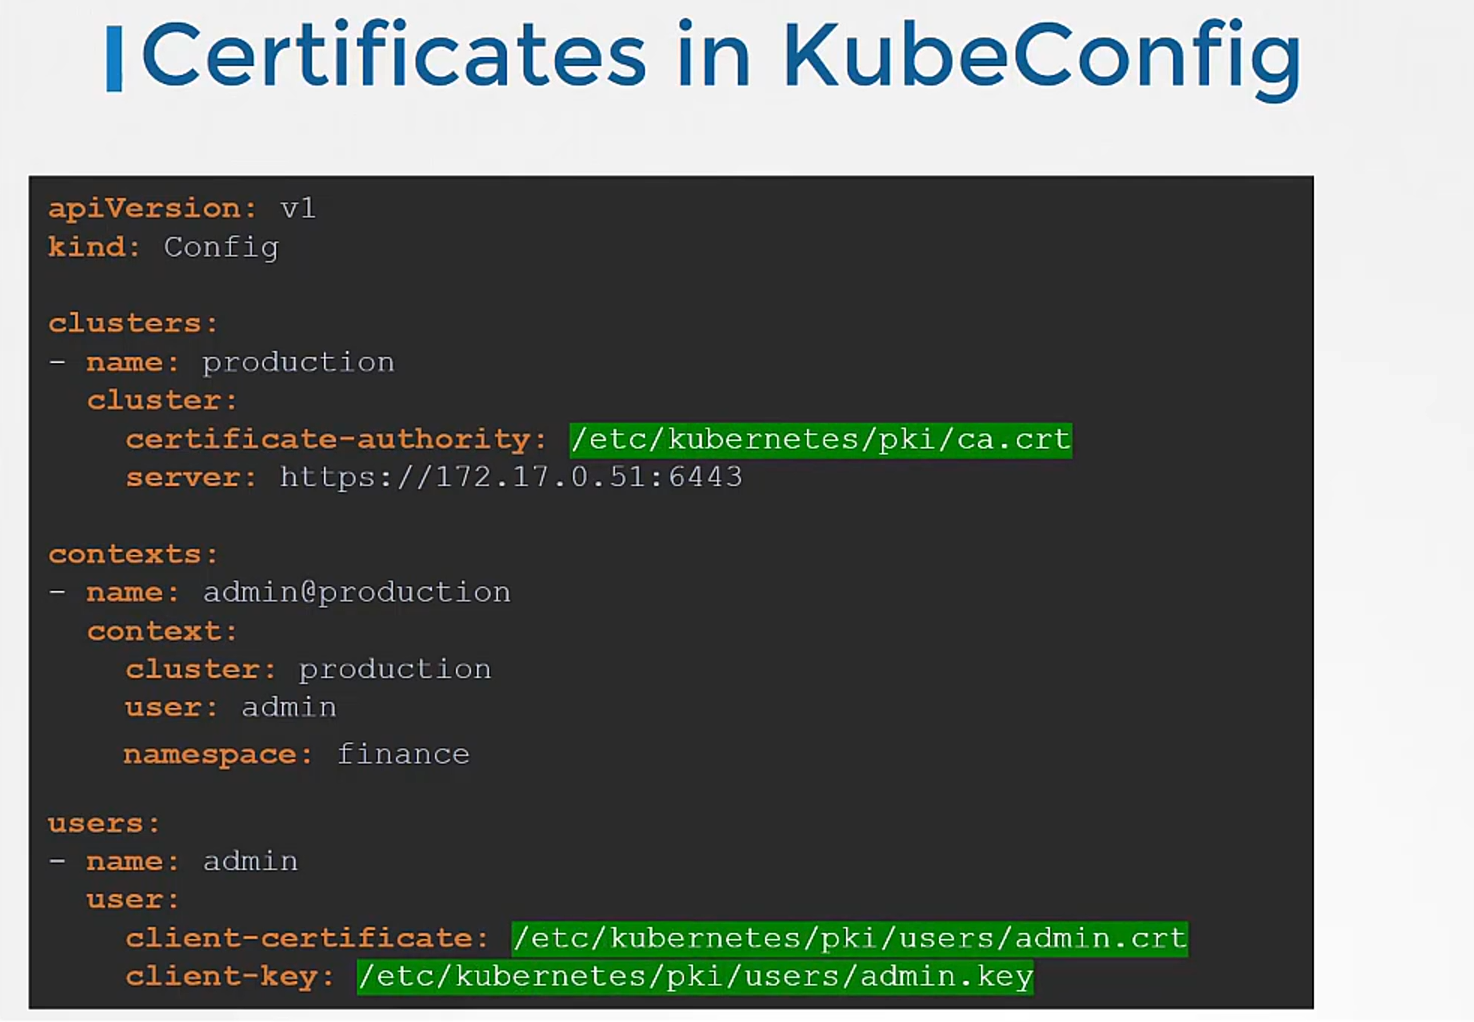
Let’s look at a real kubeconfig file now.
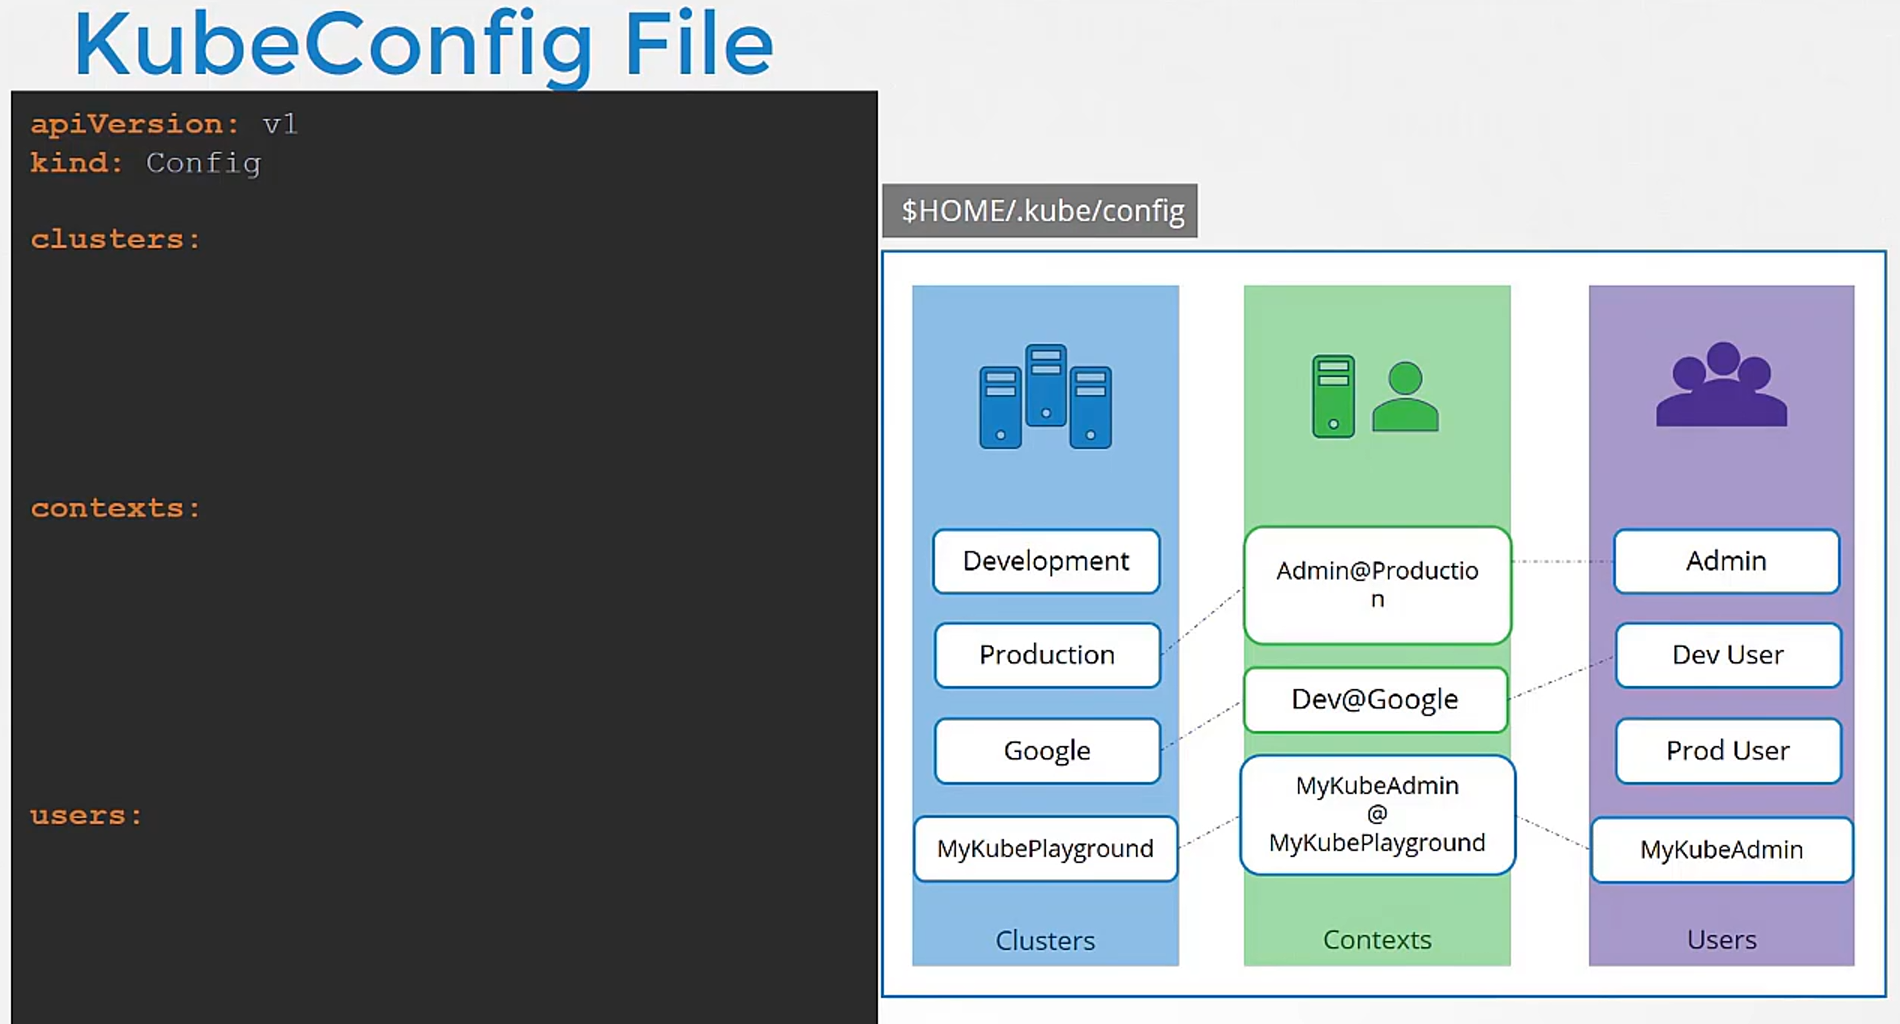
The kubeconfig file is in a YAML format.
It has API version set to v1.
The kind is config.
And then it has three sections as we discussed:
one for clusters, one for contexts and one for users.
Each of these is an array format.
That way you can specify multiple clusters,
users or contexts within the same file.
Under clusters, we add a new item
for our kube playground cluster.
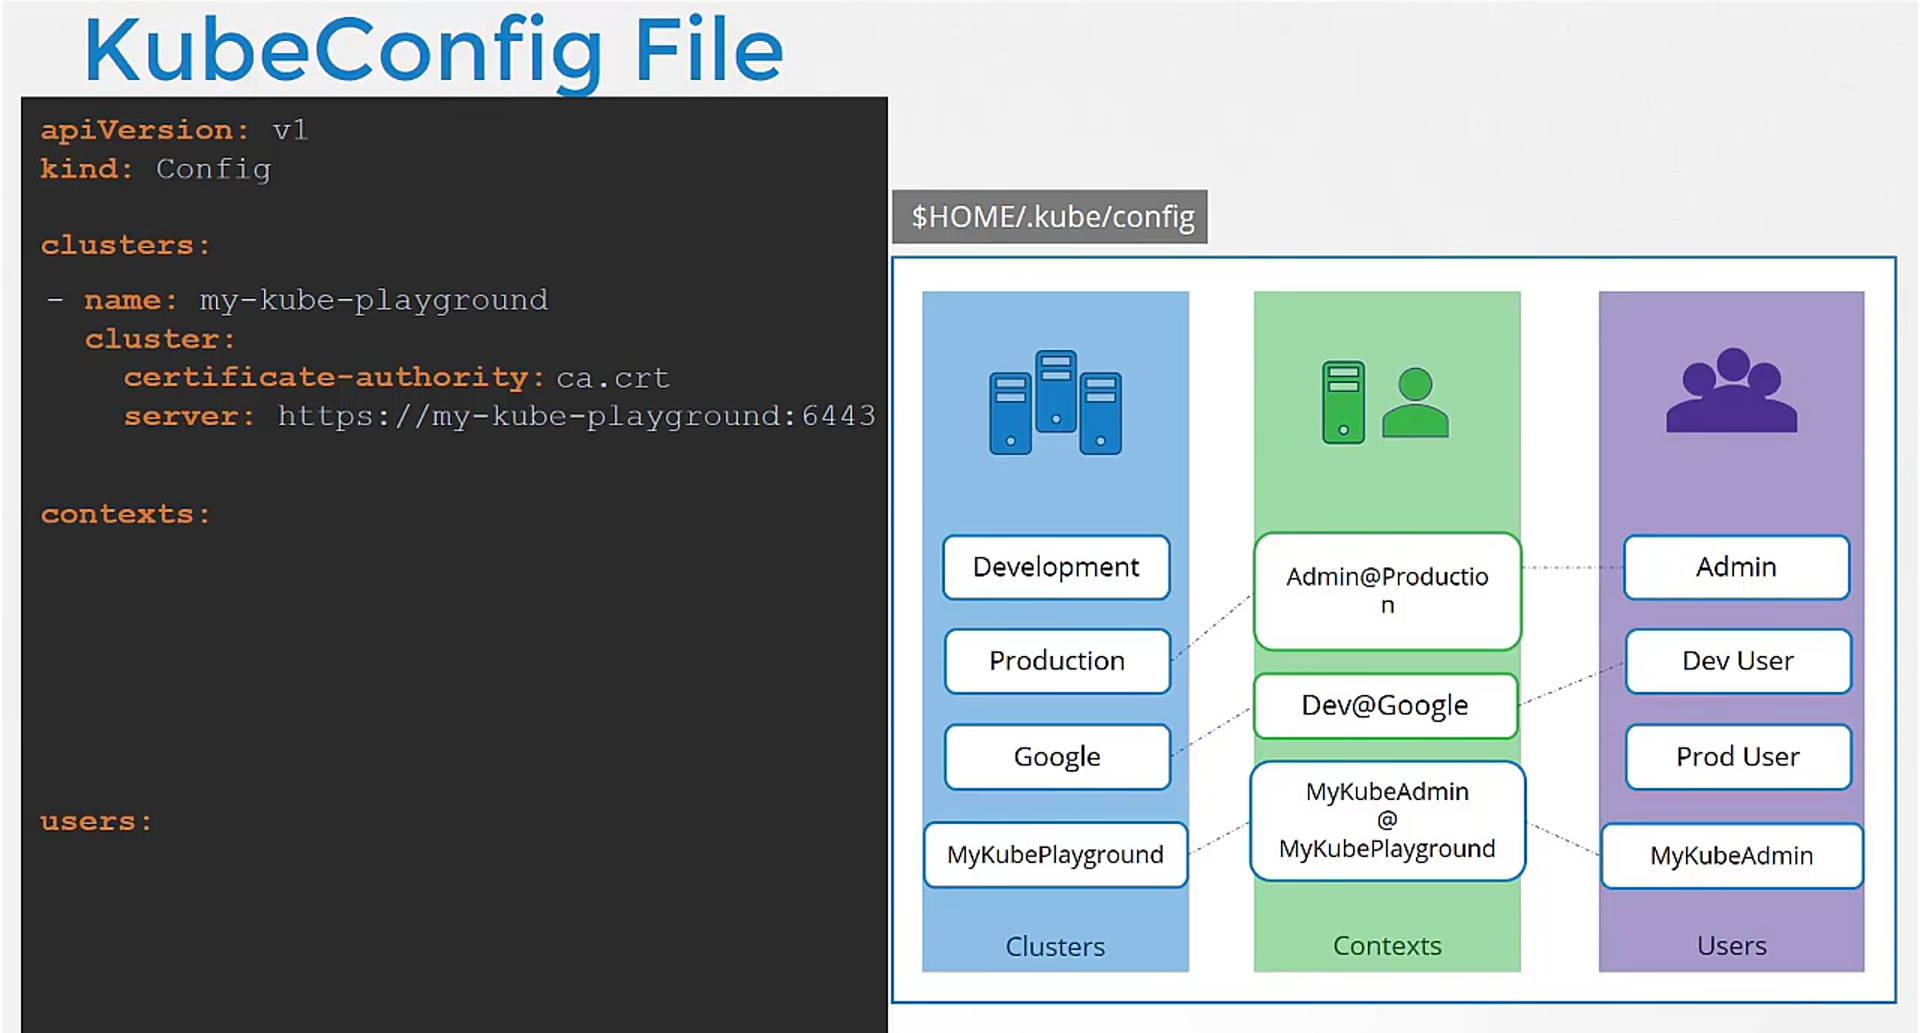 We name it my kube playground
and specify the server address under the server field.
It also requires the certificate
of the certificate authority.
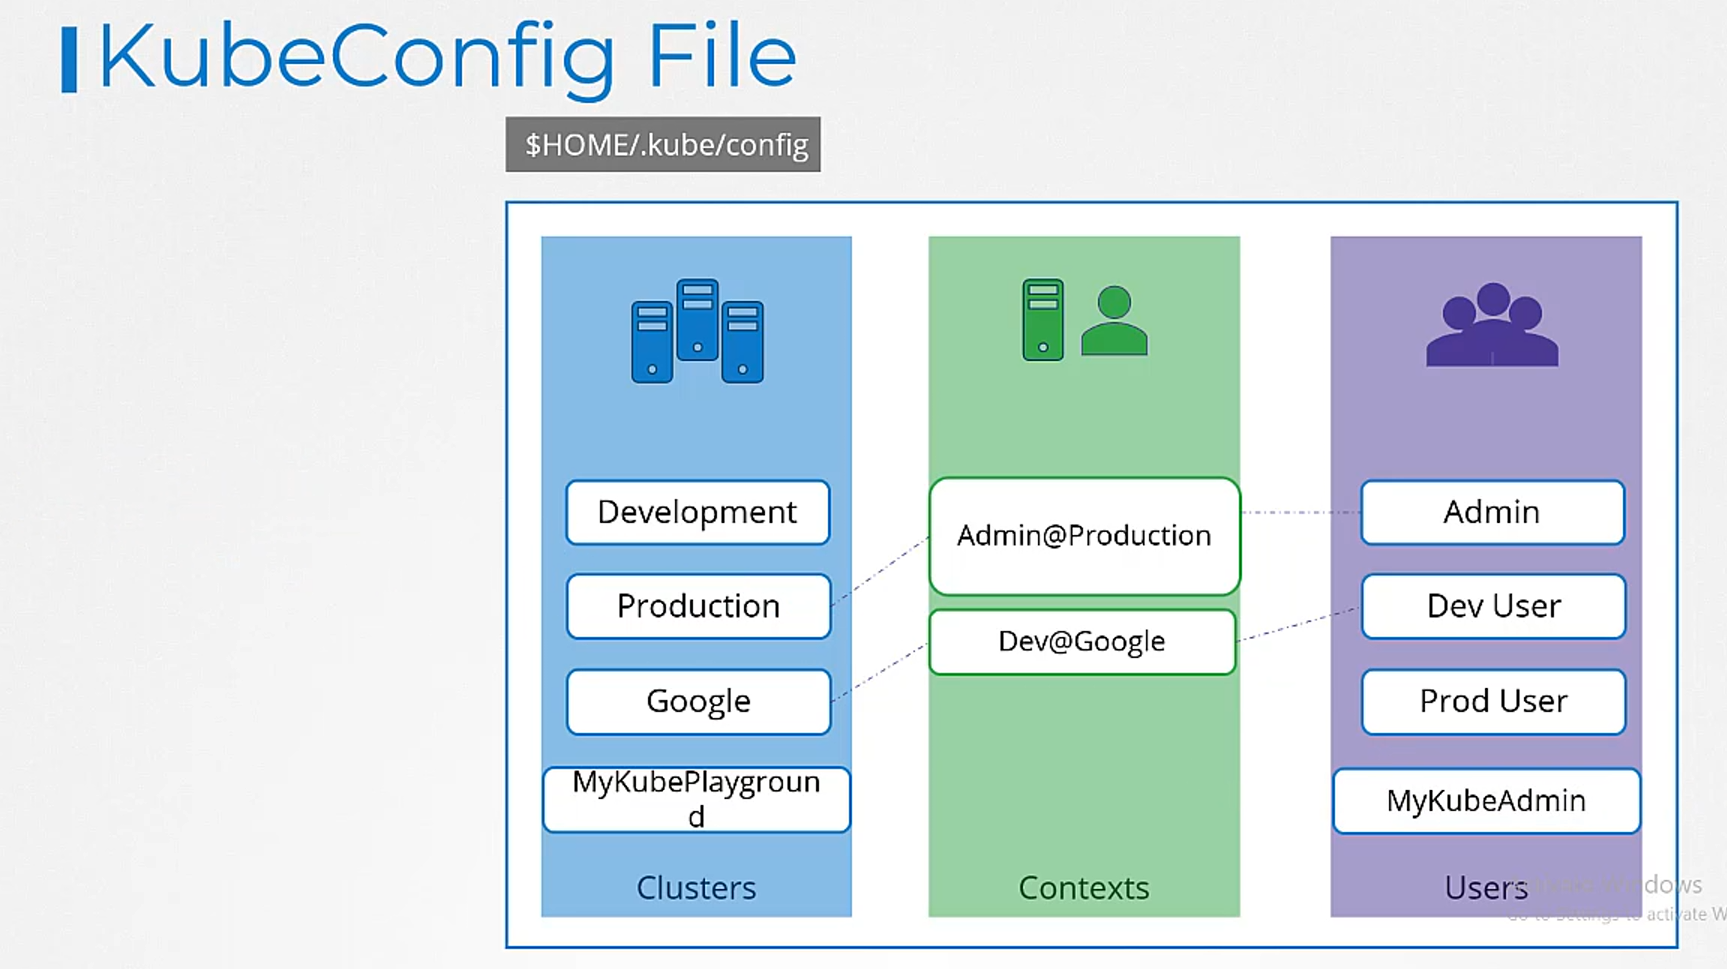
We can then add an entry into the user’s section
to specify details of my kube admin user.
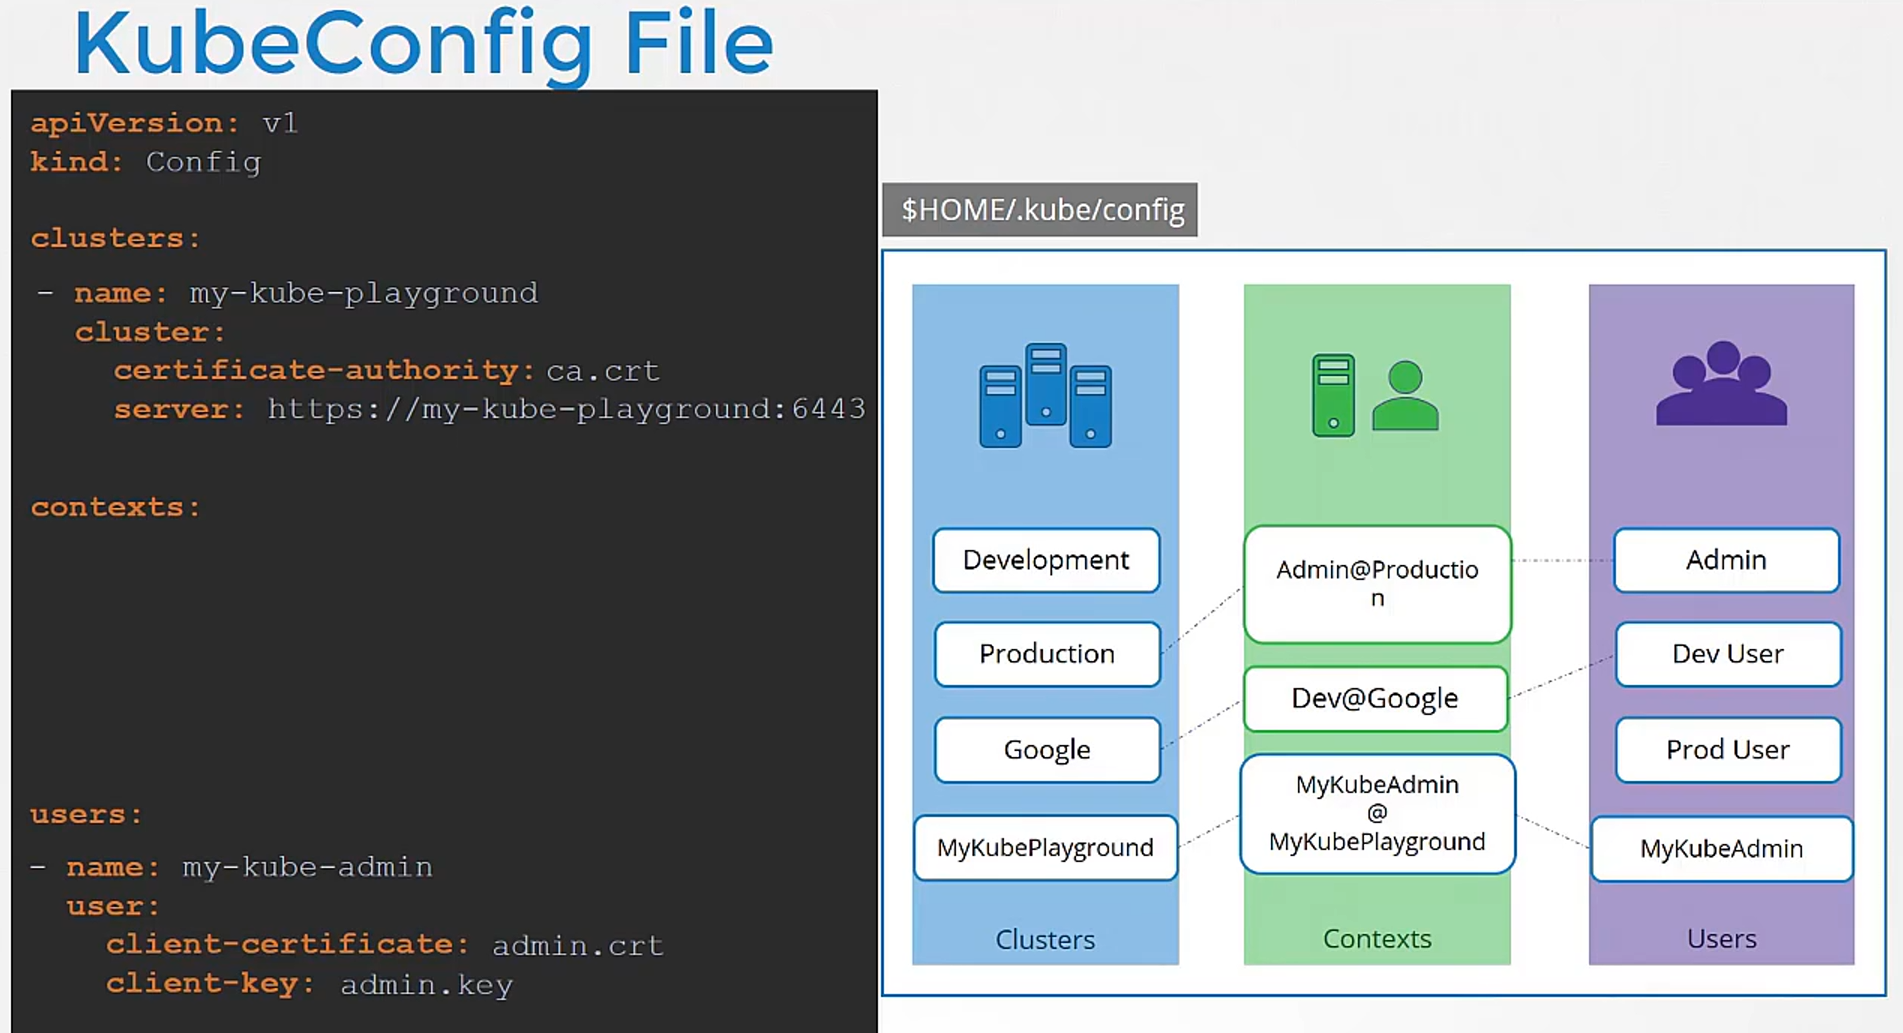 Provide the location of the client certificate
and key pair so we have now defined the cluster
and the user to access the cluster.
Next, we create an entry under the context section
to link the two together.
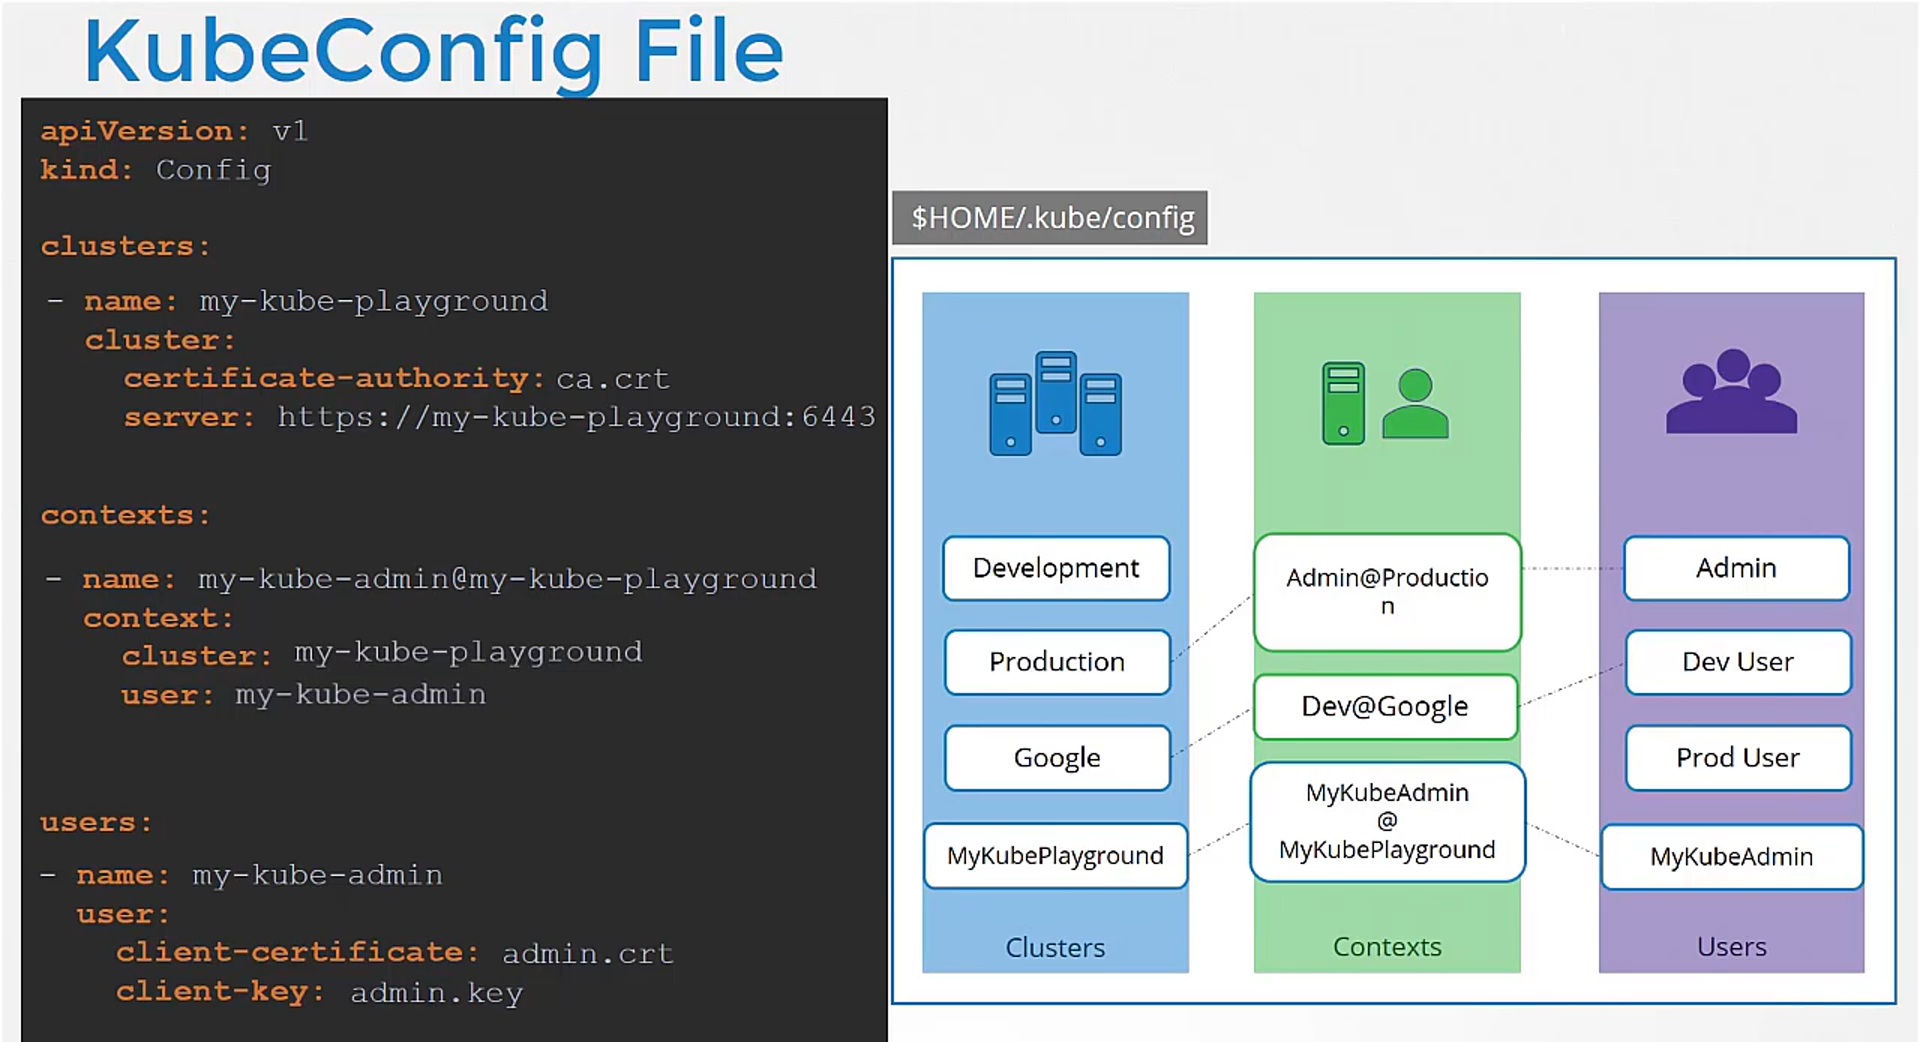 We will name the context my kube admin
at my kube playground.
We will then specify the same name we used
for cluster and user.
Follow the same procedure to add all the clusters
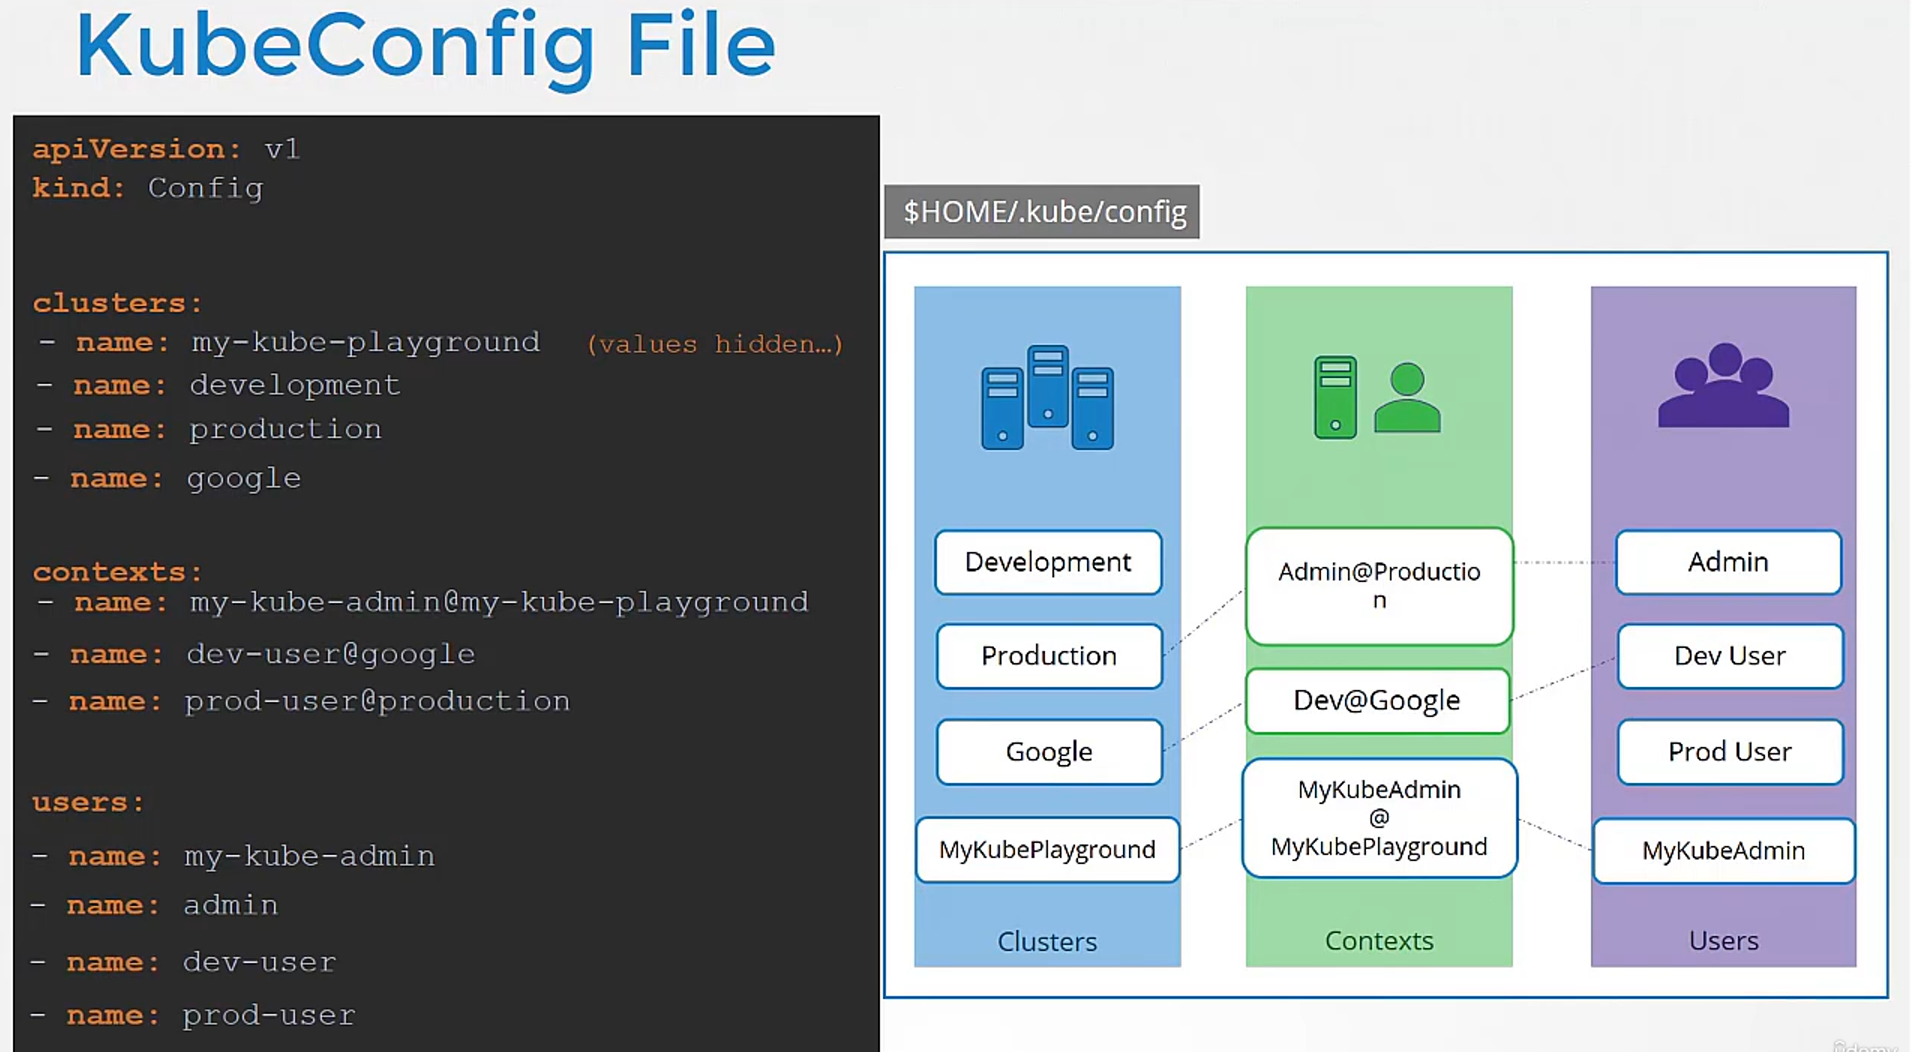 you daily access, the user credentials you use
to access them, as well as the context.
Once the file is ready,
remember, you don’t have to create any object,
like you usually do for other Kubernetes objects.
The file is left as is
and is read by the kubectl command
and the required values are used.
Now, how does kubectl know
which context to choose from?
We’ve defined three contexts here.
Which one should it start with?
You can specify the default context used
 by adding a field current context to the kubeconfig file,
specify the name of the context to use.
In this case, kubectl will always use the context dev user
at Google to access the Google clusters
using the dev user’s credentials.
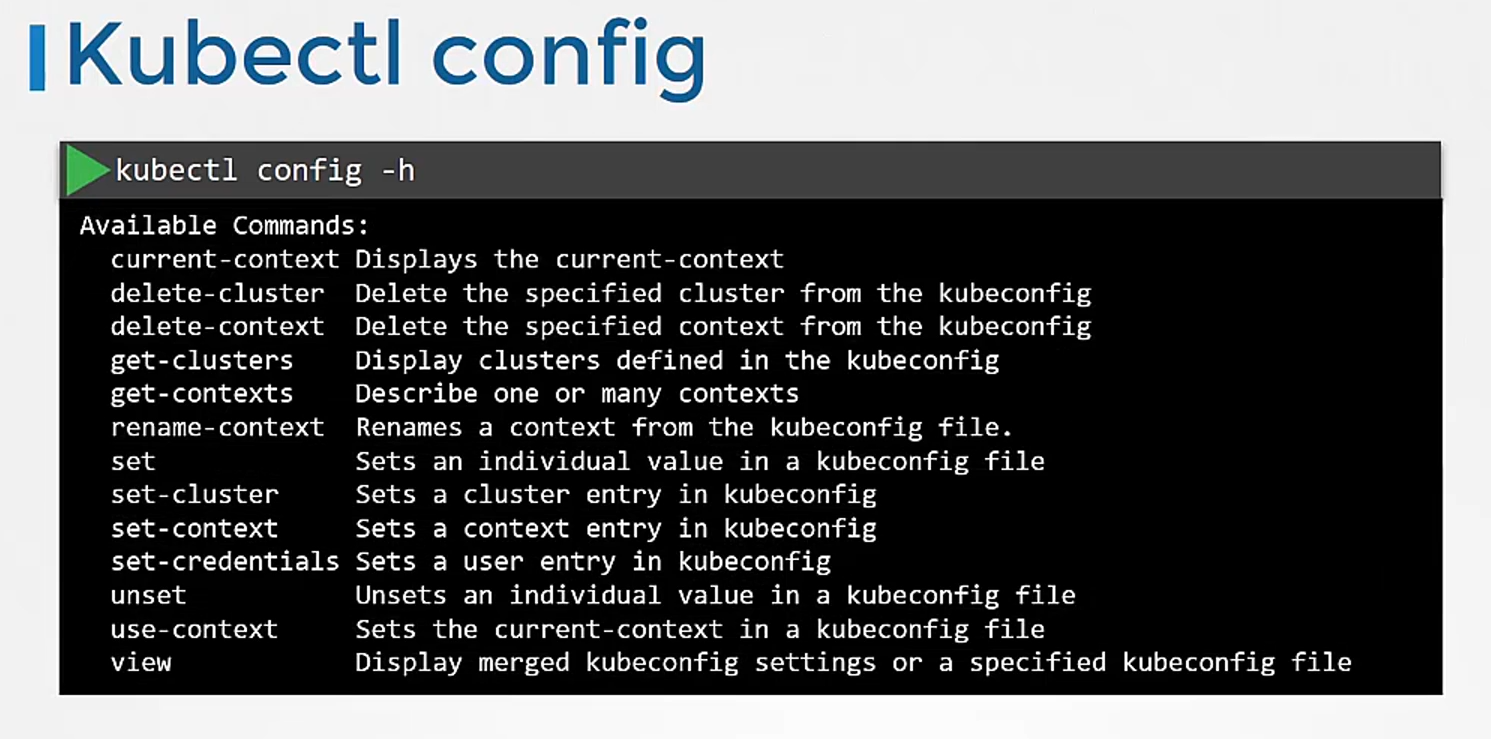
There are command line options available within kubectl to view and modify the kubeconfig files.
To view the current file being used,
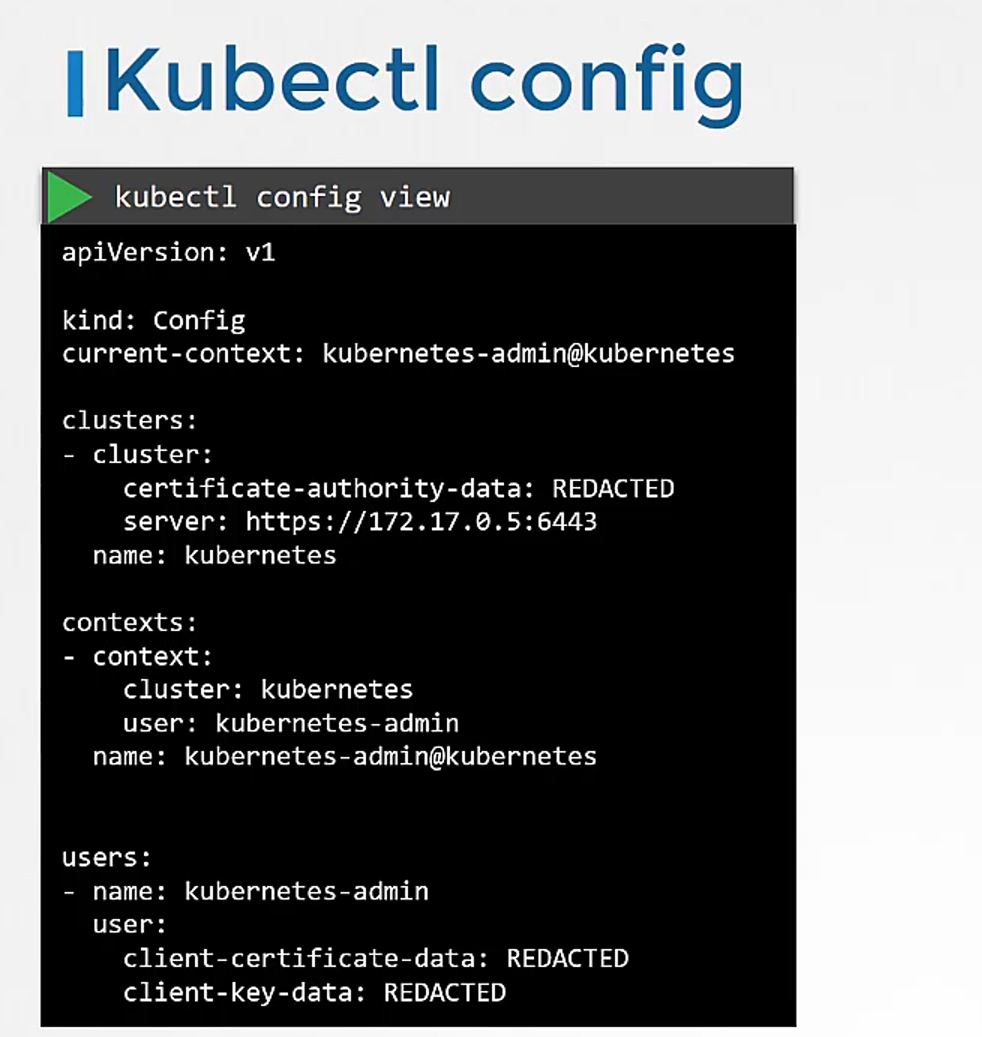 run the kubectl config view command.
It lists the cluster’s contexts and users,
as well as the current context that is set.
As we discussed earlier,
if you do not specify which kubeconfig file to use,
it ends up using the default file located
in the folder .kube in the user’s home directory.
Alternatively, you can specify a kubeconfig file
 by passing the kubeconfig option
in the command line like this.
We will move our custom config to the home directory
so this becomes our default config file.
So how do you update your current context?
So you’ve been using my kube admin user
to access my kube playground.
How do you change the context
to use prod user to access the production cluster?
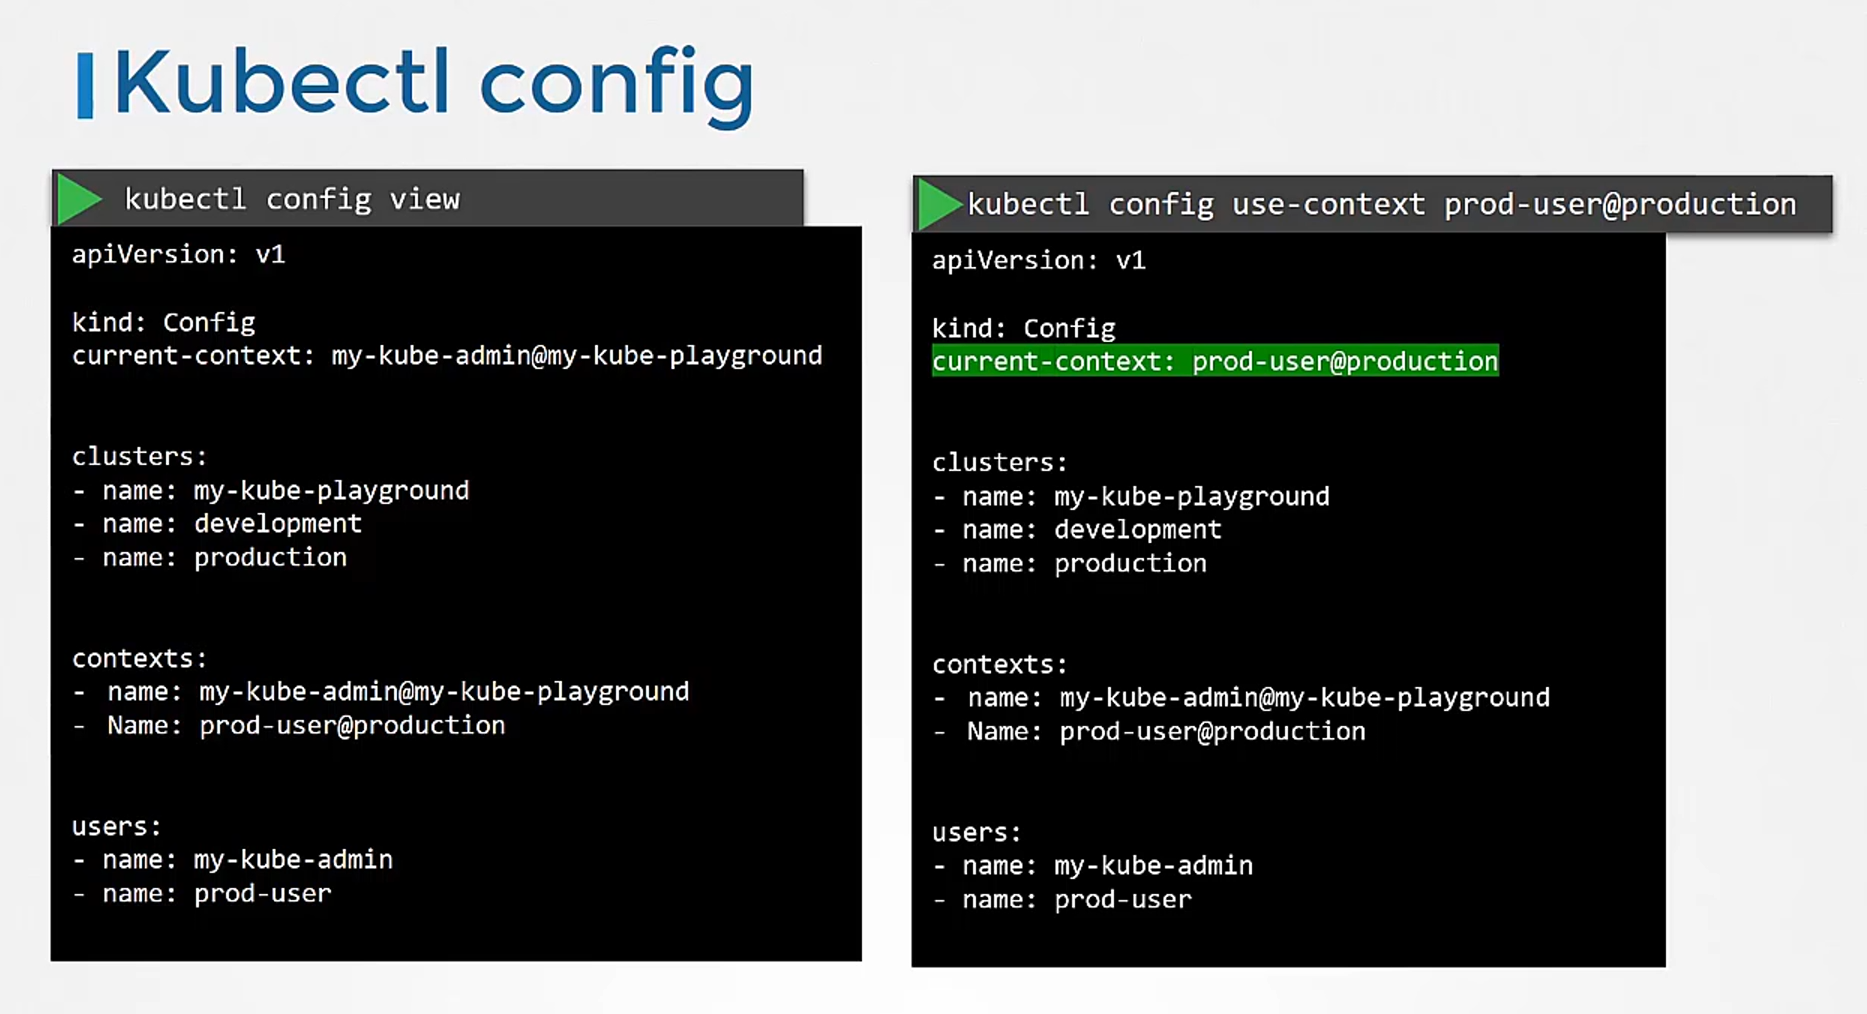 Run the kubectl config use context command
to change the current context
to the prod user at production context.
This can be seen in the current context field
in the file.
So yes, the changes made by kubectl config command
actually reflects in the file.
You can make other changes in the file,
update or delete items in it using other variations
of the kubectl config command.
Check them out when you get time.
What about namespaces? For example, each cluster may be configured with multiple namespaces within it.
Can you configure a context to switch to a particular namespace?
 Yes.
Yes.
The context section in the kubeconfig file
can take additional field called namespace
where you can specify a particular namespace.
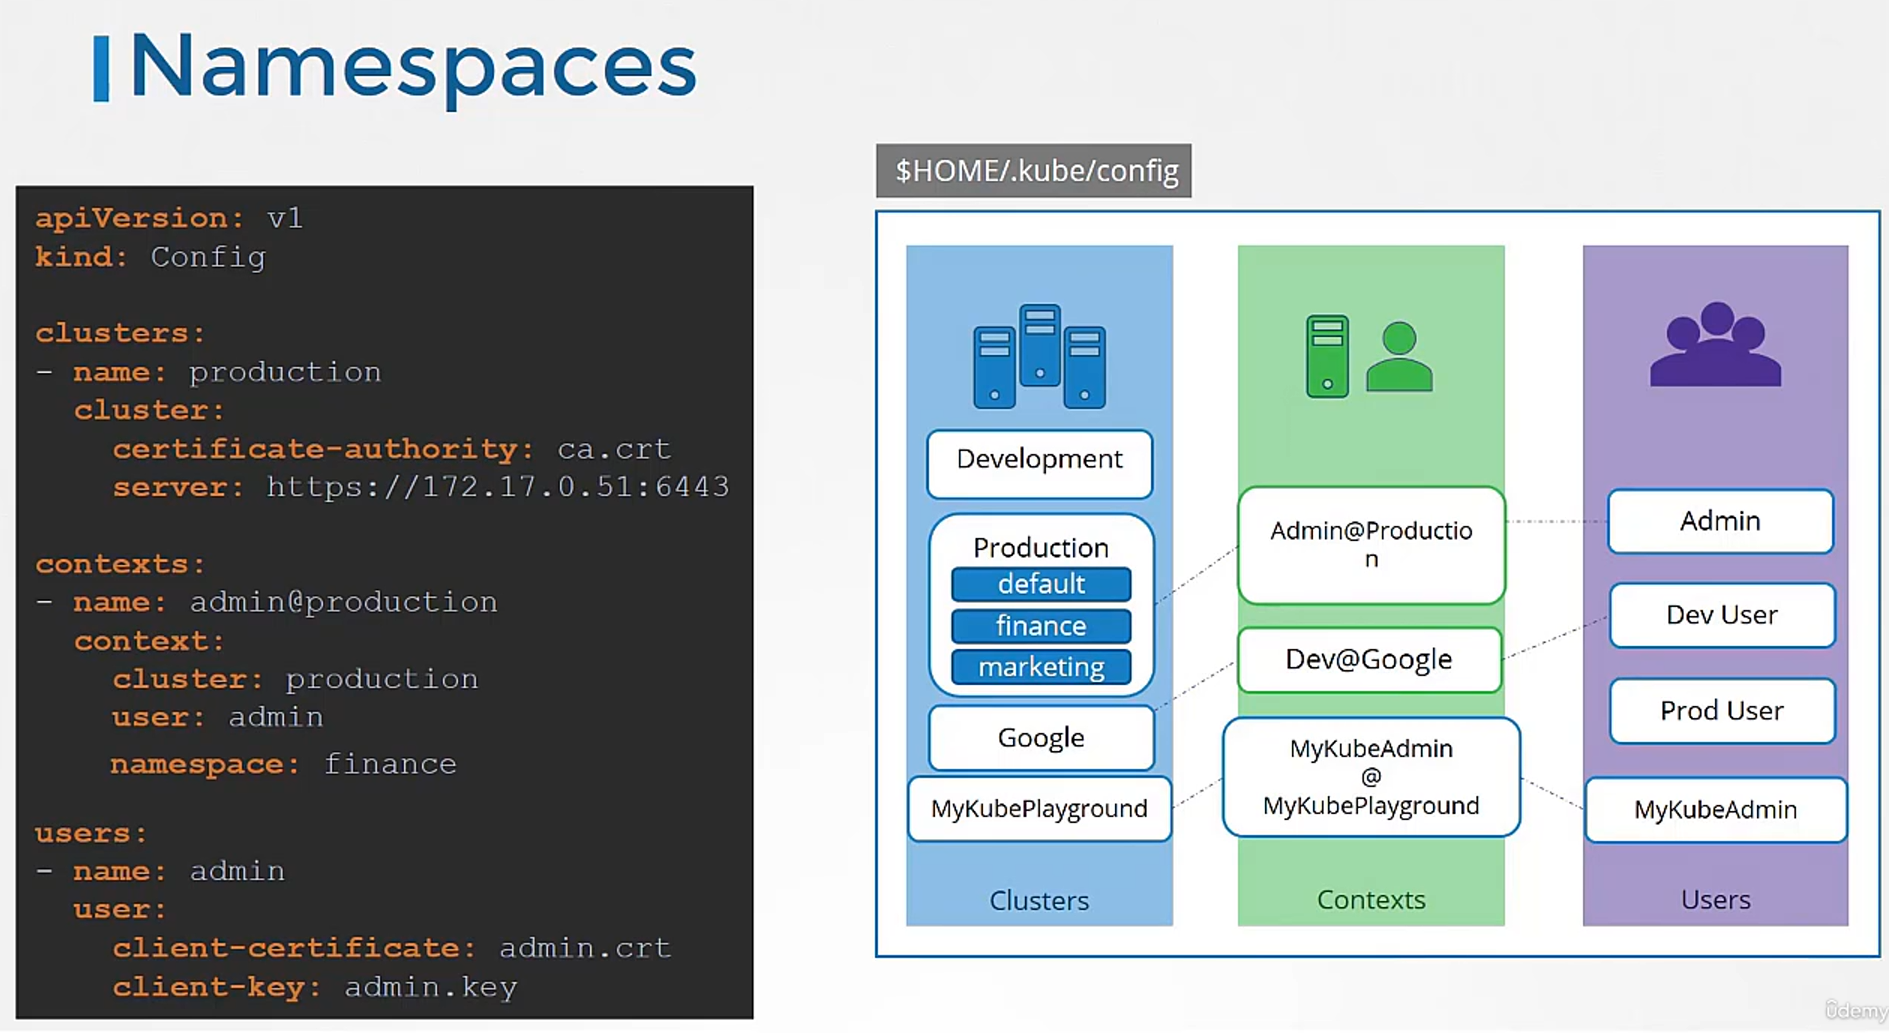 This way, when you switch to that context,
you will automatically be in a specific namespace.
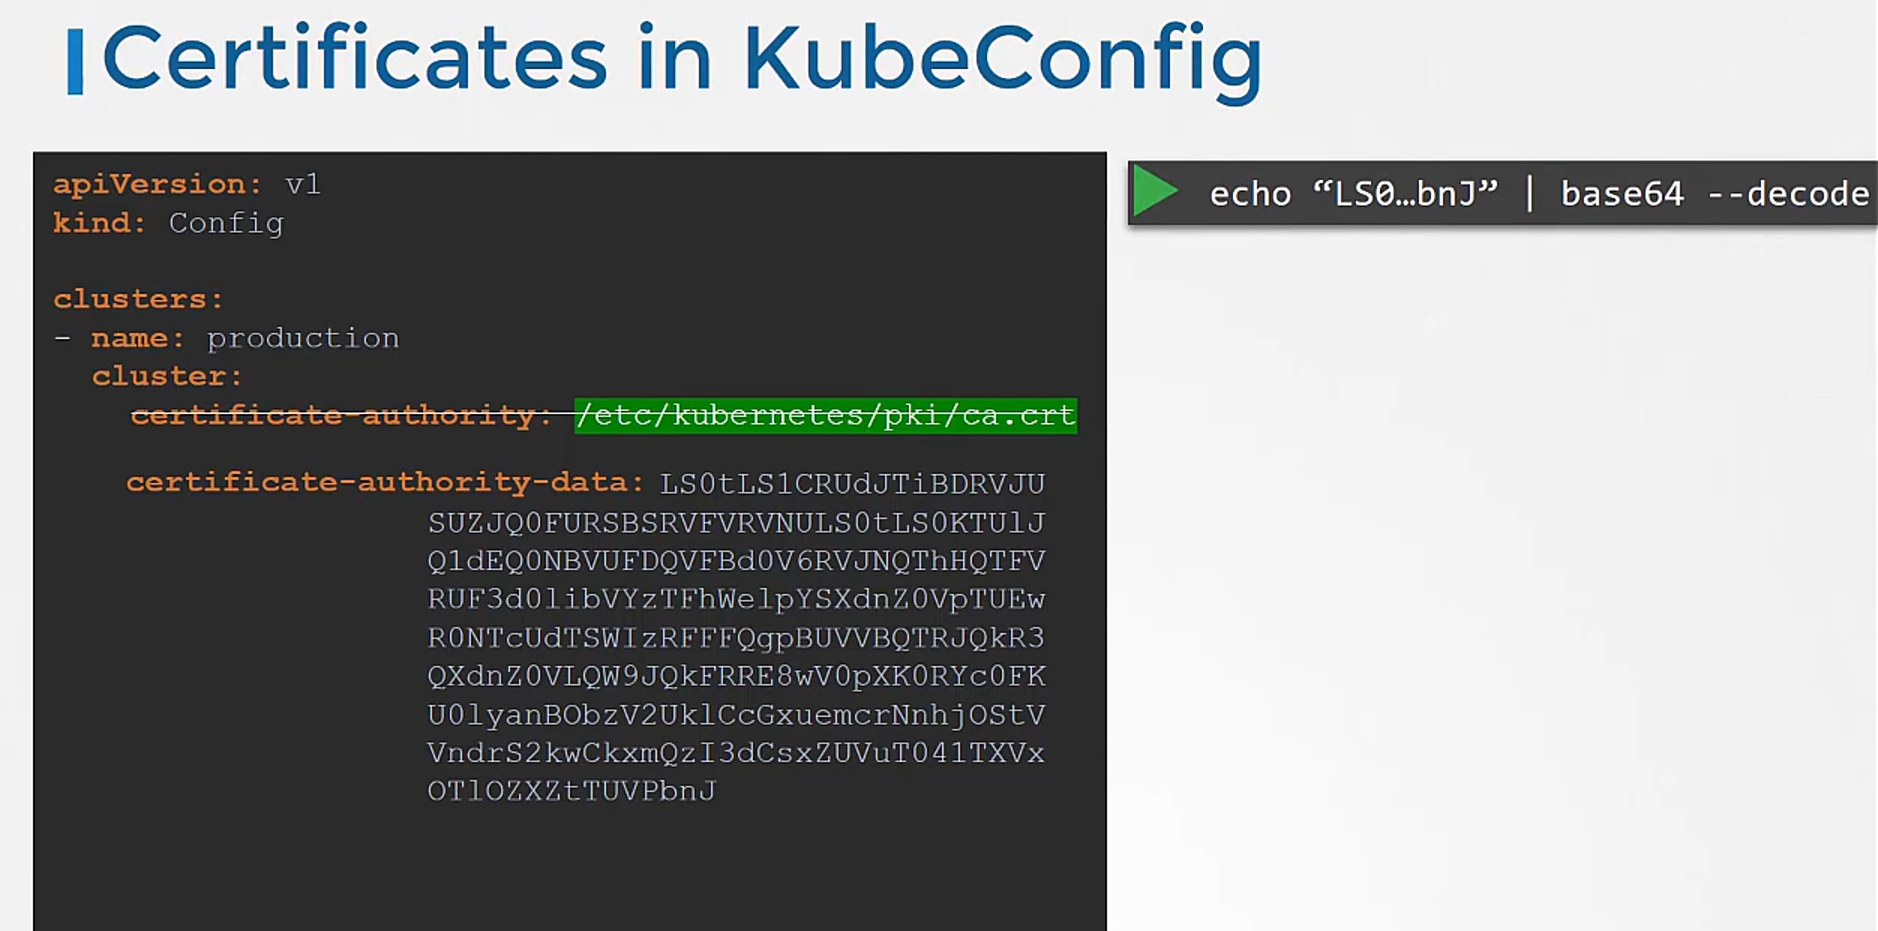
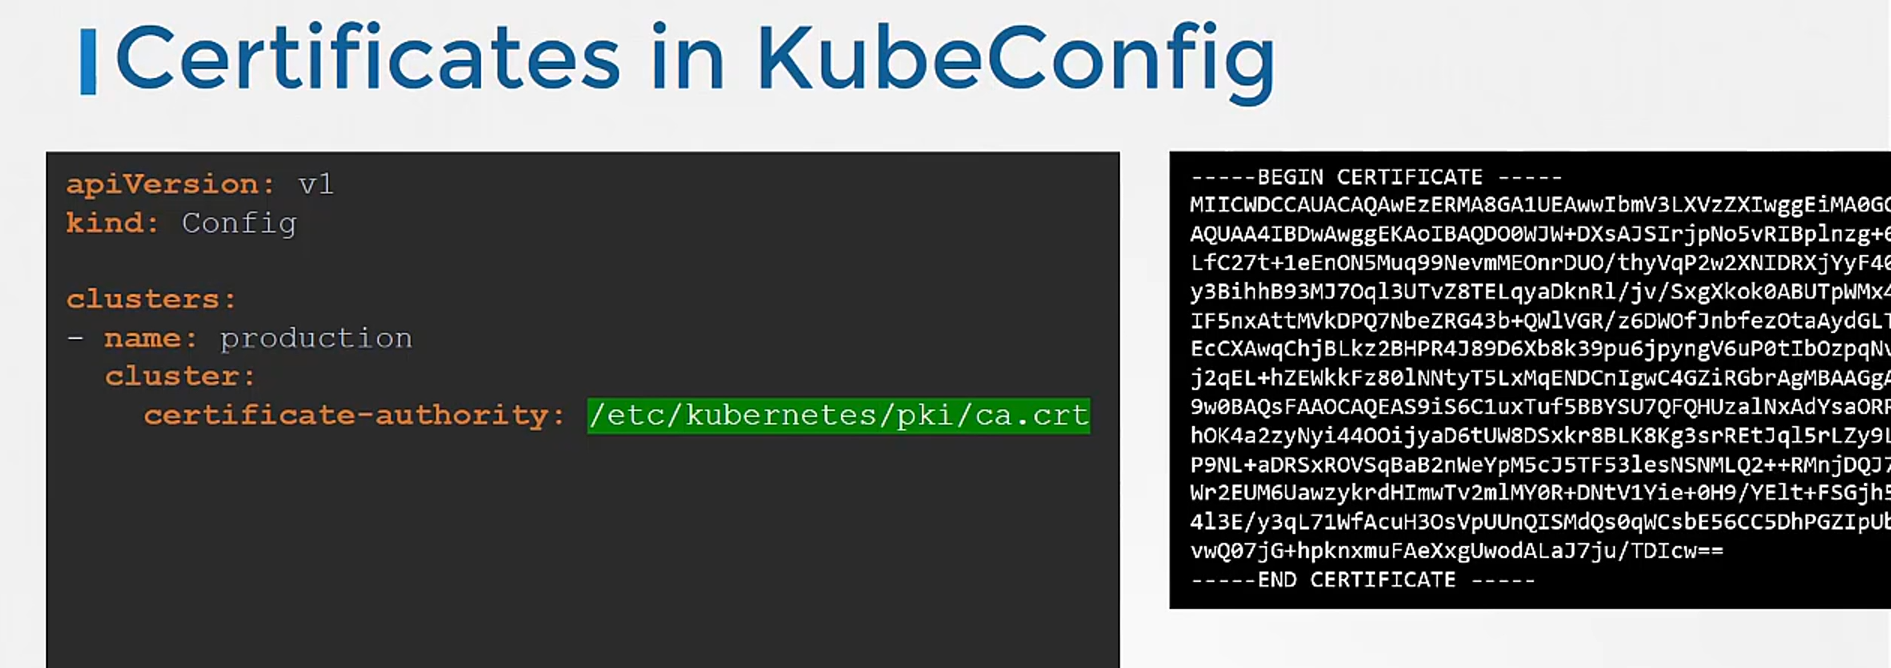
Finally, a word on certificates.
You have seen paths to certificate files mentioned
in kubeconfig like this.
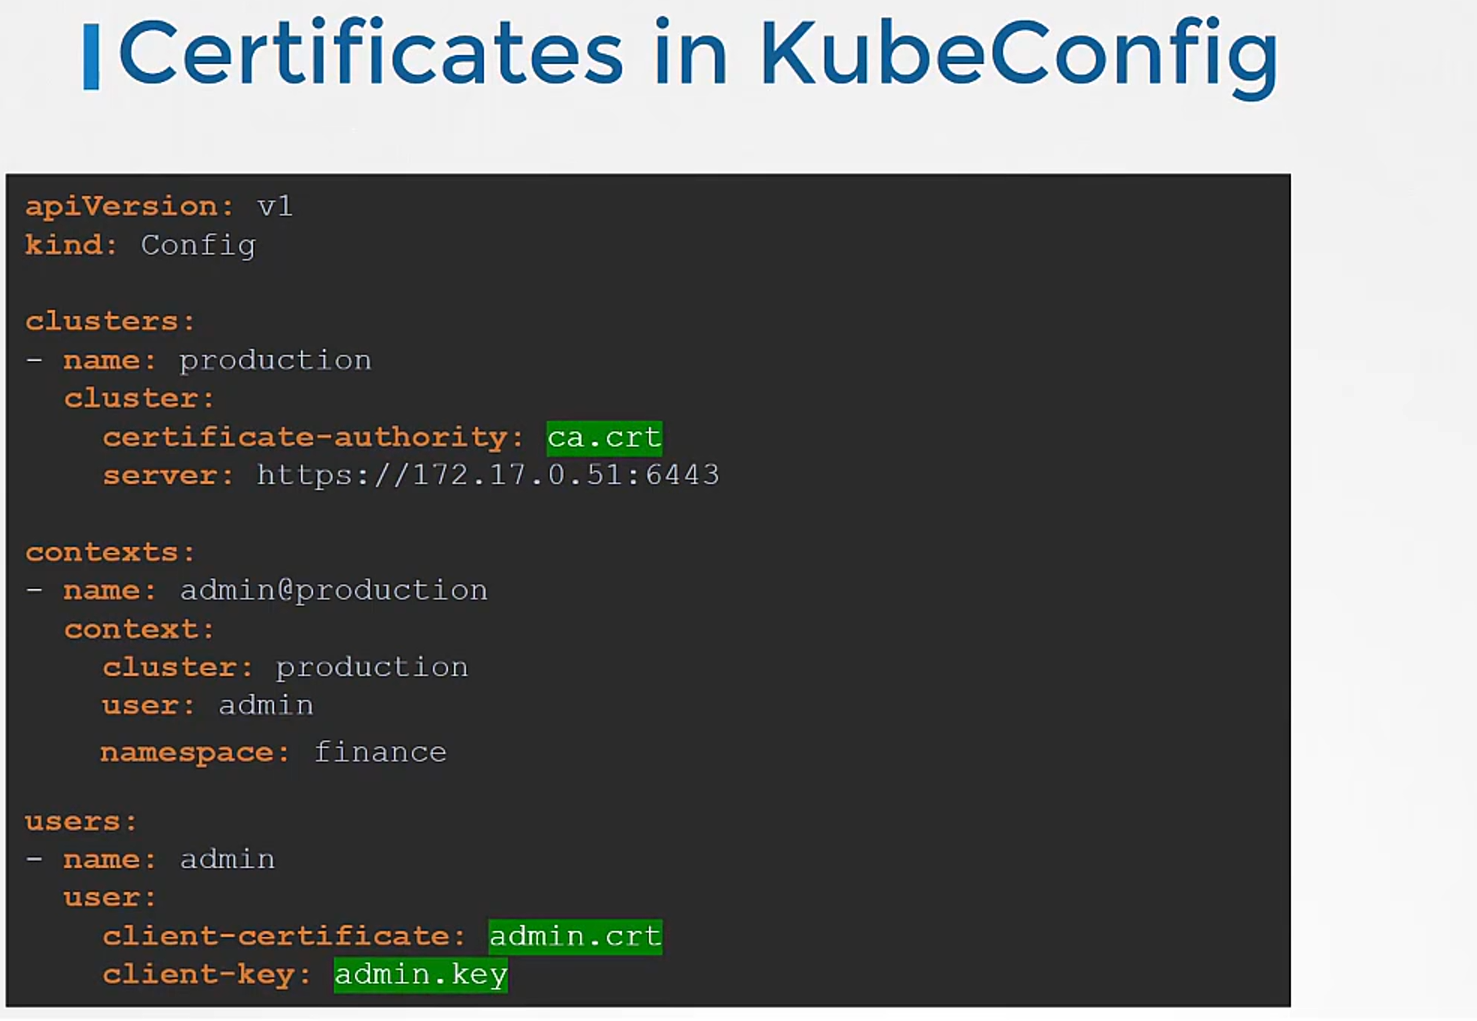
Well, it’s better to use the full path like this.
But remember, there’s also another way
to specify the certificate credentials.
Let’s look at the first one, for instance,
where we configure the path to the certificate authority.
We have the contents of the ca.crt file on the right.
 Instead of using certificate authority field
and the path to the file,
you may optionally use the certificate authority data field
and provide the contents of the certificate itself
but not the file as is.
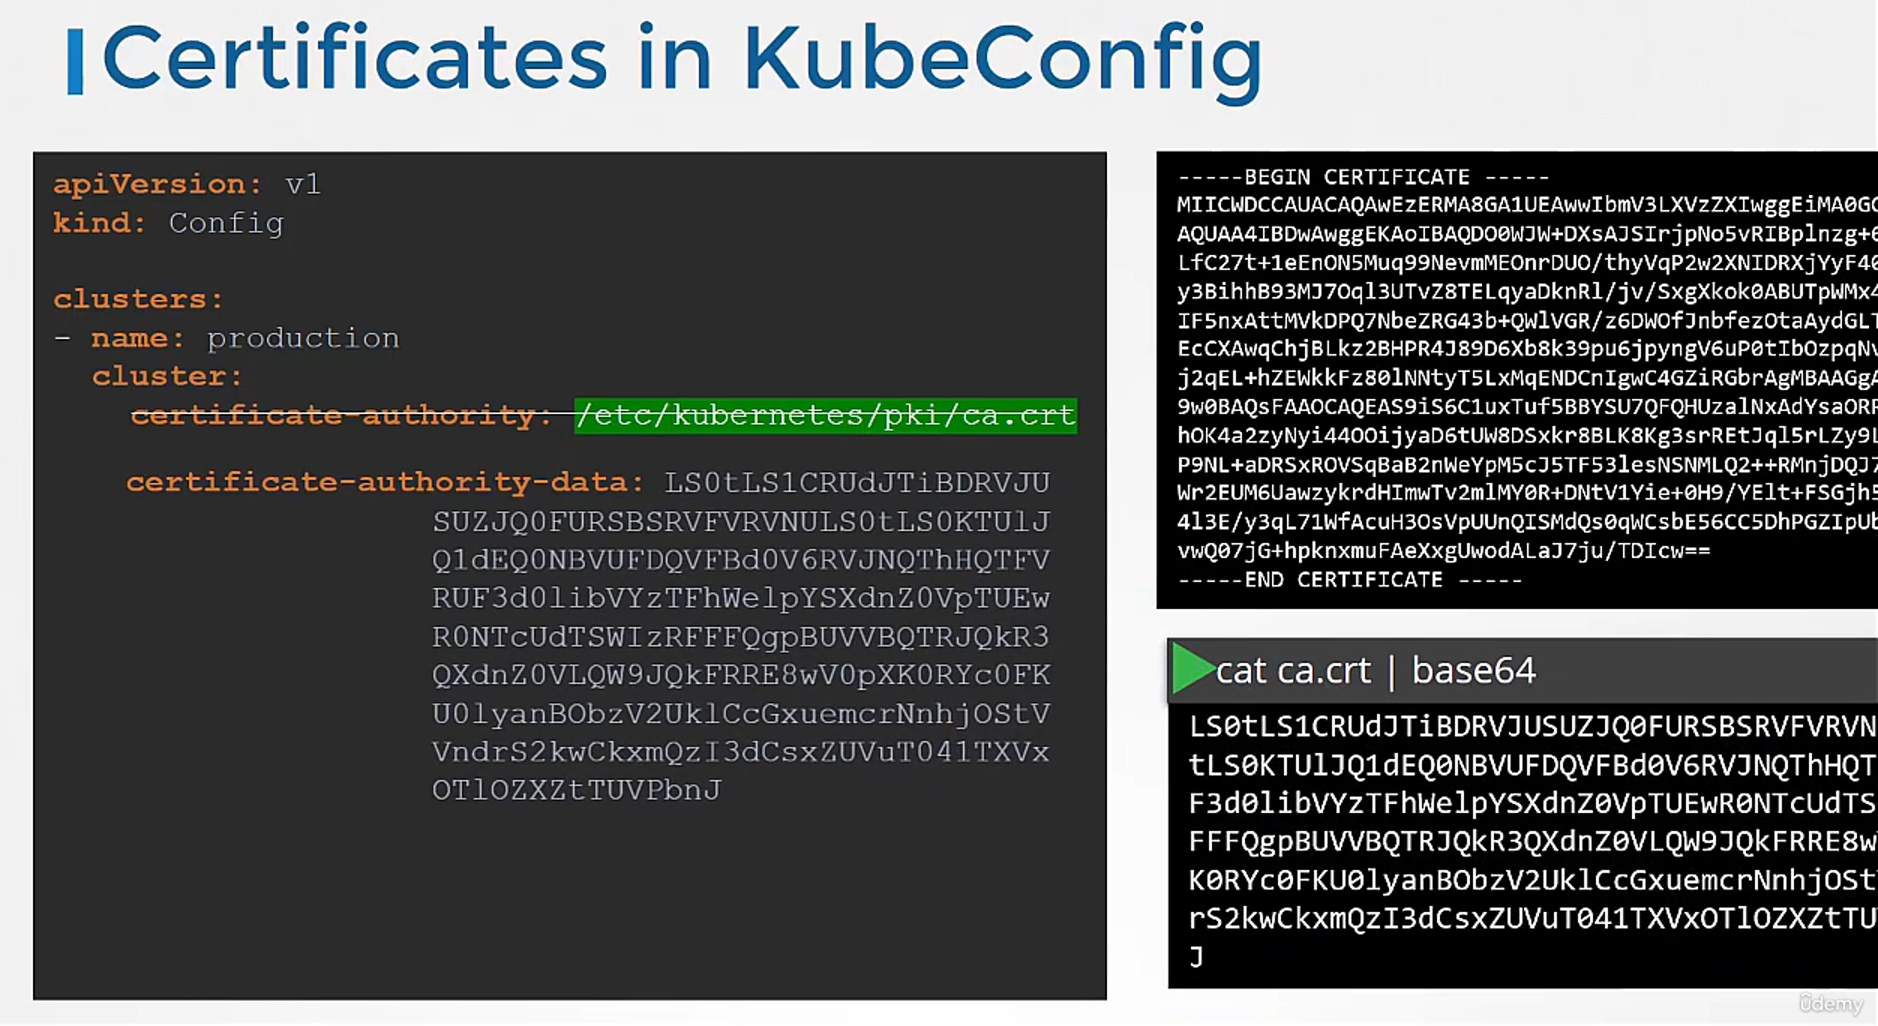 Convert the contents to a Base64 encoded format
and then pass that in.
Similarly, if you see a file
with the certificate’s data in the encoded format,
use the Base64 decode option to decode the certificate.