
Switching and Routing
Switch
Network interfaces Switch
We have two computers, A and B, laptops, desktops, VMs on the cloud, wherever,
how does system A reach B?
We connect them to a switch and the switch creates a network containing the two systems.
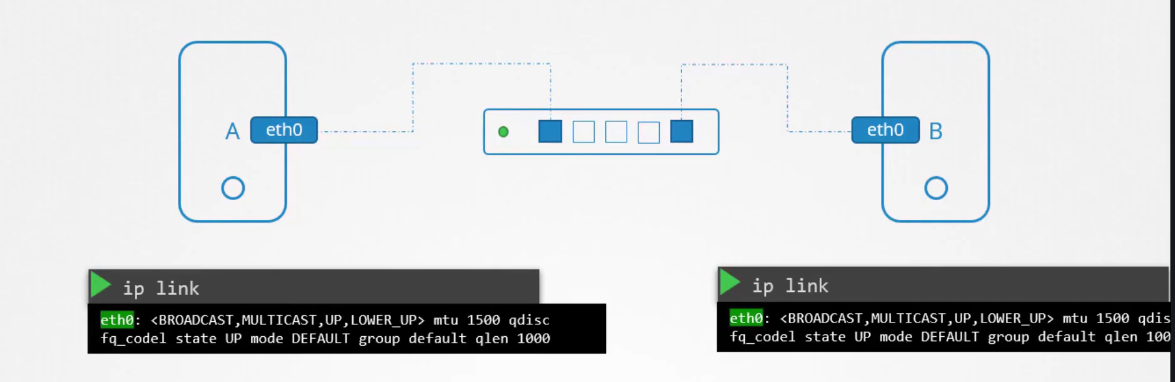
To connect them to a switch, we need an interface on each host: physical or virtual, depending on the host.
To see the interfaces for the host, we use the IP link command.
In this case, we look at the interface named Eth0 that we will be using to connect to the switch.
Let’s assume it’s a network
with the address 192.168.1.0.
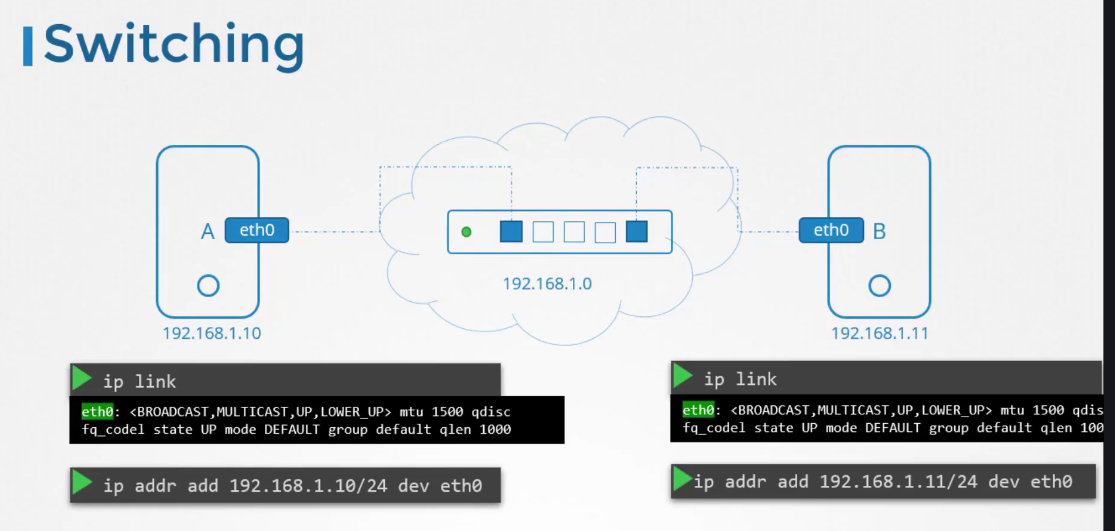
We then assign the systems with IP addresses on the same network.
 For this, we use the command ip addr.
Once the links are up and the IP addresses are assigned,
the computers can now communicate with each other
through the switch.
The switch can only enable communication
within a network,
which means it can receive packets from a host
on the network and deliver it to other systems
within the same network.
Say we have another network containing systems C and D
at address 192.168.2.0.
Router
The systems have IP address 192.168.2.10
and 2.11 respectively.
How does a system in one network reach a system
in the other?
How does system B with the IP 192.168.1.11
reach system C with the IP 2.10 on the other network?
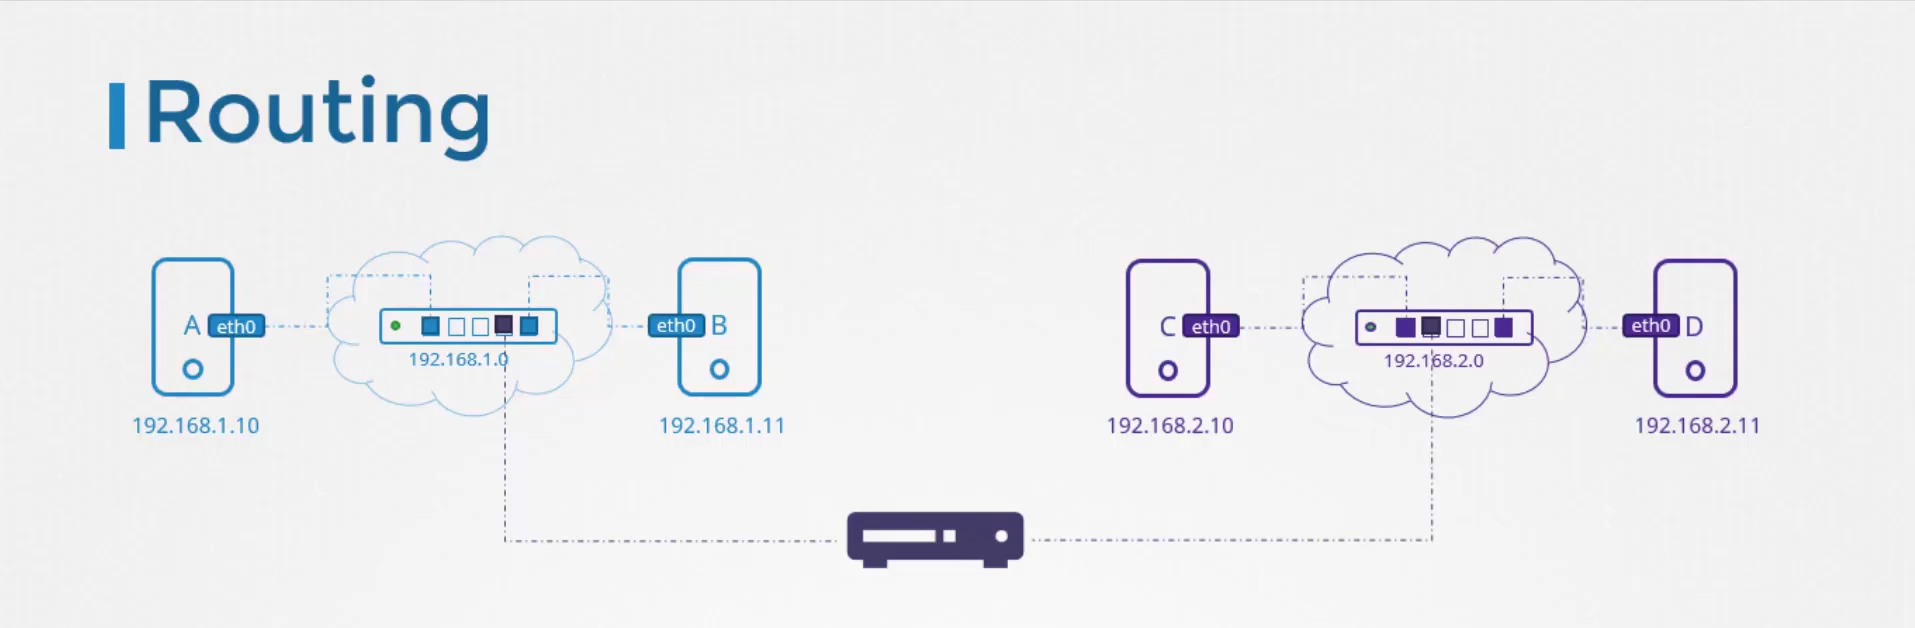 That’s where a router comes in.
A router helps connect two networks together.
It is an intelligent device.
So think of it as another server
with many network ports.
Since it connects to the two separate networks,
it gets two IPs assigned,
one on each network.
In the first network,
we assign it an IP address 192.168.1.1.
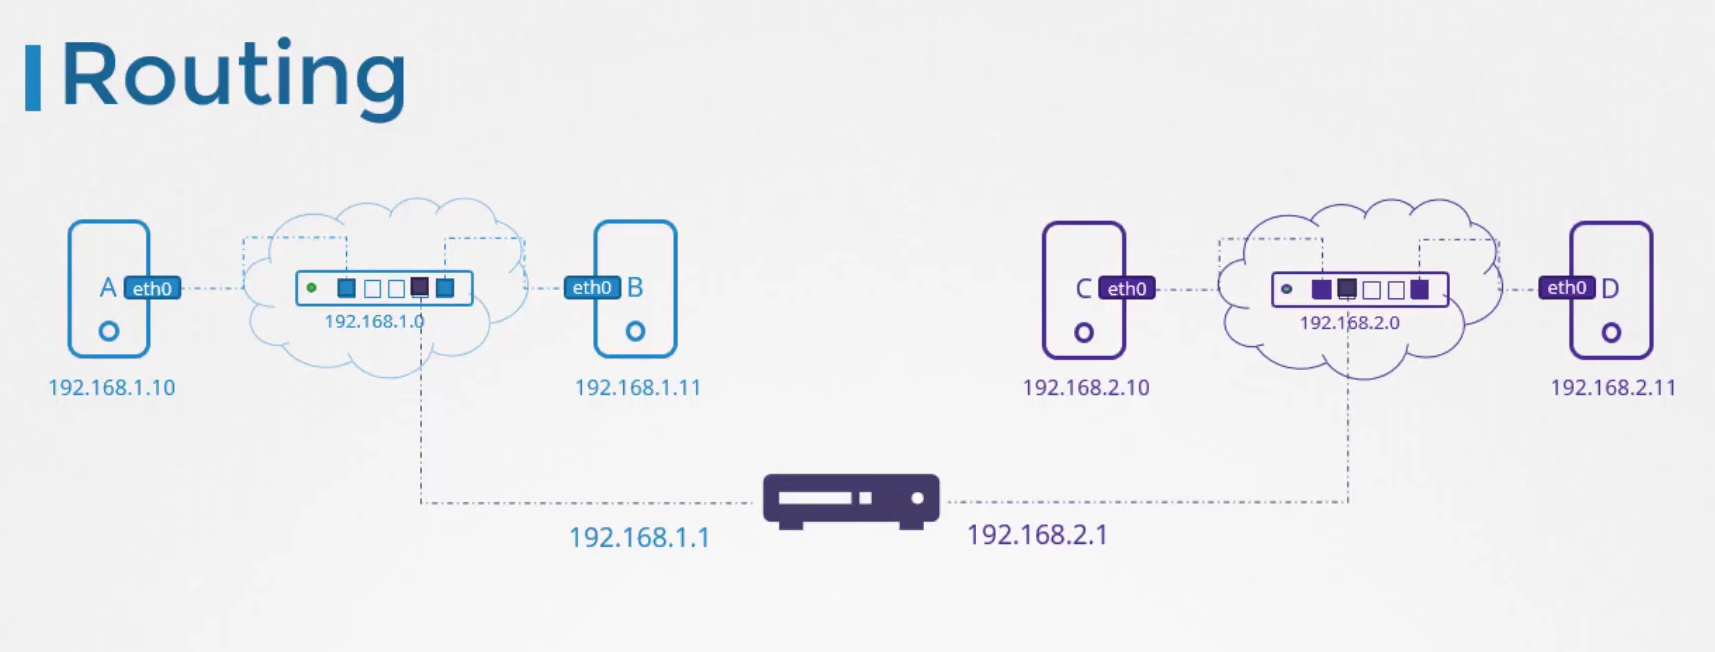 And in the second, we assign it an IP 2.1.
Now, we have a router connected to the two networks that can enable communication between them.
When system B tries to send a packet to system C, how does it know where the router is on the network to send the packet through?
The router is just another device on the network. There could be many other such devices.
That’s where we configure the systems with a gateway or a route.
If the network was a room, the gateway is a door to the outside world to the other networks or to the internet.
The systems need to know where that door is to go through that.
To see the existing routing configuration on a system, run the route command.
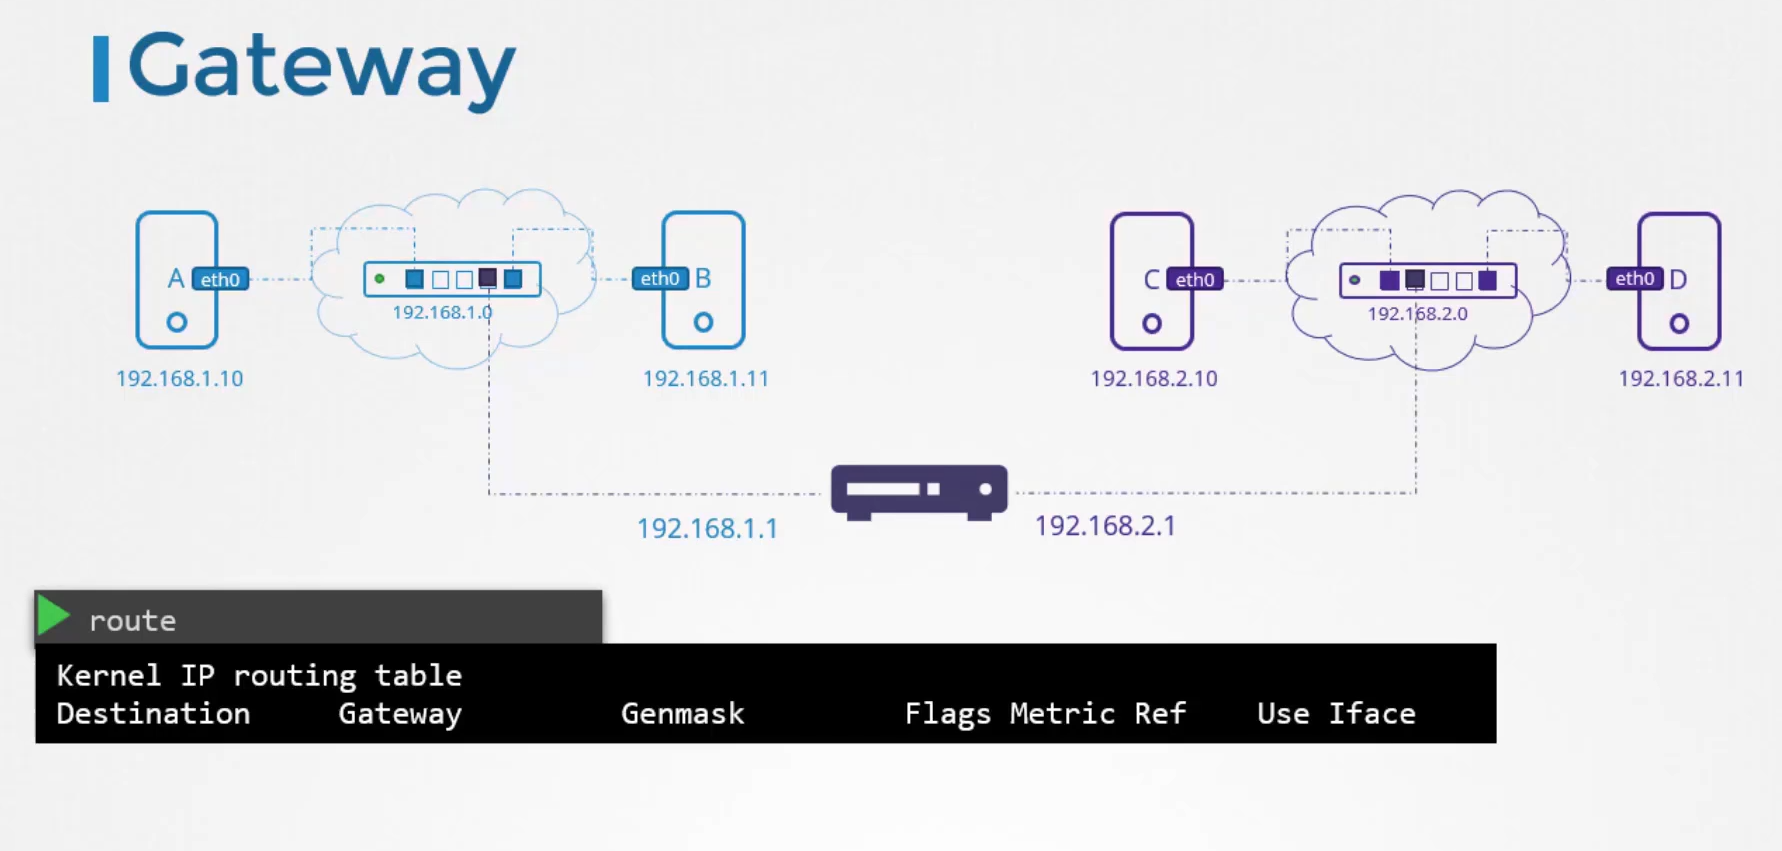 It displays the kernel’s routing table.
And within that, as you can see, there are no routing configurations as of now.
So in this condition, your system B will not be able to reach system C.
It can only reach other systems within the same network in the range 192.168.1.0.
Gateway / Route
To configure a gateway on system B
to reach the systems on network 2.0,
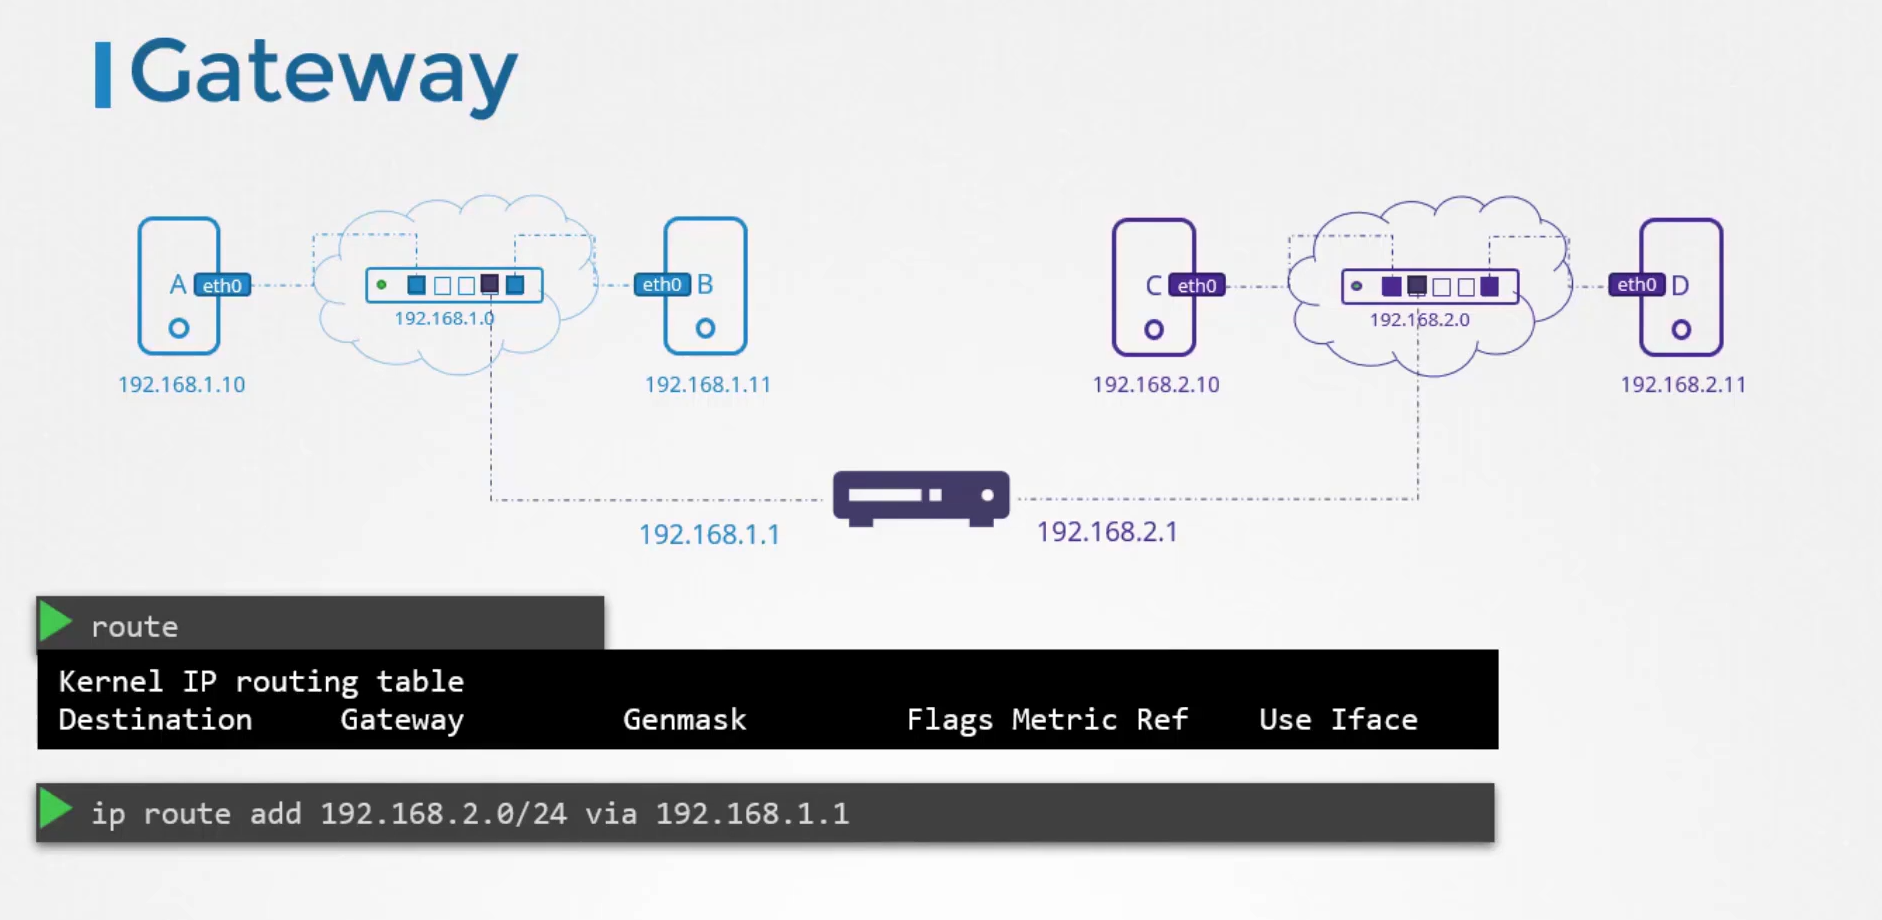 run the IP route add command
and specify that you can reach the 192.168.2.0 network
through the door or gateway at 192.168.1.1.
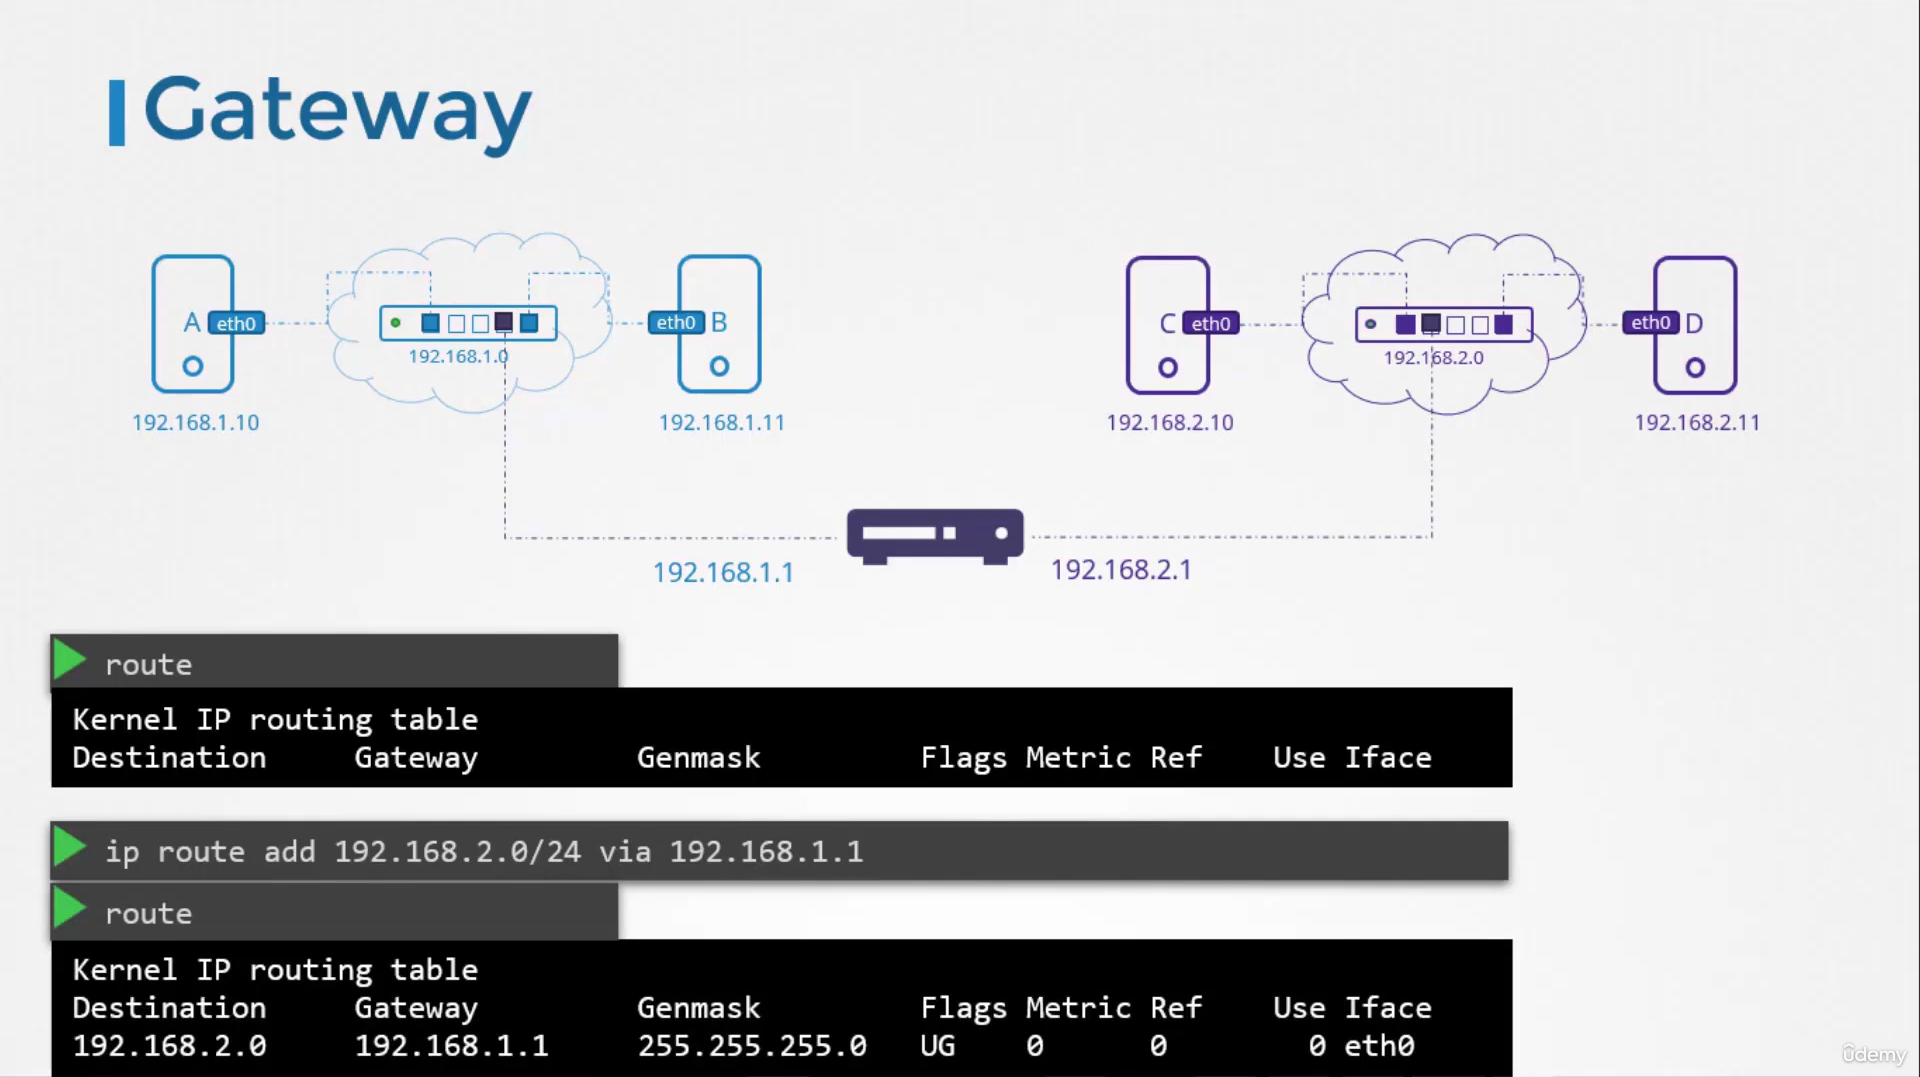 Running the route command again shows
that we have a route added
to reach the 192.168.2.0 series network
through the router.
Now, remember, this has to be configured on all the systems.
For example, if the system C is to send a packet
to system B, then you need to add a route
on system C’s routing table
to access the network at 1.0
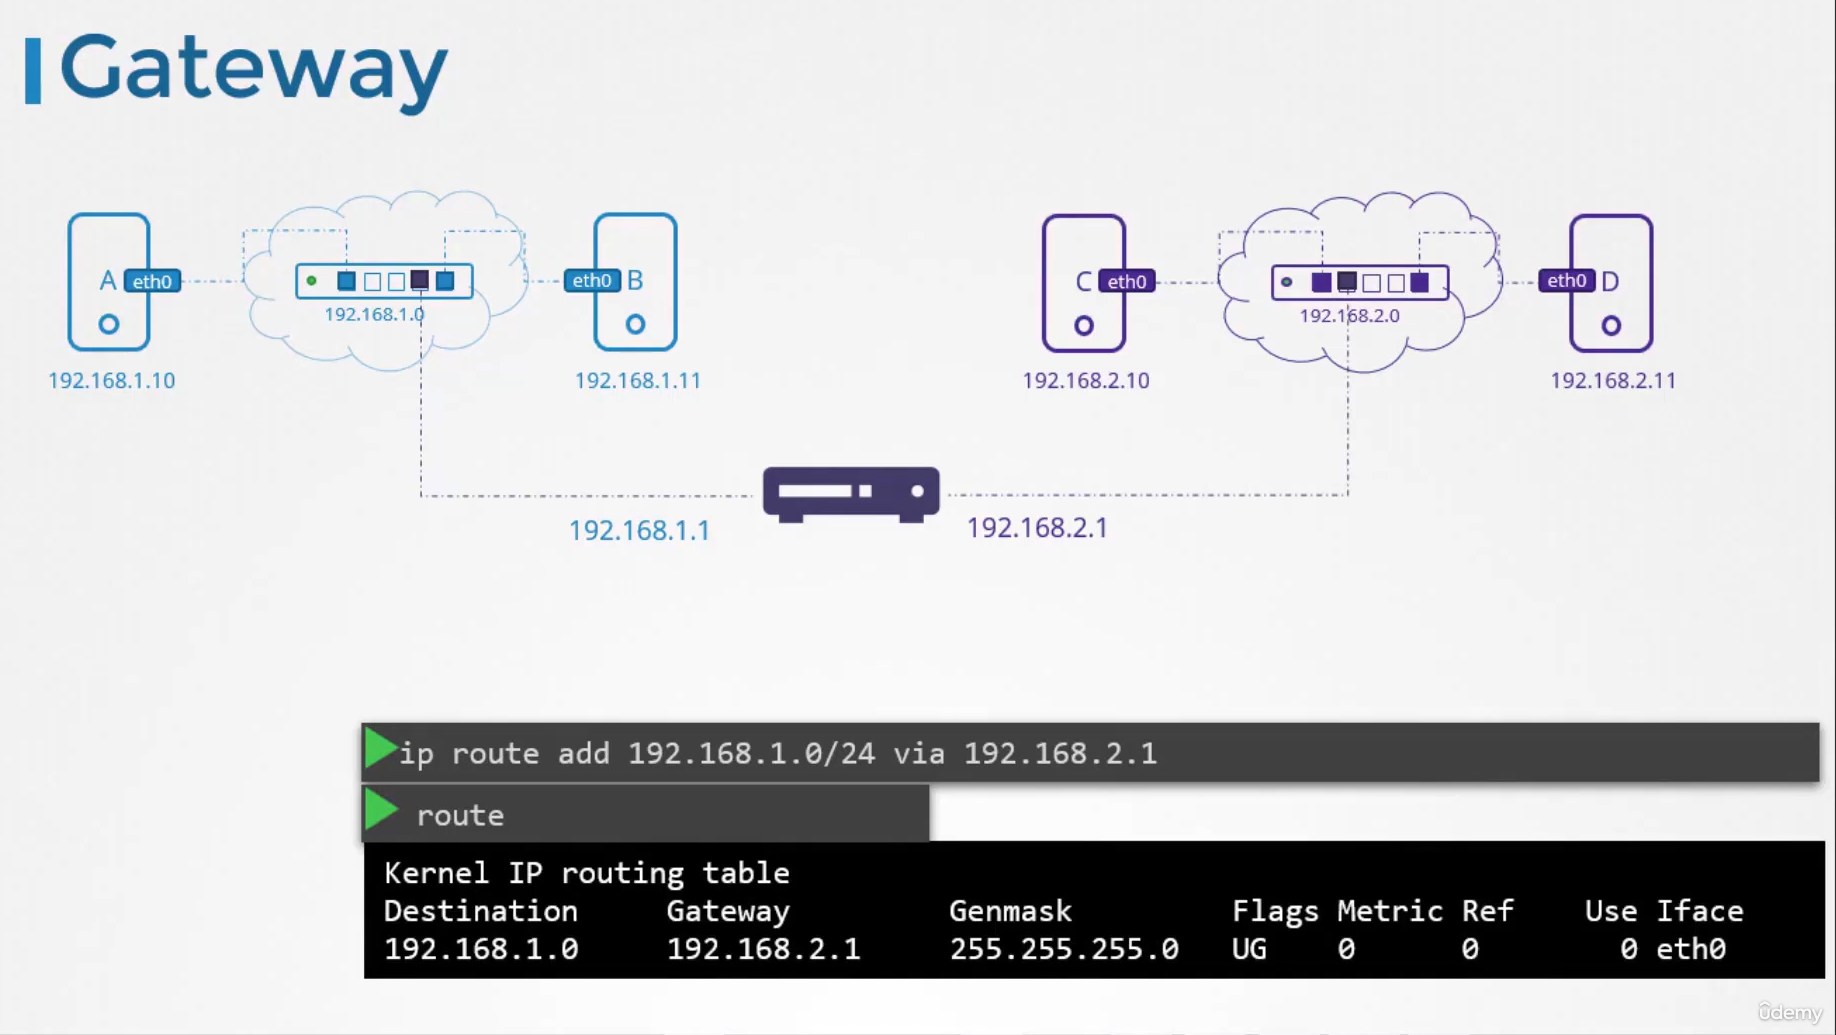 through the router configured with the IP address 2.1.
Now, suppose these systems need access to the internet.
Say they need access to Google at 172.217.194.0 network
on the internet.
So you connect the router to the internet, and then add a new route in your routing table to route all traffic to the network 172.217.194
through your router.
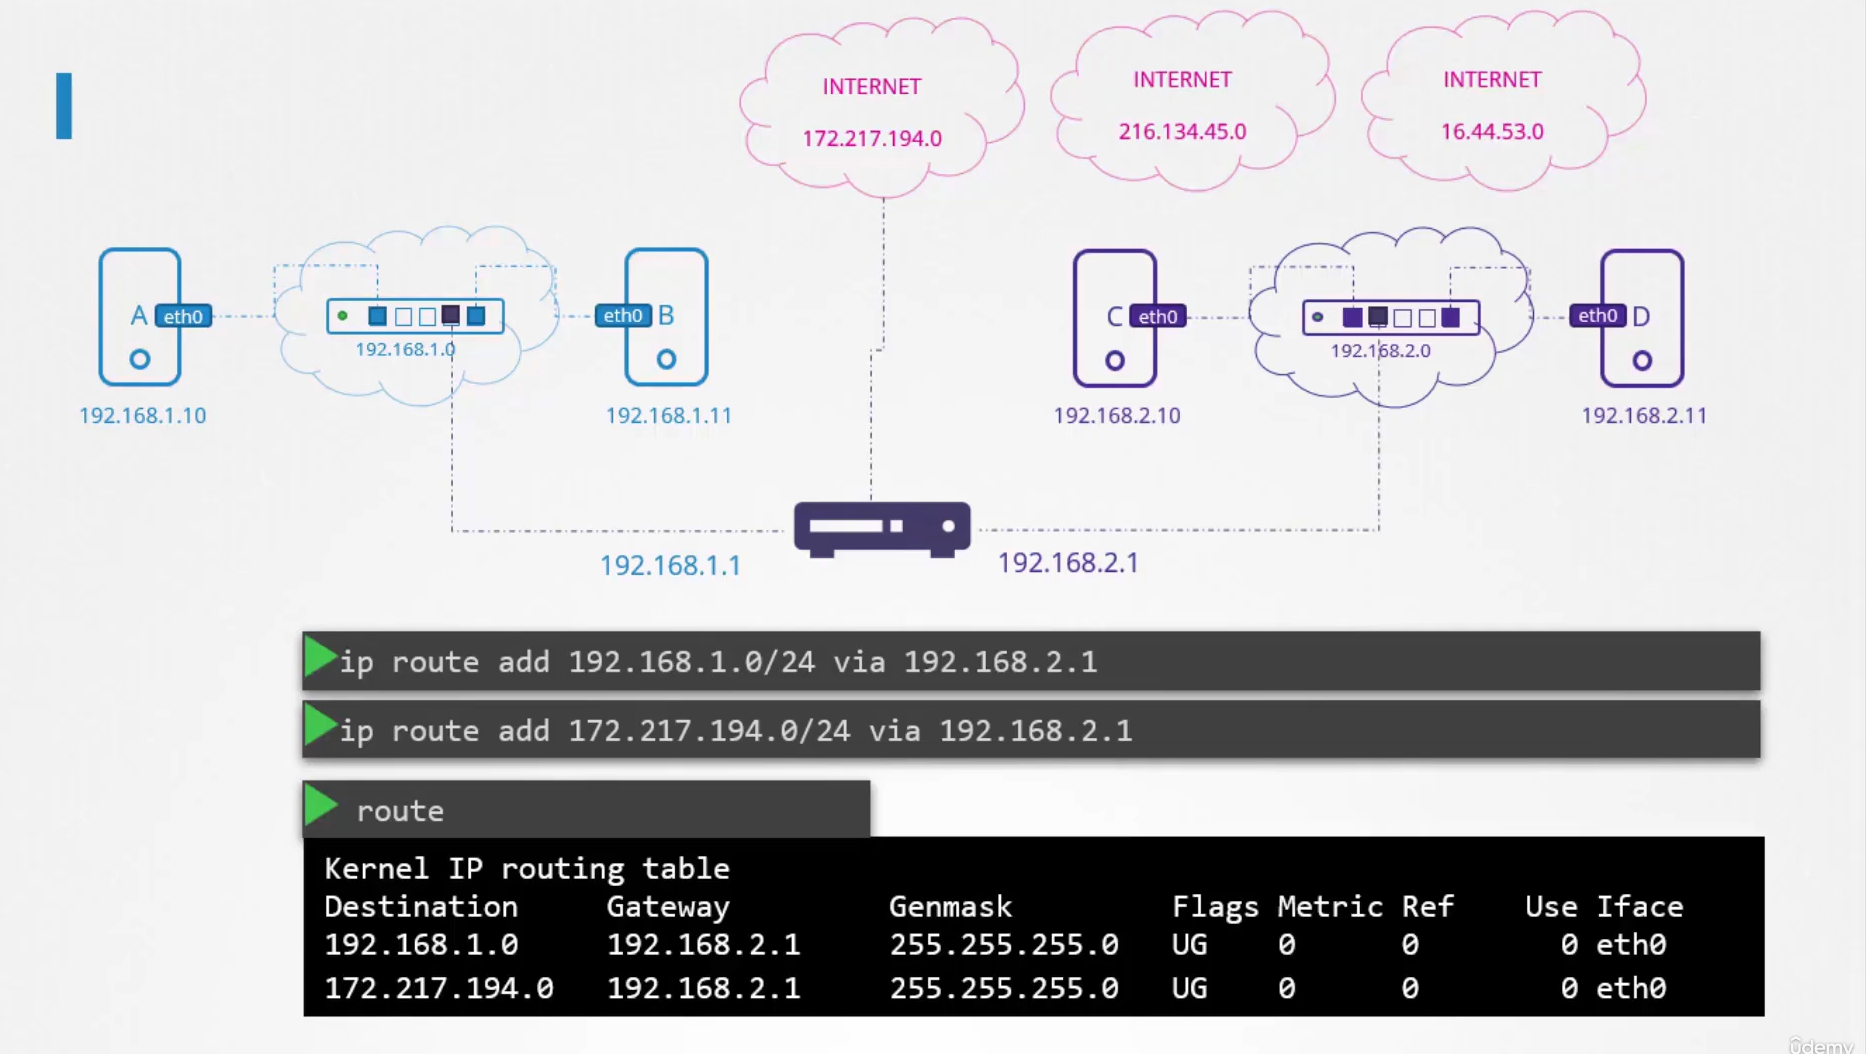 There are so many different sites on different networks
on the internet.
Instead of adding a routing table entry
for the same router’s IP address
for each of those networks,
Default Gateway
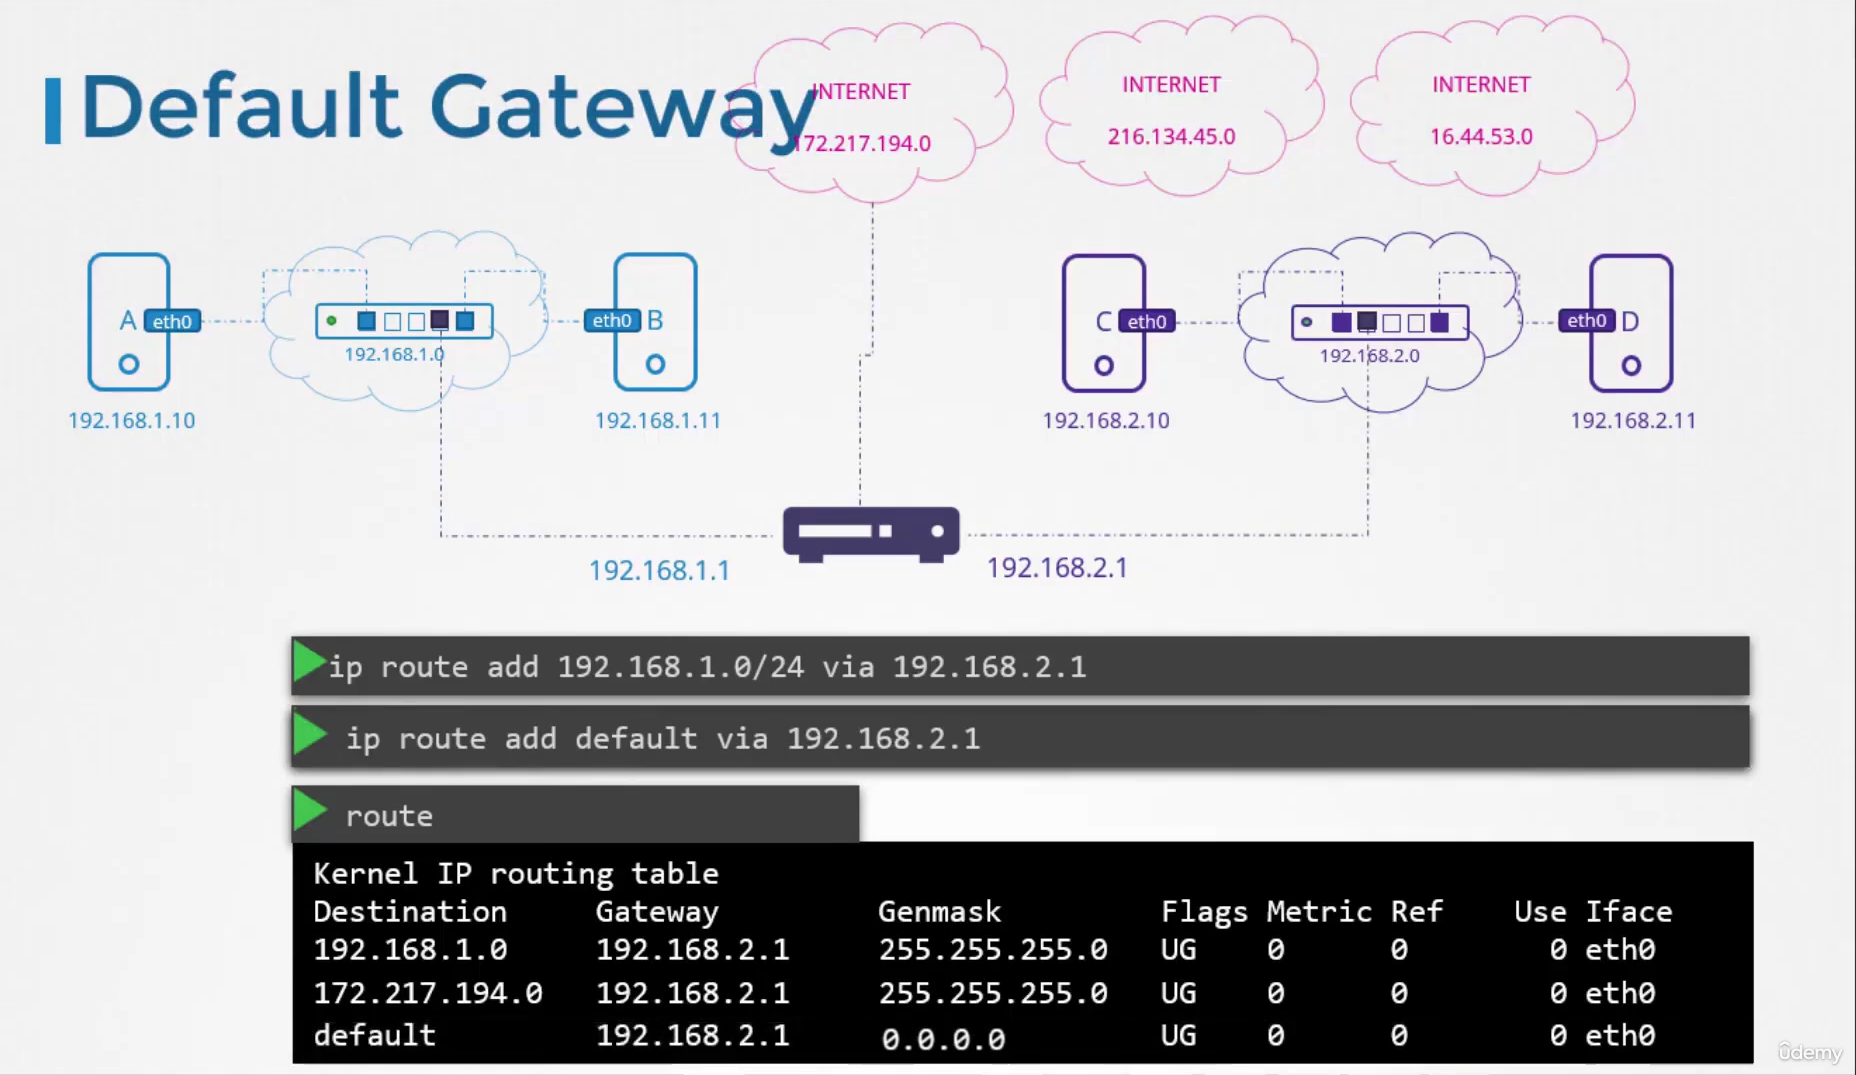 you can simply say for any network
that you don’t know a route to,
use this router as the default gateway.
This way any request to any network outside
of your existing network goes
to this particular router.
So in a simple setup like this,
all you need is a single routing table entry
with the default gateway set to the router’s IP address.
Remember, instead of the word default,
you could also say 0.0.0.0.
It means any IP destination.
Both of these lines mean the same thing.
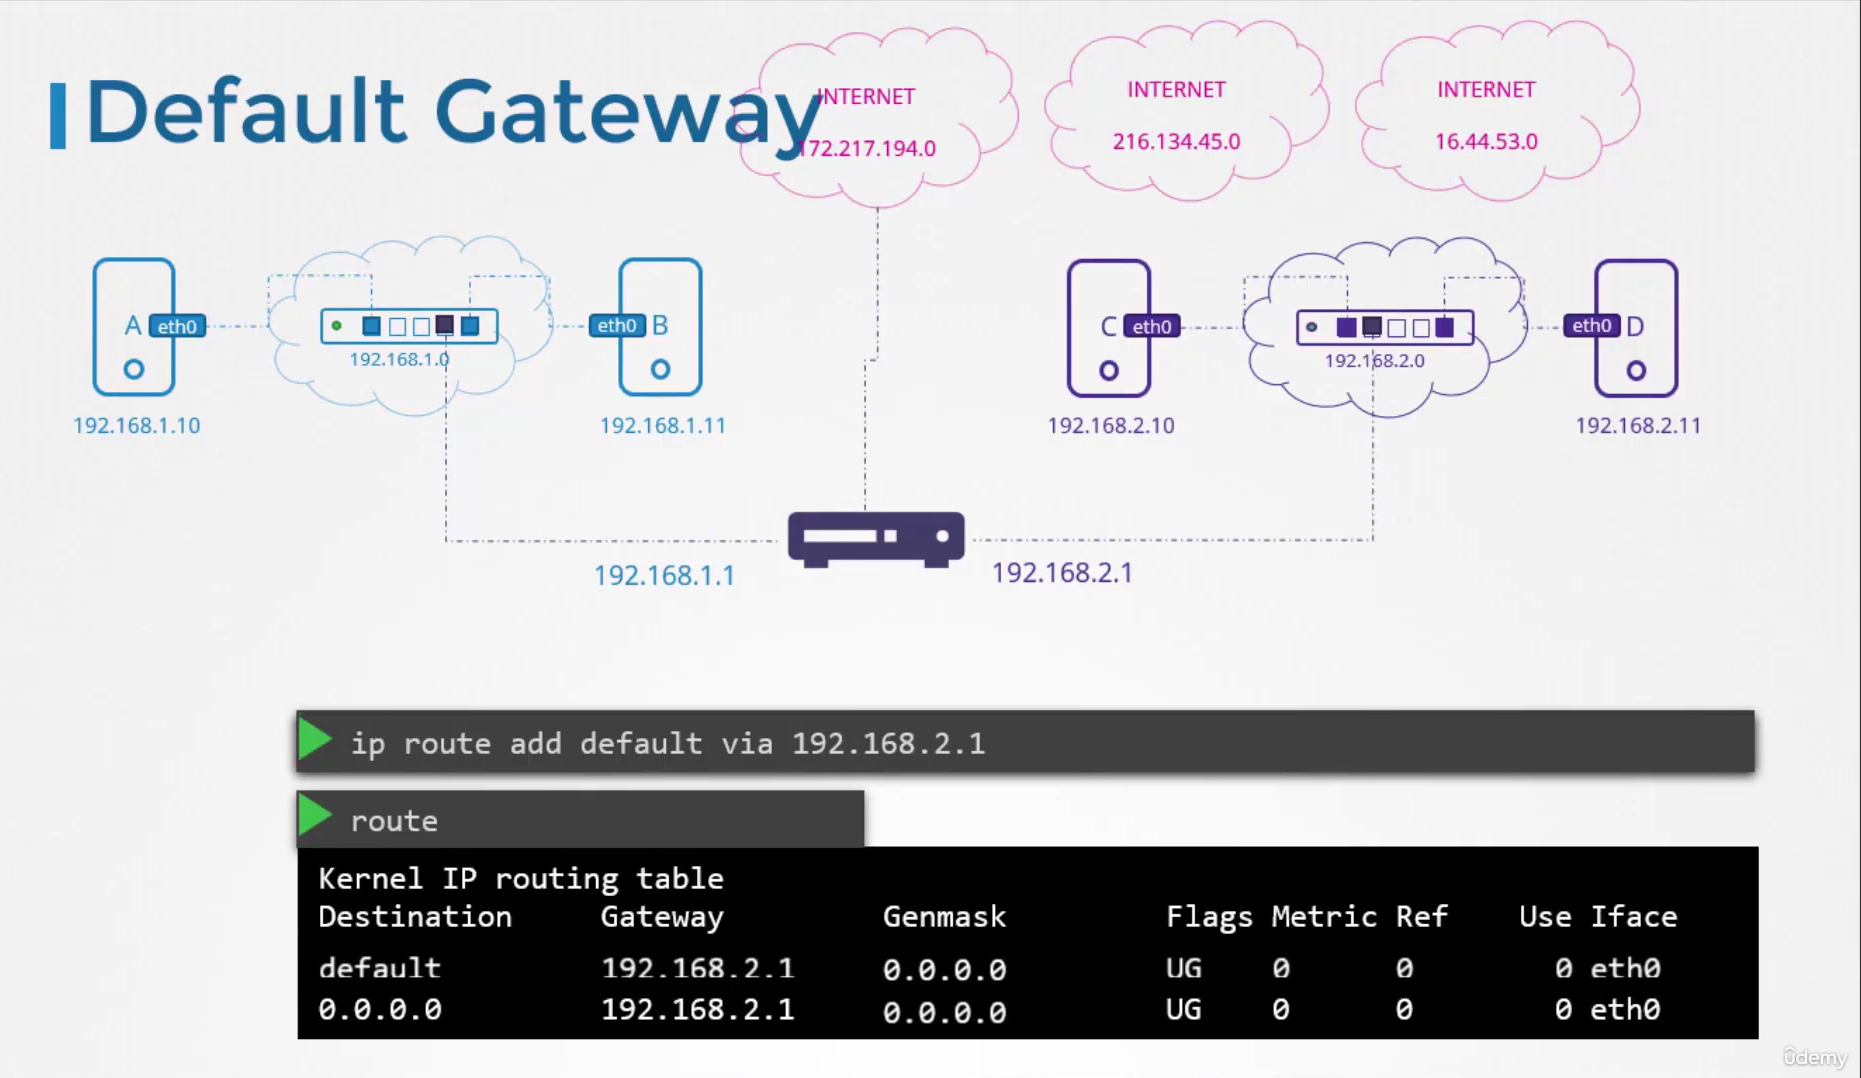
A 0.0.0.0 entry in the gateway field indicates
that you don’t need a gateway.
For example, in this case, for system C
to access any devices in the 192.168.2.0 network,
it doesn’t need a gateway
because it is in its own network.
 But say you have multiple routers in your network.
One for the internet,
another for the internal private network.
Then you will need to have two separate entries
for each network.
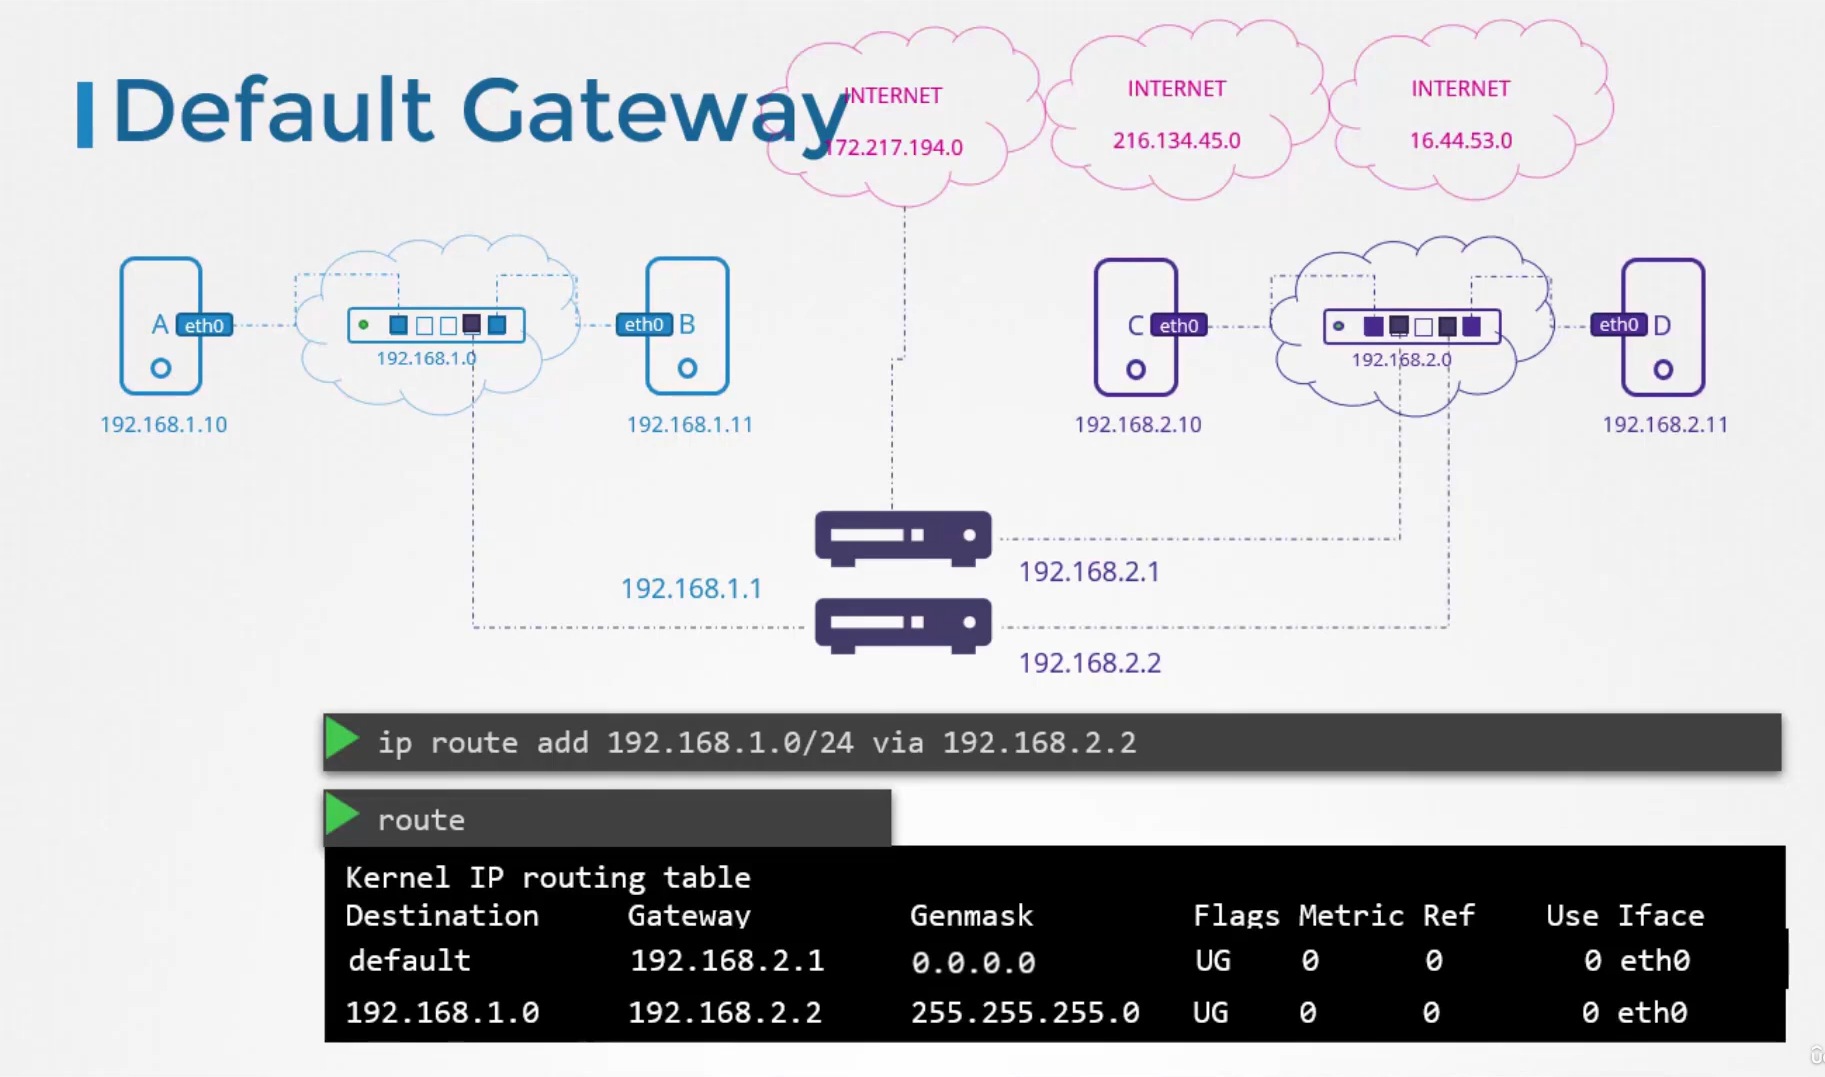 One entry for the internal private network,
and another entry with the default gateway
for all other networks, including public networks.
So if you’re having issues reaching internet
from your systems,
this routing table and the default gateway configuration
is a good place to start.
Let us now look at how we can set up a Linux host
as a router.
Let’s start with a simple setup.
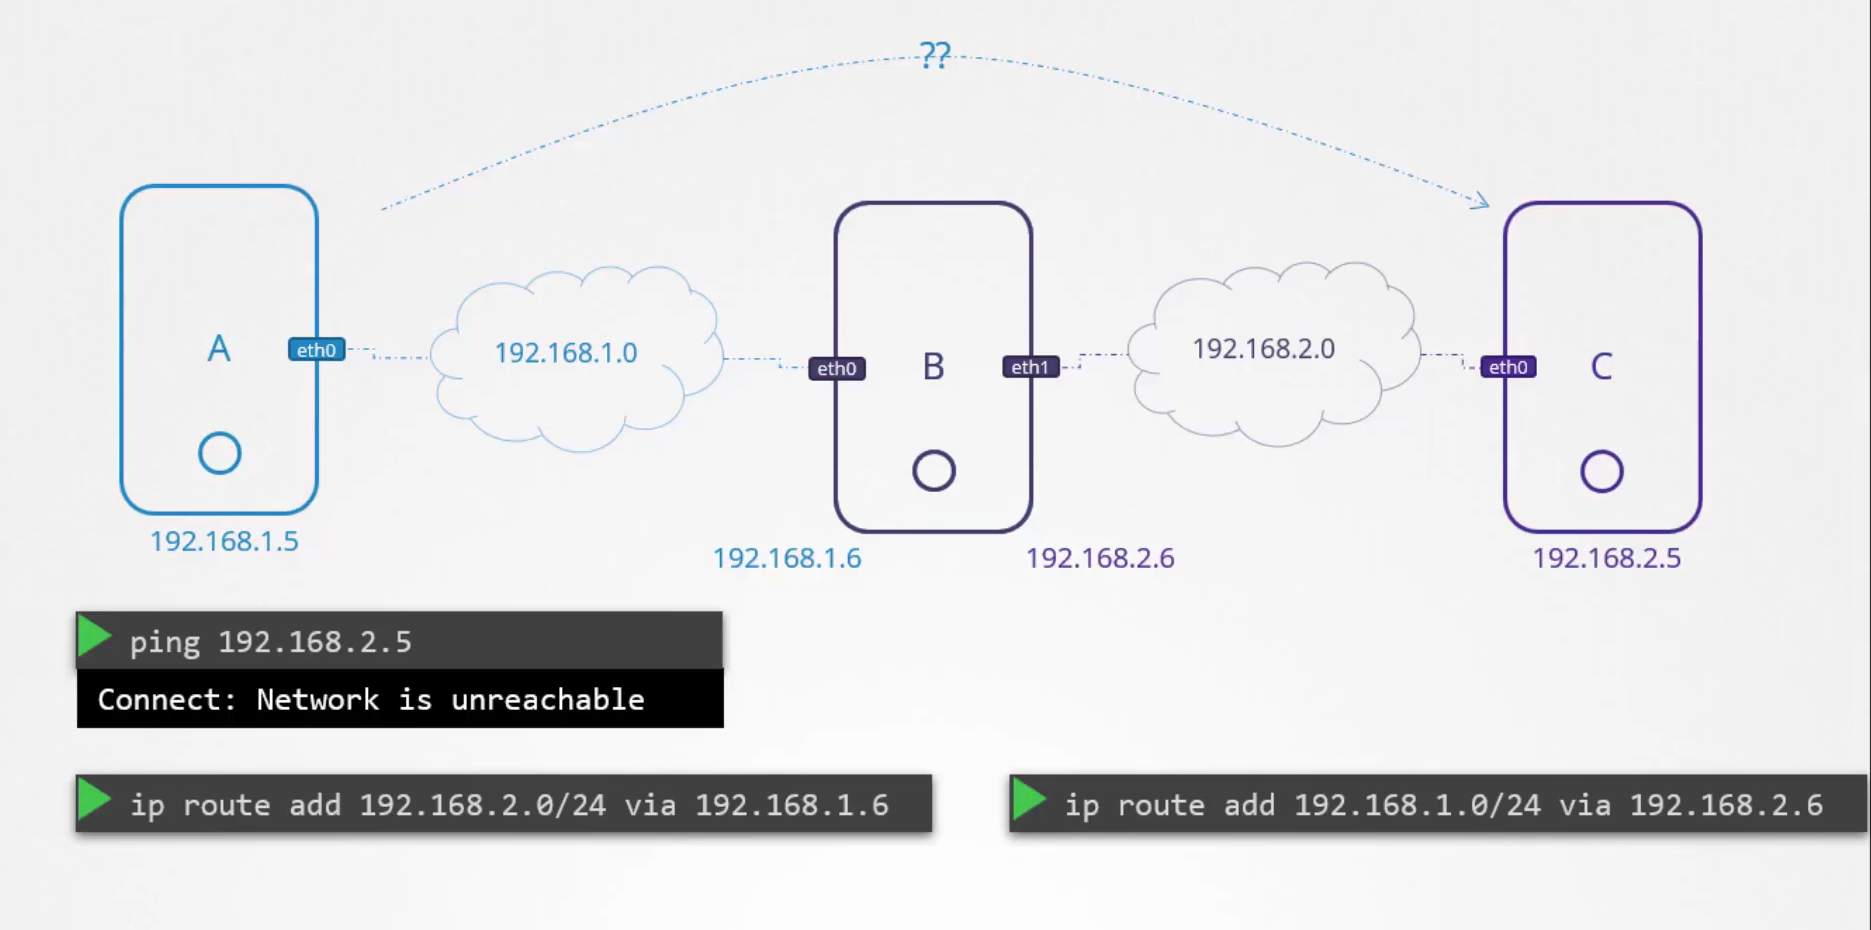
 I have three hosts, A, B and C.
A and B are connected to a network 192.168.1
and B and C to another on 192.168.2.
So host B is connected to both the networks
using two interfaces, 8.0 and 8.1.
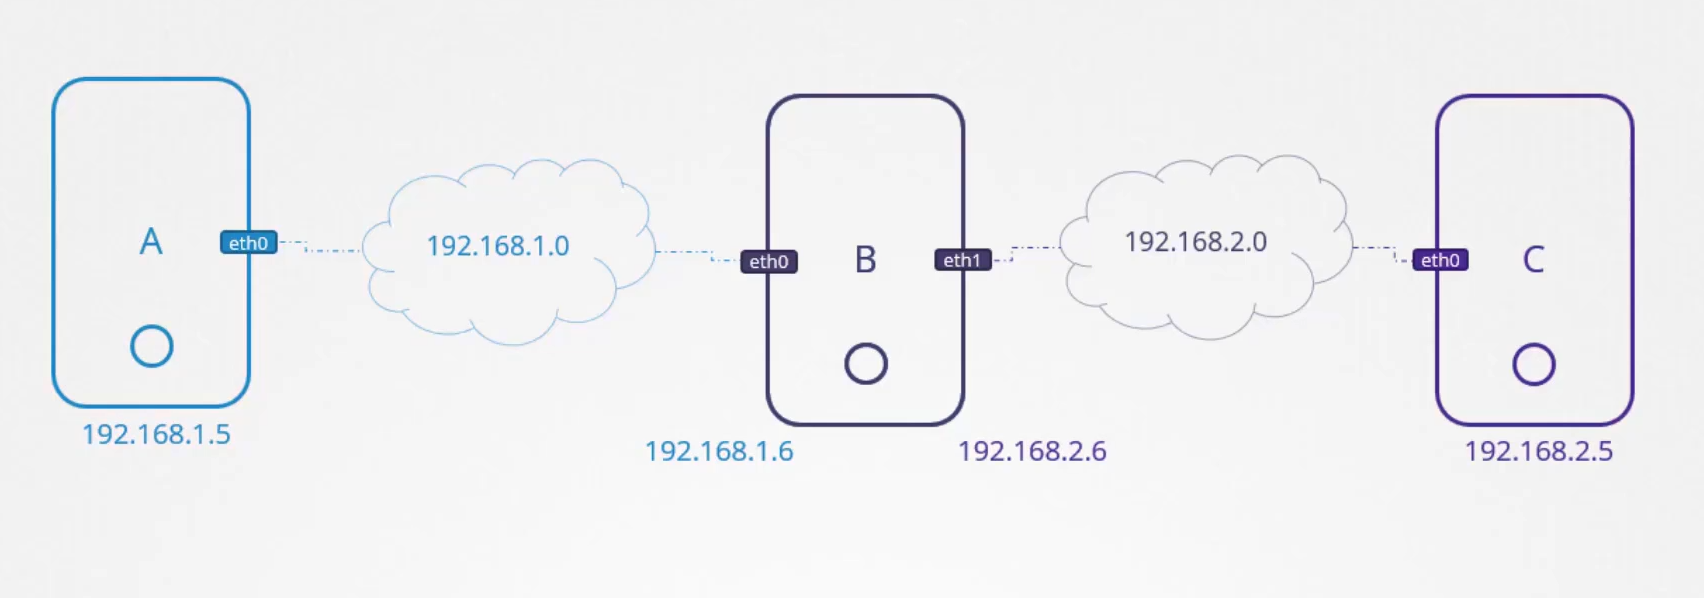 A has IP 192.168.1.5.
C has 192.168.2.5.
And B has an IP on both the networks 1.6 and 2.6.
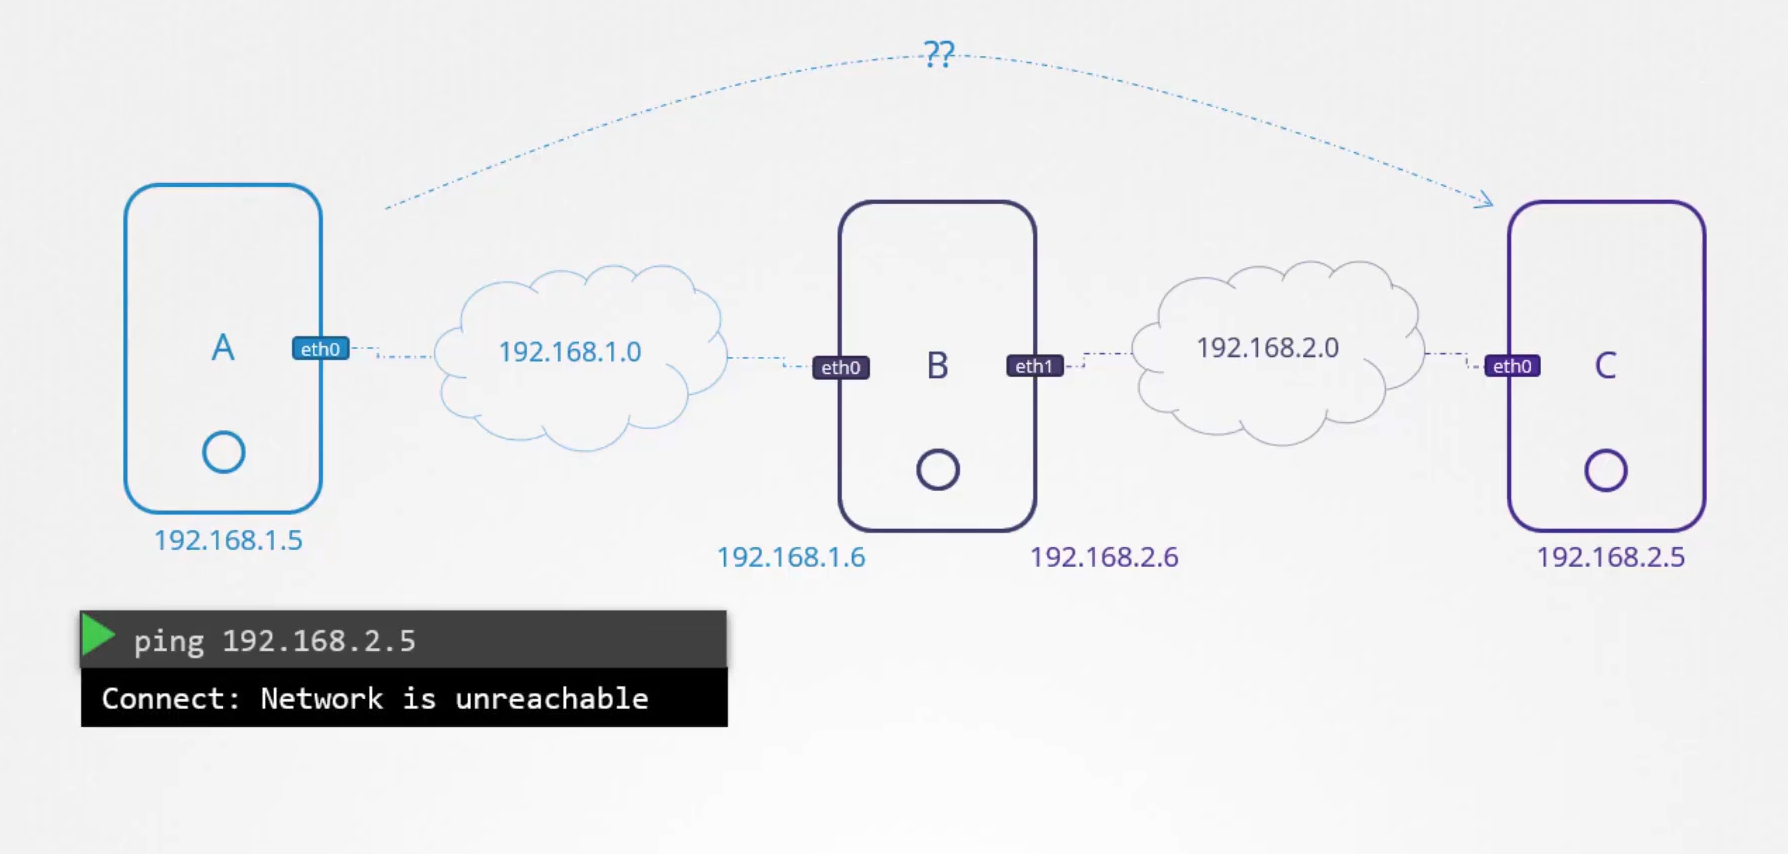 How do we get A to talk to C?
So basically, if I try to ping 2.5 from A,
it would say network is unreachable.
And by now we know why that is.
Host A has no idea how to reach a network at 192.168.2.
We need to tell host A that the door
or gateway to network two is through host B.
And we do that by adding a routing table entry.
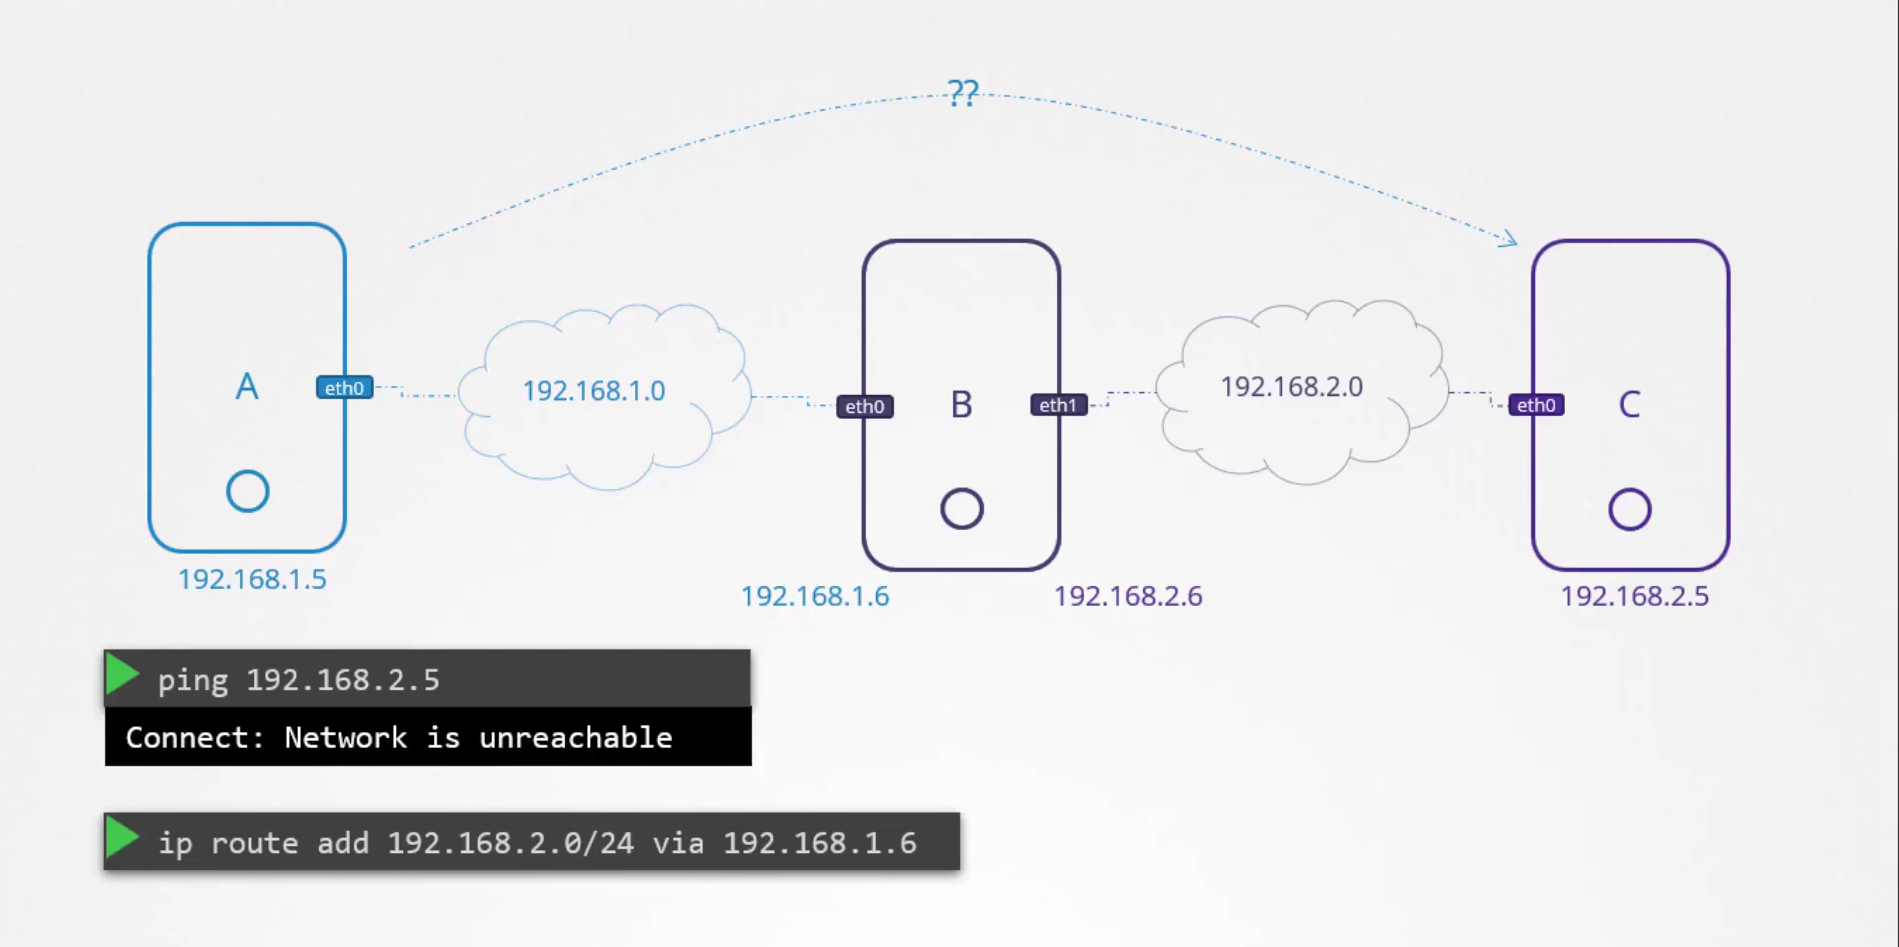 We add a route to access network 192.168.2
via the gateway 192.168.1.6.
If the packets were to get through to host C,
host C will have to send back responses to host A.
When host C tries to reach host A
at 192.168.1 network,
it would face the same issue.
So we need to let host C know
that it can reach host A through host B,
which is acting as a router.
So we add a similar entry into host C’s routing table.
 This time we say to reach network 192.168.1.0,
talk to host B at 192.168.2.6.
IP forwarding
When we try to ping now,
we no longer get the network unreachable error message.
That means our routing entries are right.
But we still don’t get any response back.
By default, in Linux,
packets are not forwarded from one interface to the next.
For example, packets received on Eth0
on host B are not forwarded to elsewhere through Eth1.
This is this way for security reasons.
For example, if you had Eth0 connected
to your private network,
and Eth1 to a public network,
we don’t want anyone from the public network
to easily send messages to the private network
unless you explicitly allow that.
But in this case, since we know
that both are private networks
and it is safe to enable communication between them,
we can allow host B to forward packets
from one network to the other.
Whether a host can forward packets
between interfaces is governed by a setting
 in this system at file proc sys net IPv4 IP_forward.
By default, the value in this file is set to zero,
meaning no forward.
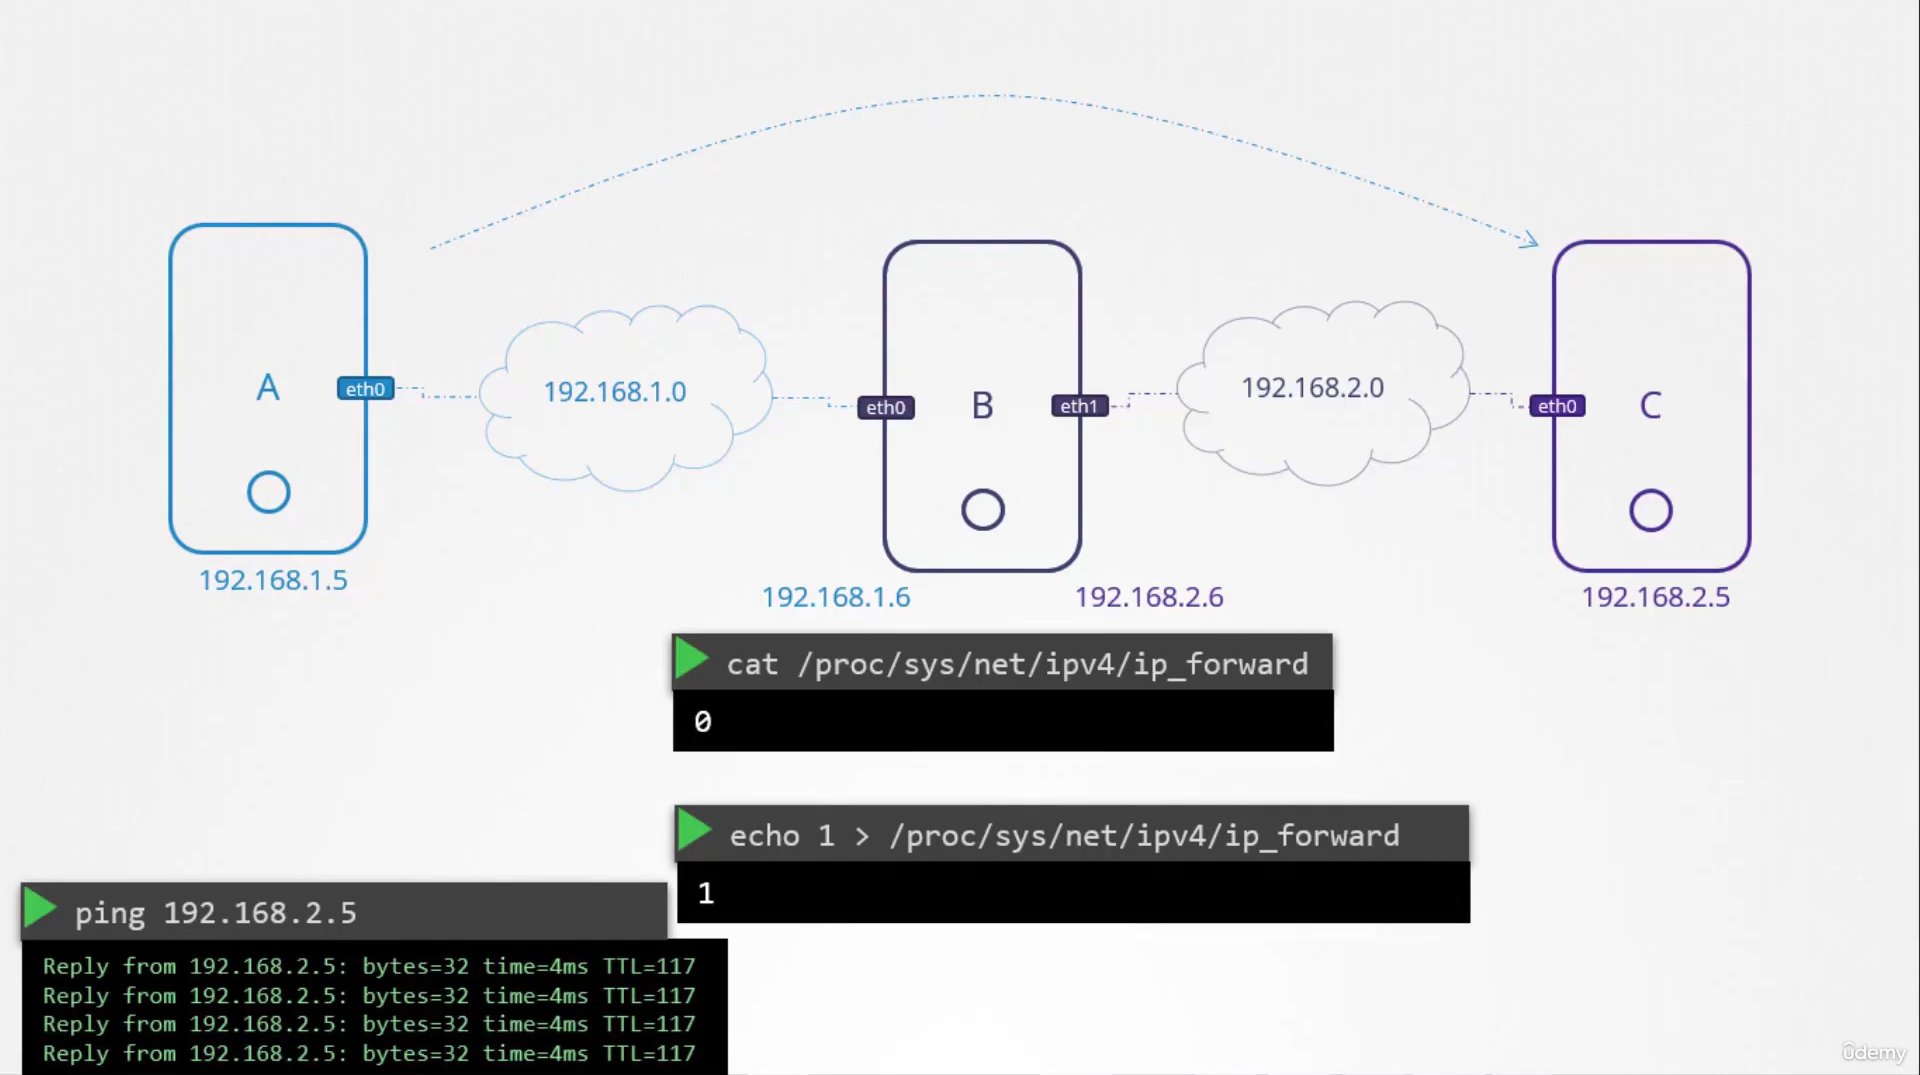 Set this to one and you should see the pings go through.
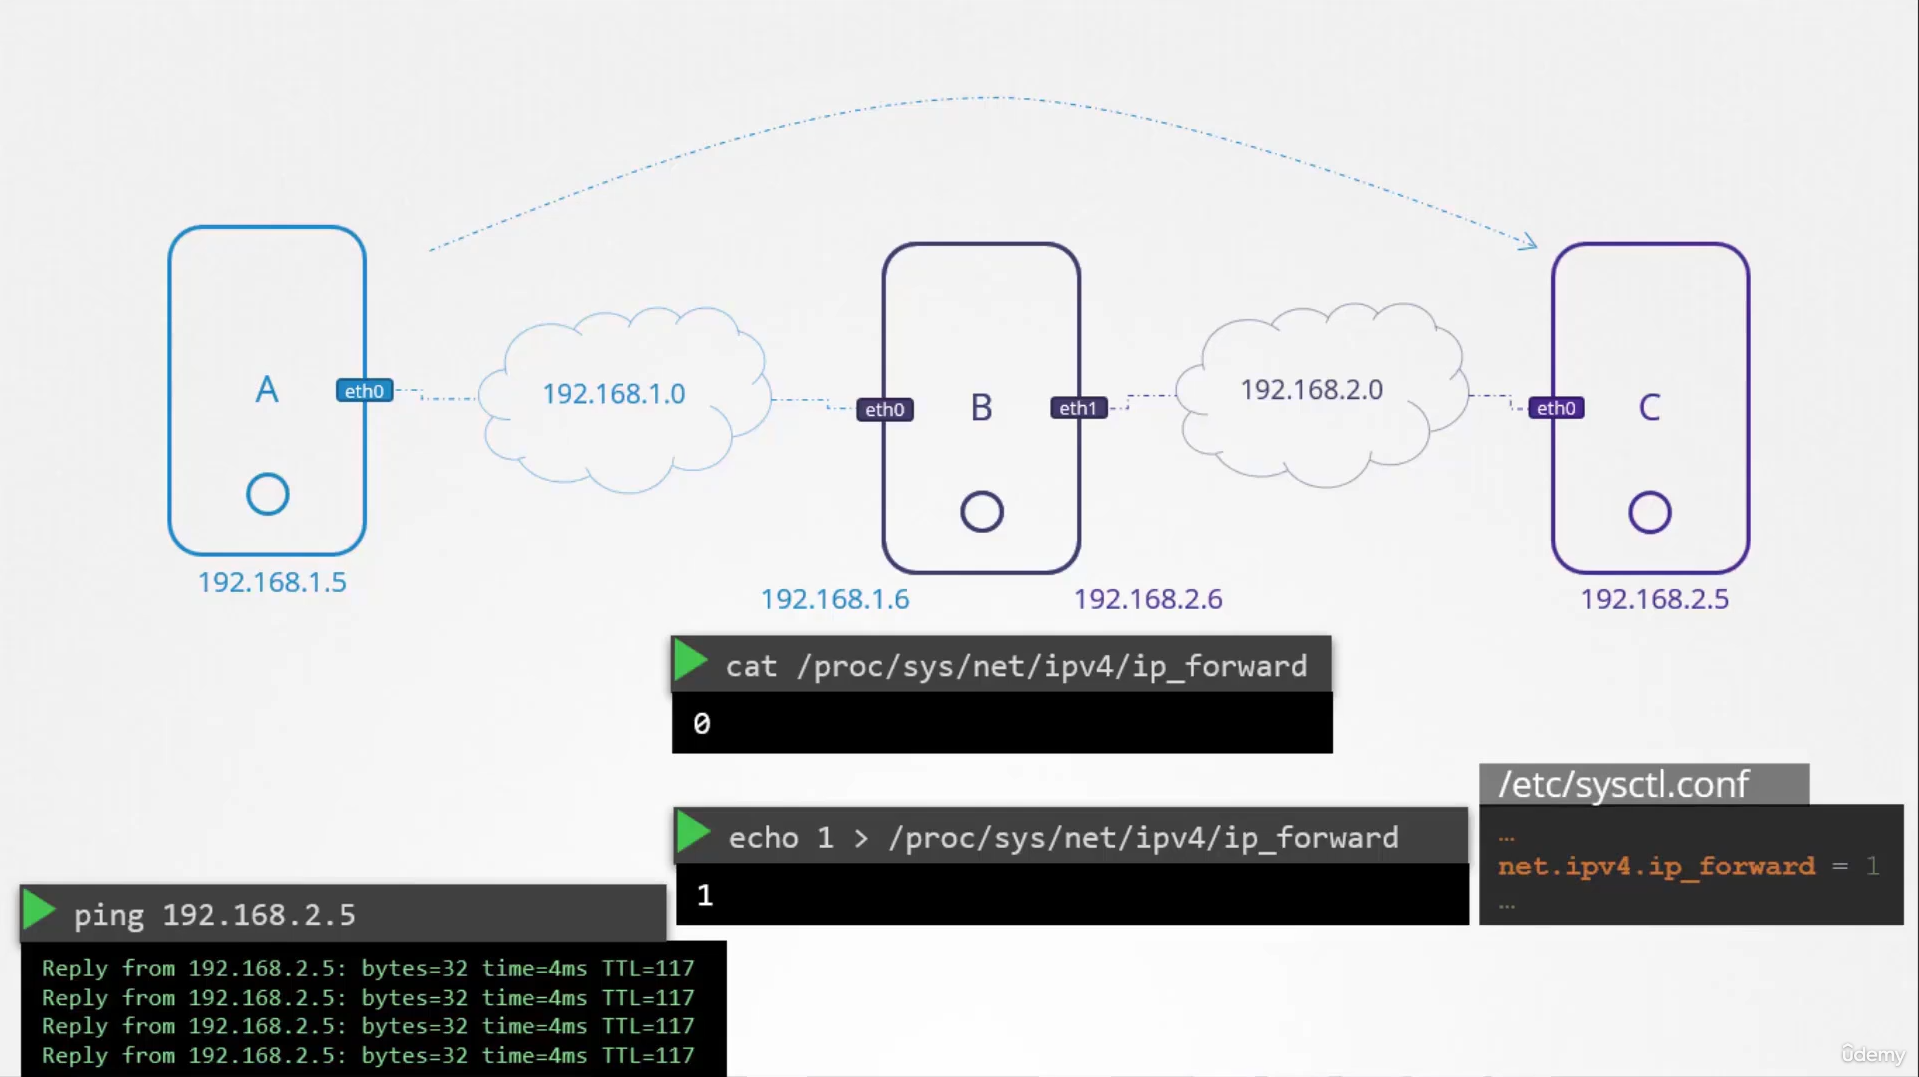
Now, remember, simply setting this value
does not persist the changes across reboots.
For that, you must modify the same value
in the etc/sys/control.conf file.
Takeaways
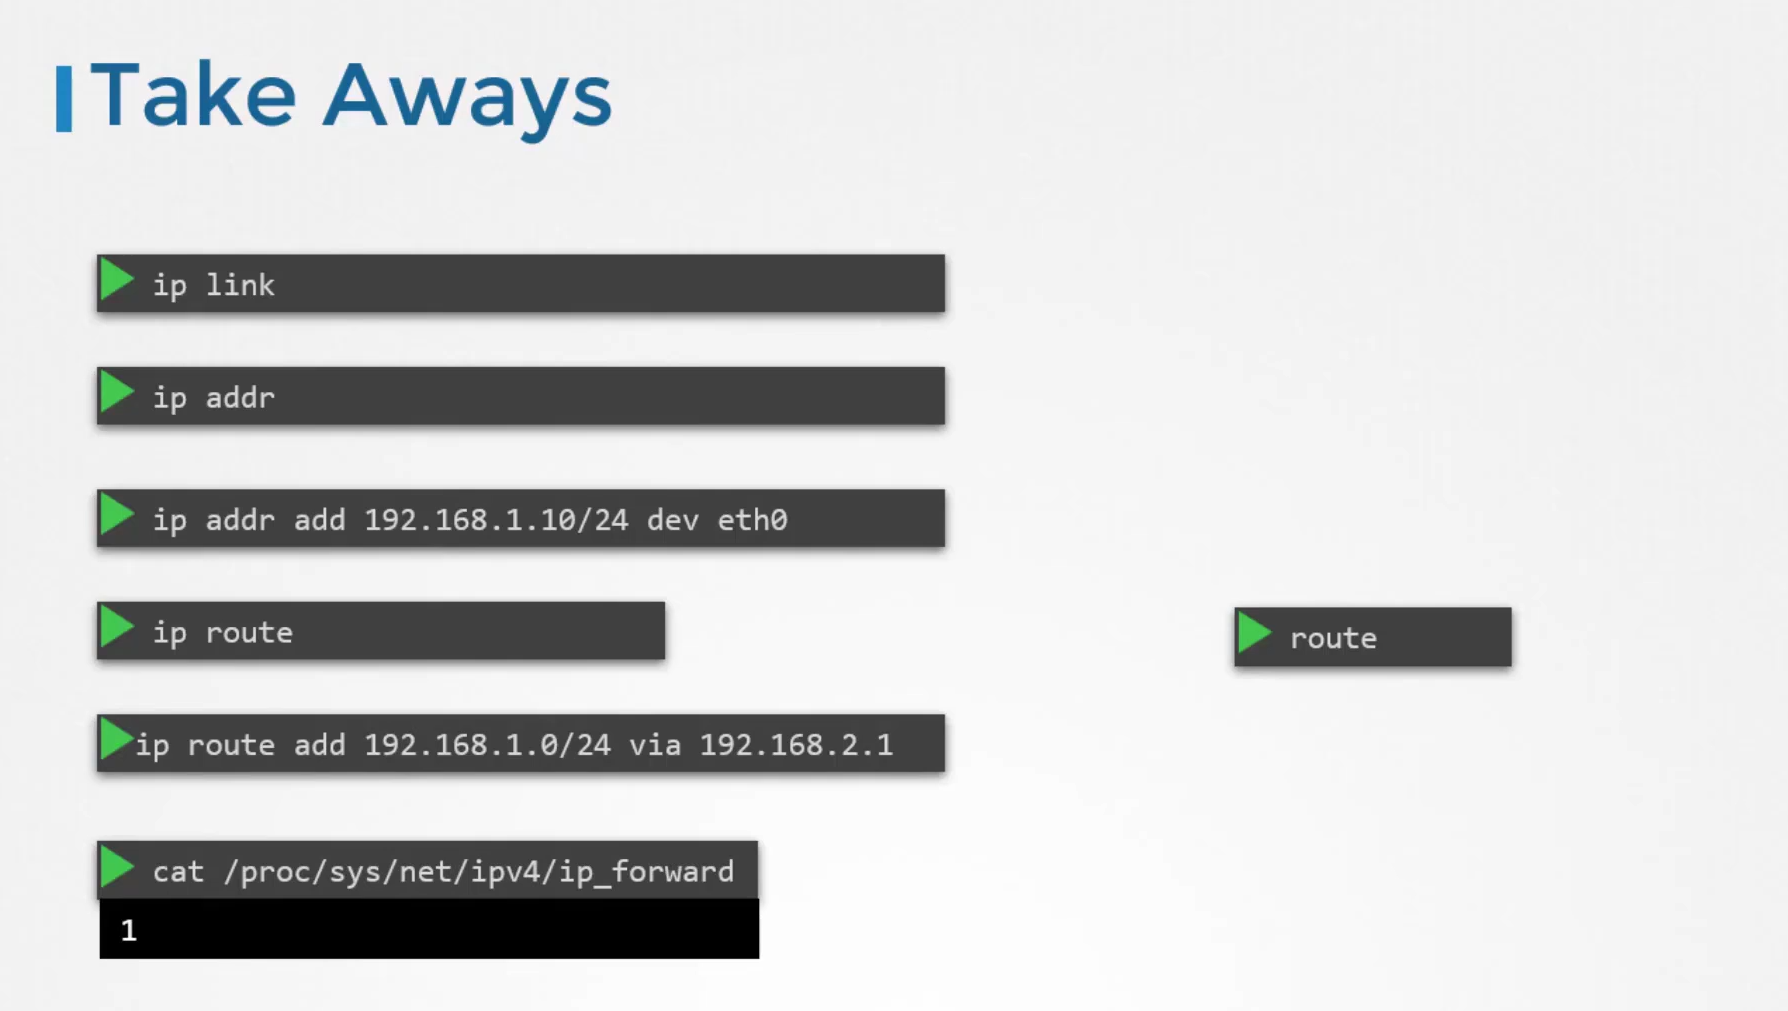
IP link is to list an modify interfaces on the host.
IP addr command is to see the IP addresses assigned
to those interfaces.
IP addr add command is used
to set IP addresses on the interfaces.
Now, remember, changes made using these commands
are only valid till a restart.
If you want to persist these changes,
you must set them in the etc/network/interfaces file.
IP route or simply the route command
is used to view the routing table.
And IP route add command
is used to add entries into the routing table.
And finally, remember, the command to check
if IP forwarding is enabled on a host,
if you’re working with a host configured as a router.