Persistent Volumes Persistent Volumes Claims Configure Applications with persistent volumes Access Modes for Volumes Kubernetes Storage Object

When you install Docker on a system
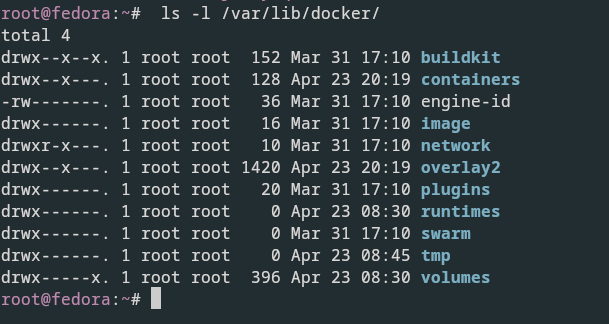
Docker File System
it creates this folder structure at /var/lib/docker/. It have multiple folder under it called AUFS containers, image volumes, et cetera.

-
This is where docker stores all its data by default.
-
When I say data, I mean files related to images and containers running on the Docker host.
-
For example, All files related to containers are stored under the containers folder, and the files related to images are stored under the image folder.
-
Any volumes created by the docker containers are created under the volumes folder.
-
Well, don’t worry about that for now.
-
We will come back to that in a bit.
-
For now, let’s just understand where Docker stores its files and in what format.
-
So how exactly does Dockers store the files of an image and a container?
-
To understand that we need to understand Docker’s layered architecture.
-
When Docker builds images it builds these in a layered architecture.
Docker Layered Architecture
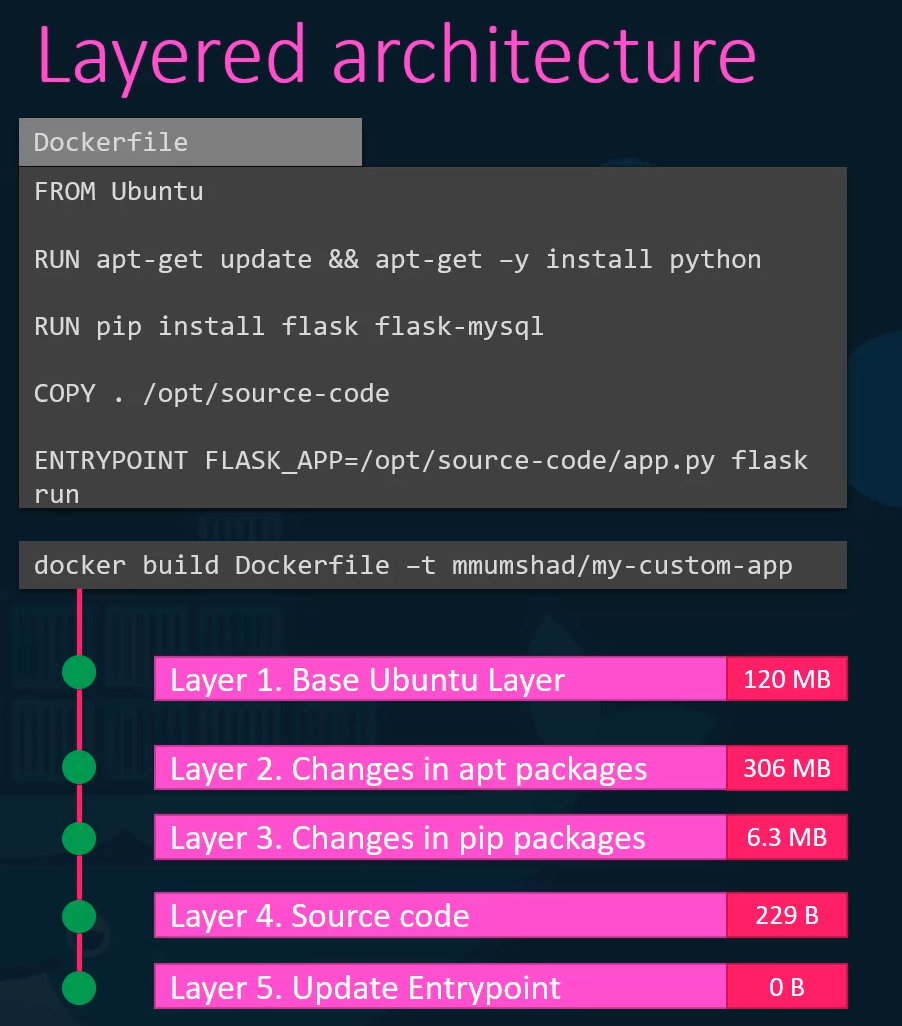
- Each line of instruction in the Docker file creates a new layer in the Docker image with just the changes from the previous layer.
- For example, the first layer is a base Ubuntu operating system, followed by the second instruction that creates a second layer which installs all the APT packages and then the third instruction creates a third layer which with the Python packages.
- Followed by the fourth letter that copies the source code over and then finally the fifth layer that updates the entry point of the image.
- Since each layer only stores the changes from the previous layer, it is reflected in the size as well.
- If you look at the base Ubuntu image it is around 120 megabytes in size.
- The APT packages that I install is around 300 mb and then the remaining layers are small.
- To understand the advantages of this layered architecture let’s consider a second application.
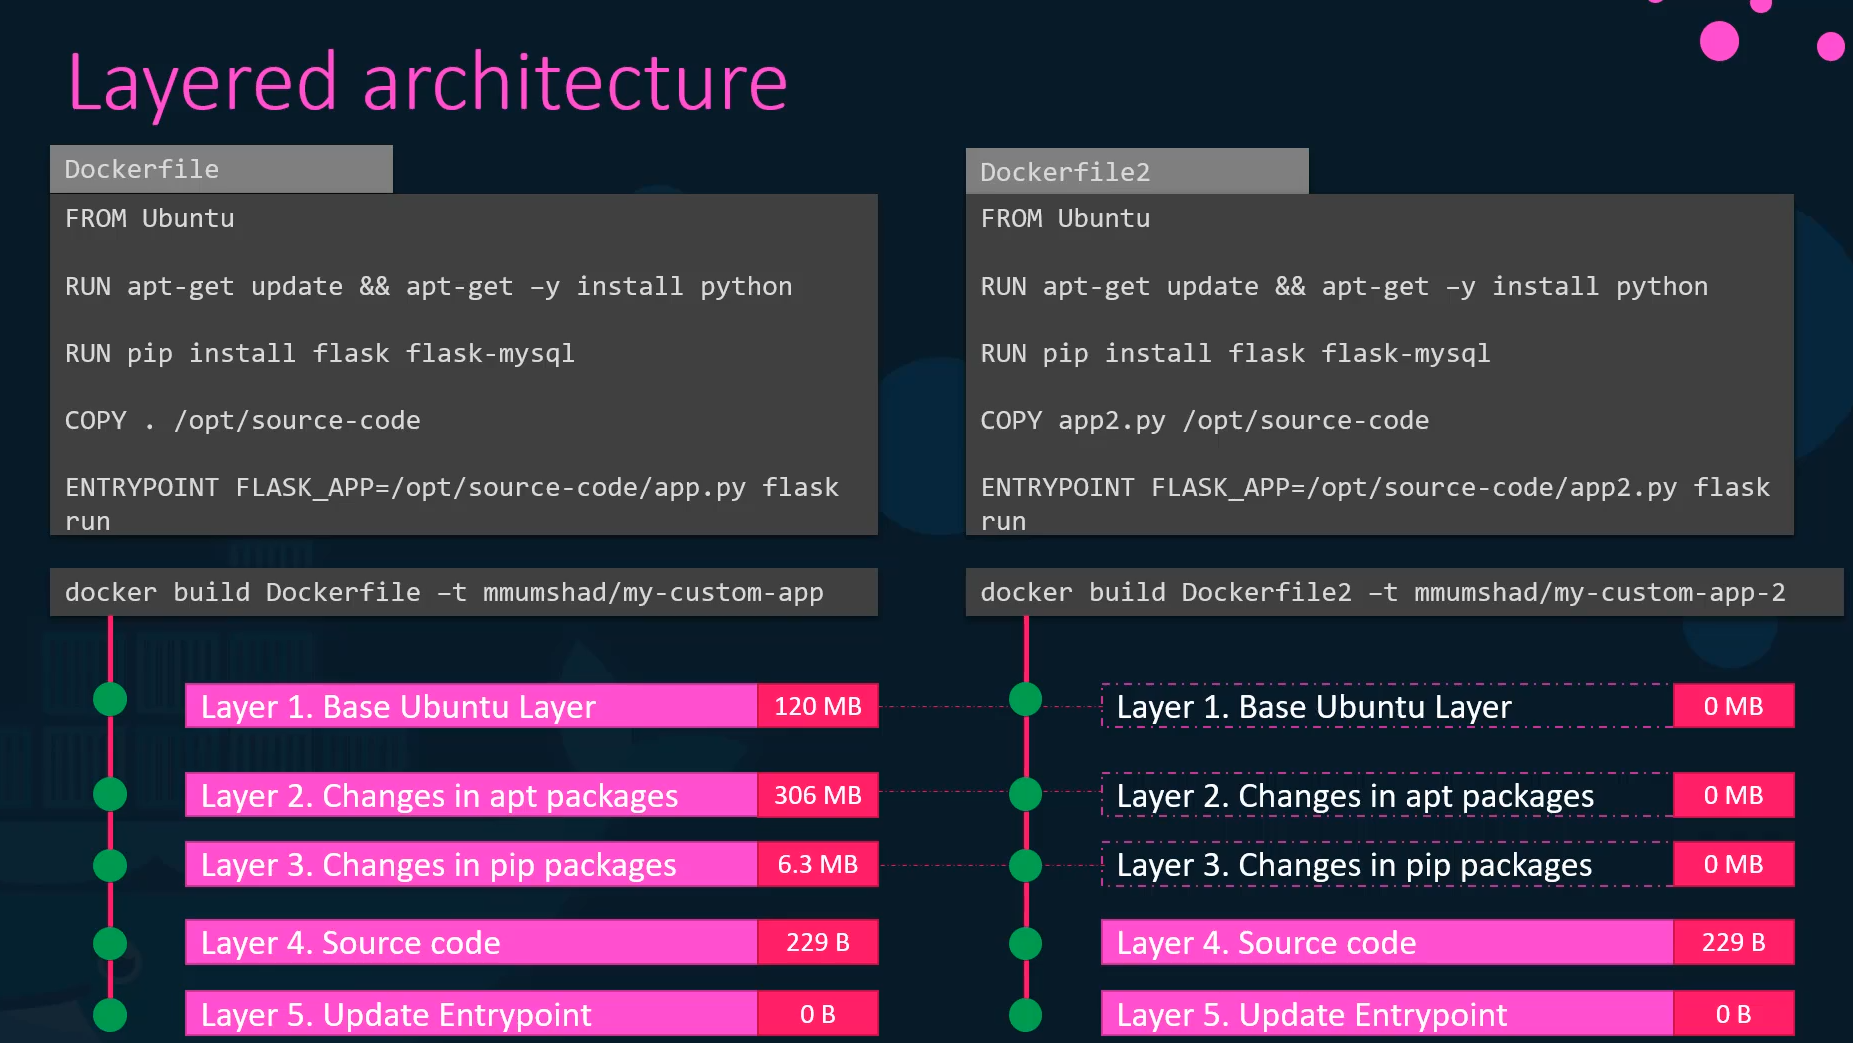
- This application has a different docker file
- but it’s very similar to our first application as in it uses the same base image as Ubuntu, uses the same Python and flask dependencies,
- but uses a different source code to create a different application. and so a different entry point as well.
- When I run the Docker build command to build a new image for this application, since the first three layers
- of both the applications are the same, Docker is not going to build the first three layers.
- Instead, it reuses the same three layers it built for the first application from the cache.
- And only creates the last two layers with the new sources and the new entry point.
- This way Docker builds images faster and efficiently saves disc space.
- This is also applicable if you were to update your application code.
- Whenever you update your application code such as the app dot py in this case,
- Docker simply reuses all the previous layers from cache and quickly rebuilds the application image by updating the latest source code.
- Thus saving us a lot of time during rebuilds and updates.
- Let’s rearrange the layers bottom up so we can understand it better.
Copy on Write (CoW)

- At the bottom, we have the base Ubuntu layer then the packages, then the dependencies and then the source code of the application, and then the entry point.
- All of these layers are created when we run the docker build command to form the final docker image.
- So all of these are the docker image layers.
- Once the build is complete, you cannot modify the contents of these layers.
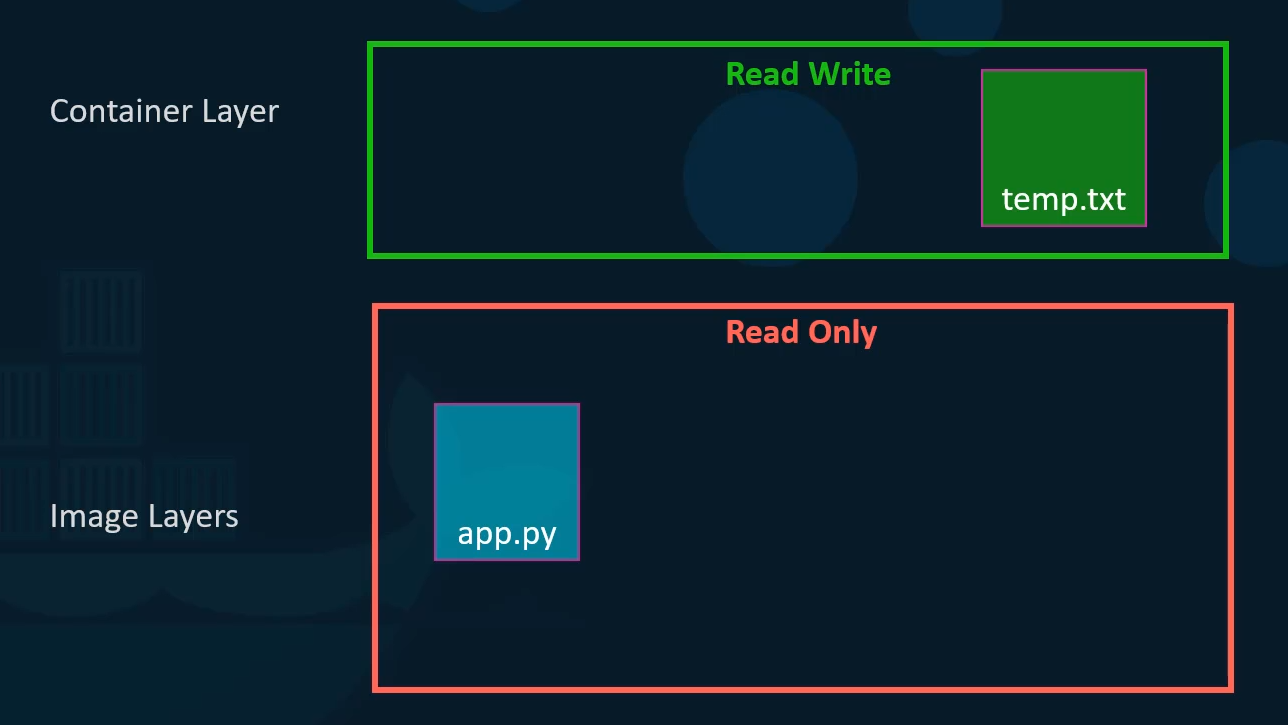
- And so they are read only and you can only modify them by initiating a new build.
- When you run a container based off of this image using the docker run command,
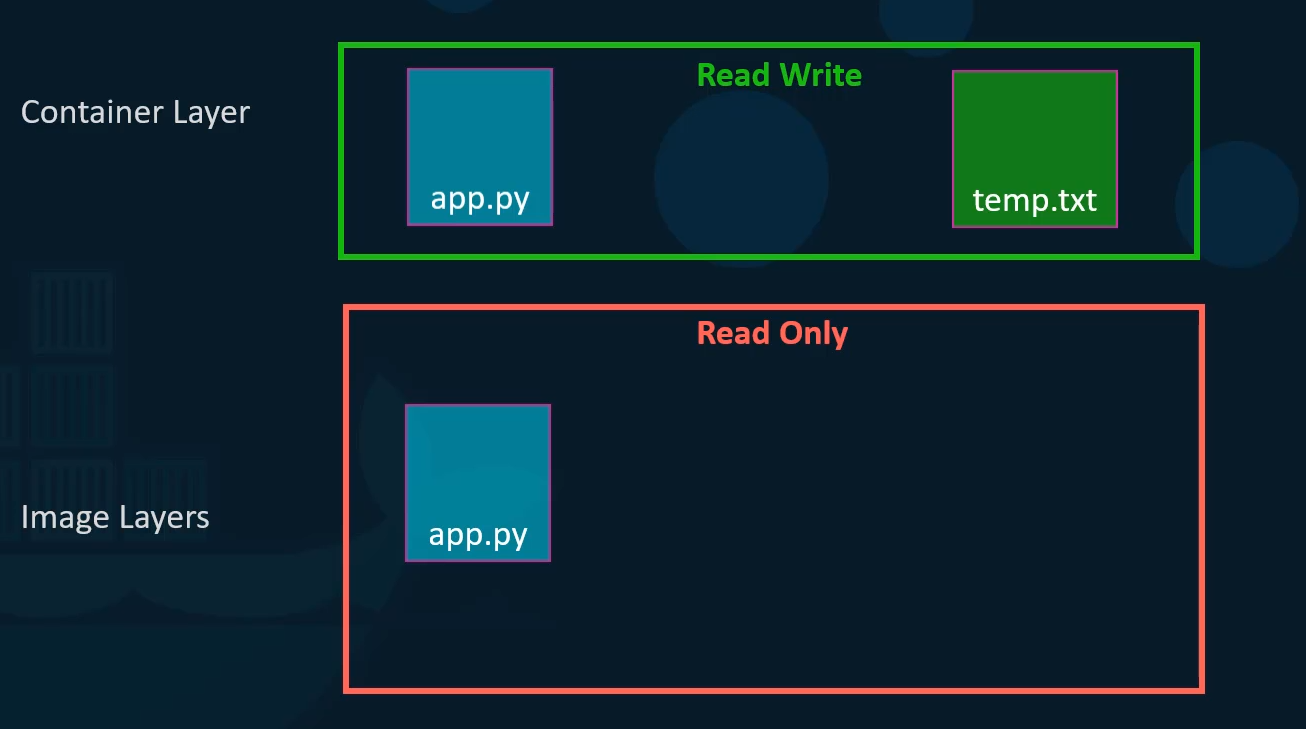
- Docker creates a container based off of these layers and creates a new writeable layer on top of the image layer.
- The writeable layer is used to store data created by the container such as log files written by the applications any temporary files generated by the container or just any file modified by the user on that container.
- The life of this layer though is only as long as the container is alive.
- When the container is destroyed, this layer and all of the changes stored in it are also destroyed.
- Remember that the same image layer is shared by all containers created using this image.
- If I were to log into the newly created container and say create a new file called tem dot txt it will create that file in the container layer which is read and write.
- We just said that the files in the image layer are read only meaning you cannot edit anything in those layers.
- Let’s take an example of our application code. Since we bake our code into the image the code is part of the image layer and as such is read only after running a container.
- What if I wish to modify the source code to say test a change?
- Remember, the same image layer may be shared between multiple containers created from this image.
- So does it mean that I cannot modify this file inside the container?
- No, I can still modify this file
 but before I save the modified file
Docker automatically creates a copy of the file
in the read write layer
and I will then be modifying a different version
of the file in the read write layer.
All future modifications will be done on this
copy of the file in the Read Write layer.
 This is called copy on write mechanism (CoW).
The image layer being read only just means that the files
in these layers will not be modified in the image itself.
So the image will remain the same all the time
until you rebuild the image using the docker build command.
What happens when we get rid of the container?
All of the data that was stored in the container
layer also gets deleted.
The change we made to the app.py
and the new temp file we created will also get removed.
Volumes
So what if we wish to persist this data?
For example, if we were working with a database
and we would like to preserve
the data created by the container
we could add a persistent volume to the container.
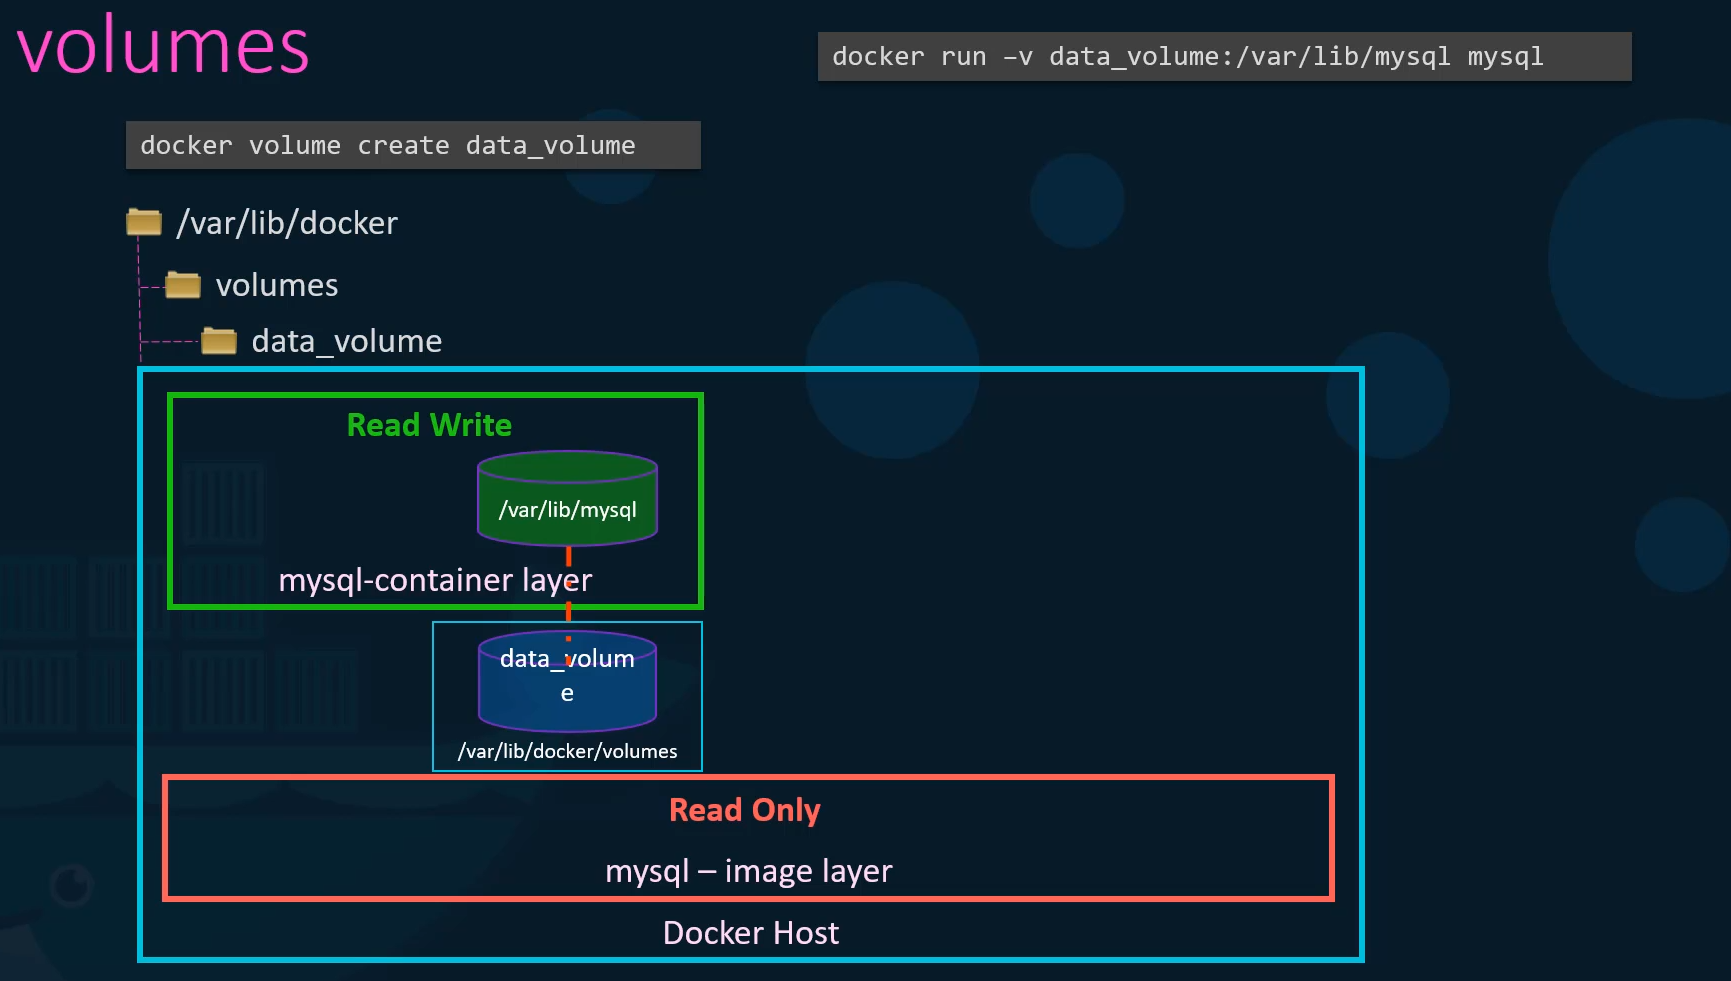 To do this first create a volume using the docker volume create command.
So when I run the docker volume create data underscore volume command
it creates a folder called data underscore volume under the VAR lib docker volumes directory.
Then when I run the docker container using the docker run command,
I could mount this volume inside the docker containers rewrite layer using the dash V option like this.
So I would do a docker run dash V then specify my newly created volume name followed by a colon and the location inside my container
which is the default location where my SQL stores data and that is where lib my SQL and then the image name my SQL.
This will create a new container and mount the data volume we created into VAR lib mysql folder inside the container.
So all data written by the database is in fact stored on the volume created on the Docker host.
Even if the container is destroyed the data is still active.
Now, what if you didn’t run the docker volume
Create command to create the volume
before the docker run command?
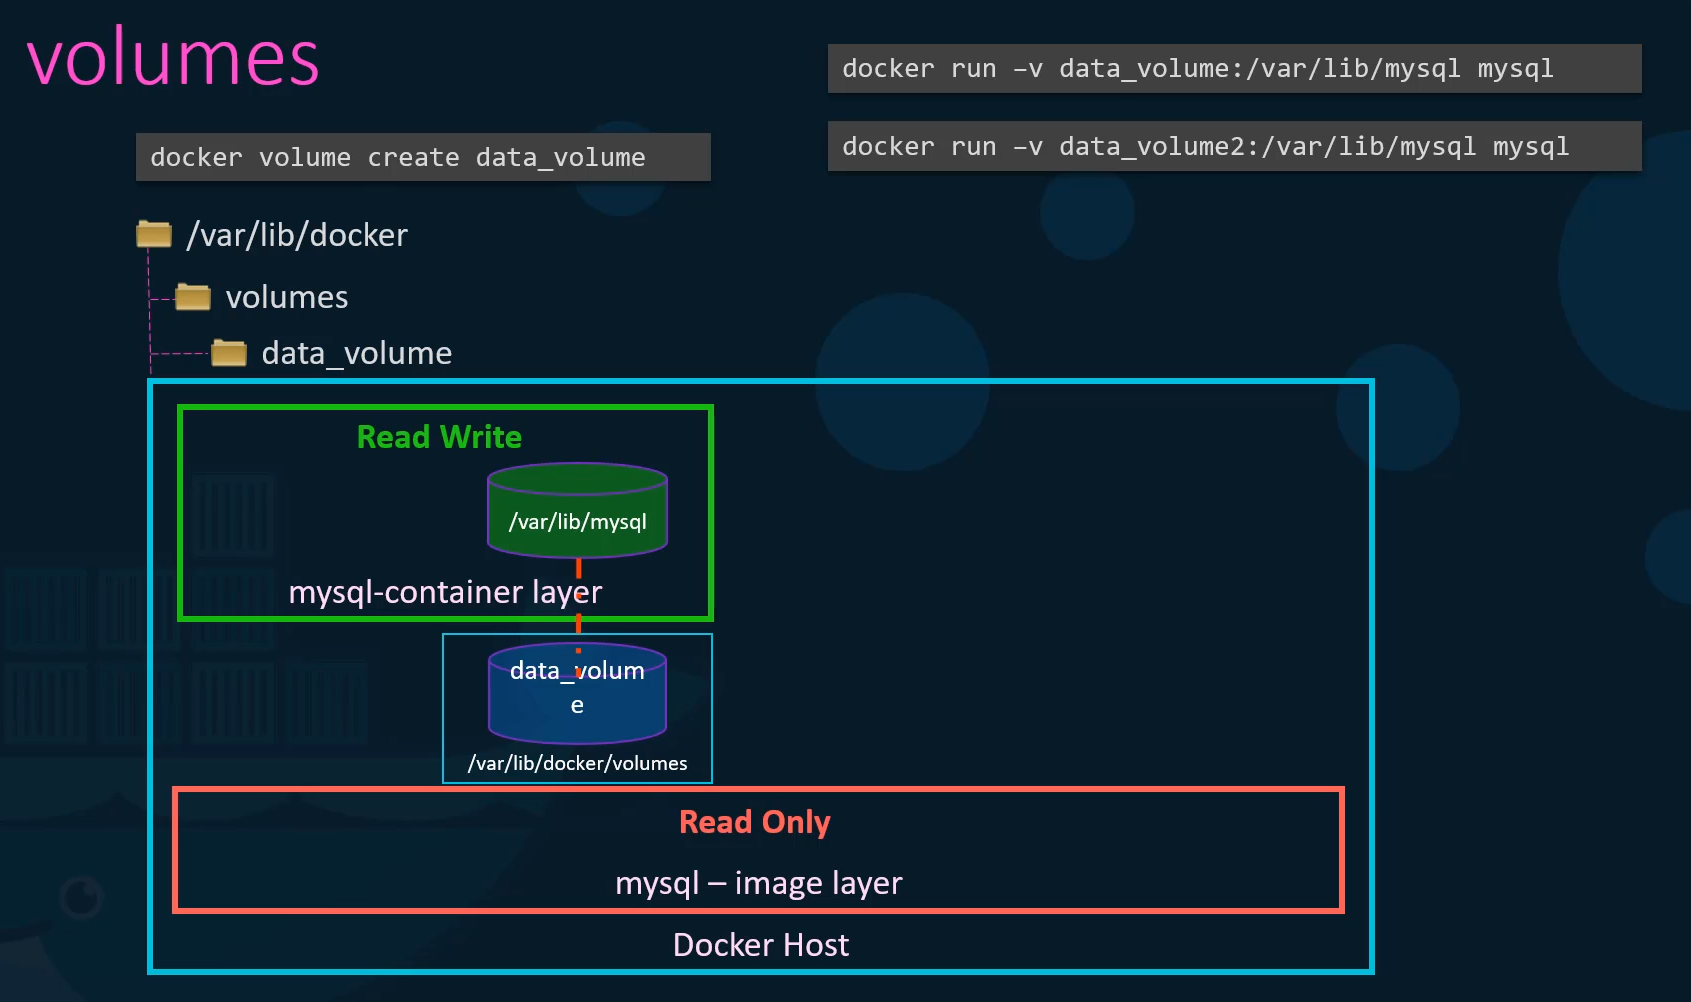 For example, if I run the Docker run command to
create a new instance of my SQL container
with the volume data underscore volume two
which I have not created yet,
Docker will automatically create a volume named
data underscore volume two and mount it to the container.
You should be able to see all these volumes
if you list the contents
of the VAR lib docker volumes folder.
This is called volume mounting
as we are mounting a volume created
by Docker under the VAR lib docker volumes folder.
But what if we had our data already at another location?
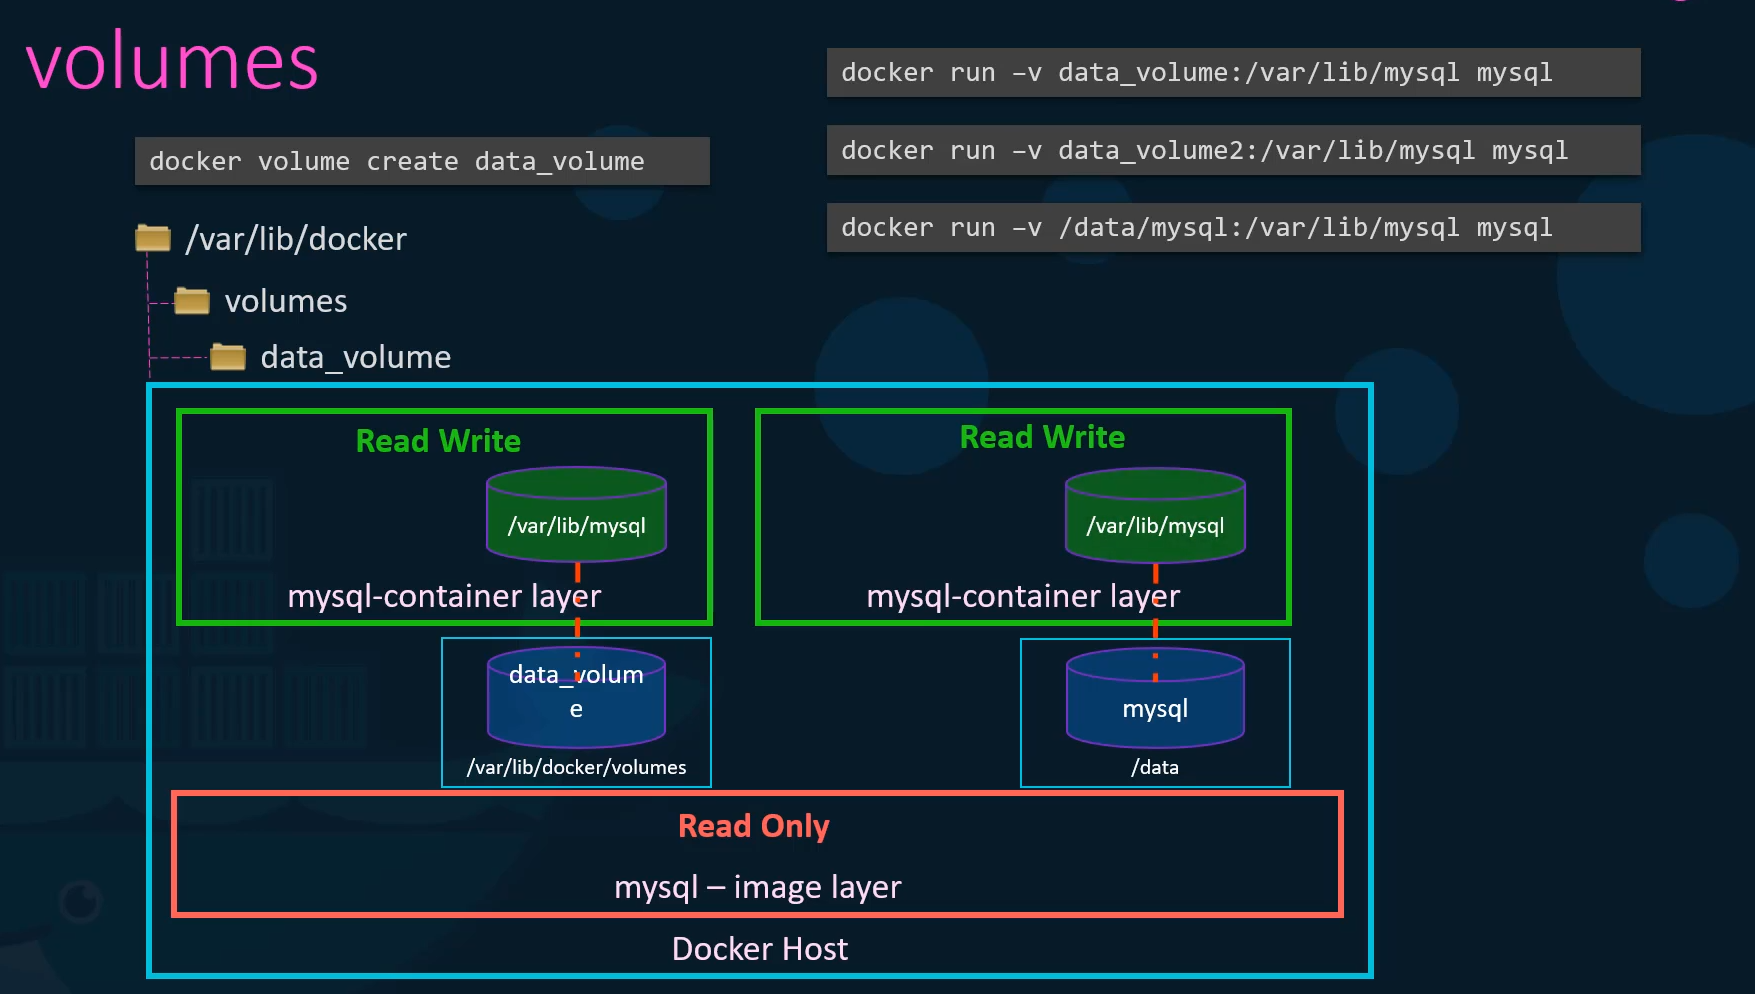 For example, let’s say we have some external storage
on the Docker host at Forward slash Data
and we would like to store database data on that volume
and not in the default Var lib docker volumes folder.
In that case, we would run a container using
the command Docker run dash V,
but in this case we will provide the complete path
to the folder we would like to mount.
That is forward slash data, forward slash MySQL
and so it will create a container
and mount the folder to the container.
This is called bind mounting.
So there are two types of mounts.
A volume mounting and a bind mount.
Volume mount mounts a volume from the volumes directory
and bind mount mounts a directory
from any location on the Docker host.
One final point note before I let you go.
Using the dash V is an old style.
The new way is to use dash mount option.
The dash dash mount is the preferred way
as it is more verbose
so you have to specify each parameter
in a key equals value format.
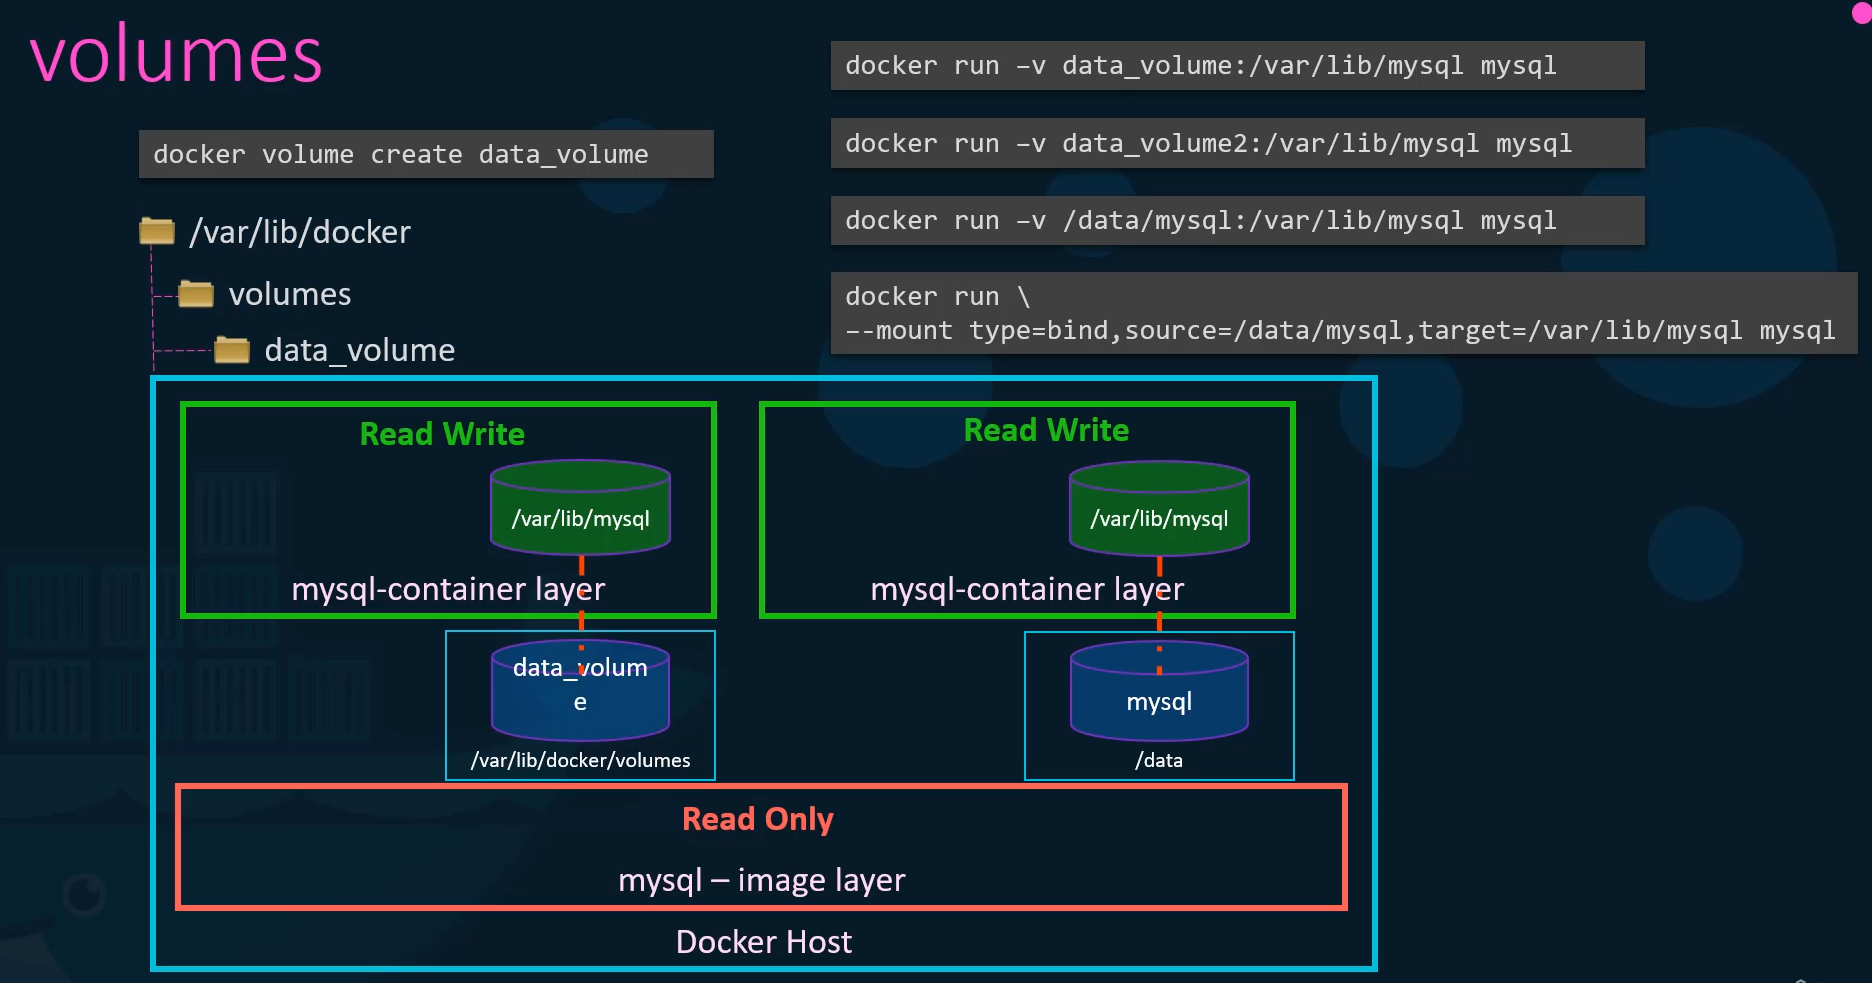 For example, the previous command can be written
with the dash mount option
as this using the type source and target options.
The type in this case is bind the source is the location
on my host and target is the location on my container.
So who is responsible for doing all of these operations?
Maintaining the layered architecture,
creating a writeable layer, moving files
across layers to enable copy and write, et cetera.
It’s the storage drivers.
So Docker uses storage drivers to
enable layered architecture.
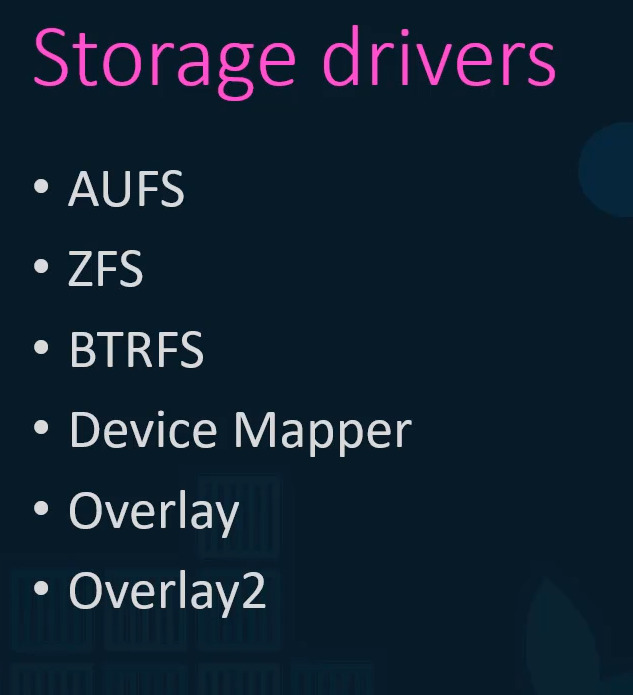 Some of the common storage drivers are AUFS, VTRFS, ZFS,
device mapper overlay, and overlay two.
The selection of the storage driver depends
on the underlying OS being used.
For example, with Ubuntu
the default storage driver is AUFS
whereas this store’s driver is not available
on other operating systems like Fedora or Cent OS.
In that case, device mapper may be a better option.
Docker will choose the best storage driver
available automatically based on the operating system.
The different storage drivers also
provide different performance and stability characteristics.
So you may want to choose one that fits the needs
of your application and your organization.
If you would like to read more
on any of these stories drivers
please refer to the links in the attached documentation.
Volume Drivers
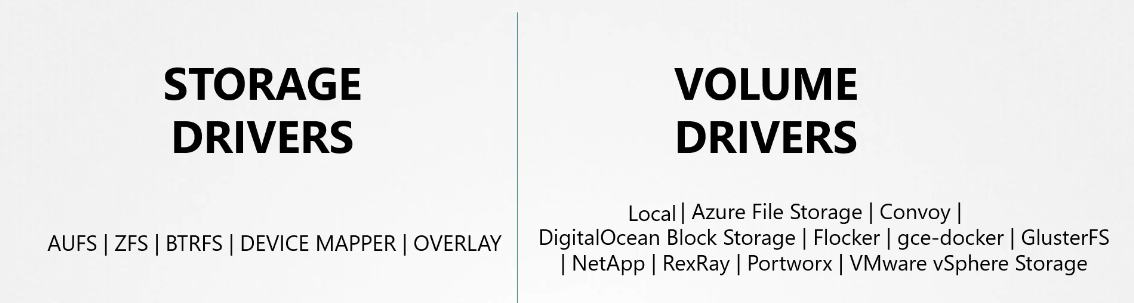
Storage drivers help manage storage
on images and containers.
We also briefly touched upon volumes
in the previous lecture.
We learned that if you want to persist storage,
you must create volumes.
Remember that volumes are not handled by storage drivers.
Volumes are handled by volume driver plugins.
The default volume driver plugin is local.
The local volume plugin helps create a volume
on the Docker host and store its data
under the var/lib/docker volumes directory.
There are many other volume driver plug-ins
that allow you to create a volume on third party solutions
like Azure file storage, Convoy, DigitalOcean,
Block Storage, Flocker, Google Compute Persistent Disks,
Cluster FS, NetApp, REX-Ray, Portworx,
and VMware vSphere storage.
These are just a few of the many.
Some of these volume drivers
support different storage providers.
For instance, REX-Ray storage driver
can be used to provision storage on AWS EBS, S3,
EMC storage arrays like Isilon and ScaleIO,
or Google Persistent Disk, or OpenStack Cinder.
When you run a Docker container
you can choose to use a specific volume driver
such as the REX-Ray EBS to provision a volume
from Amazon EBS.
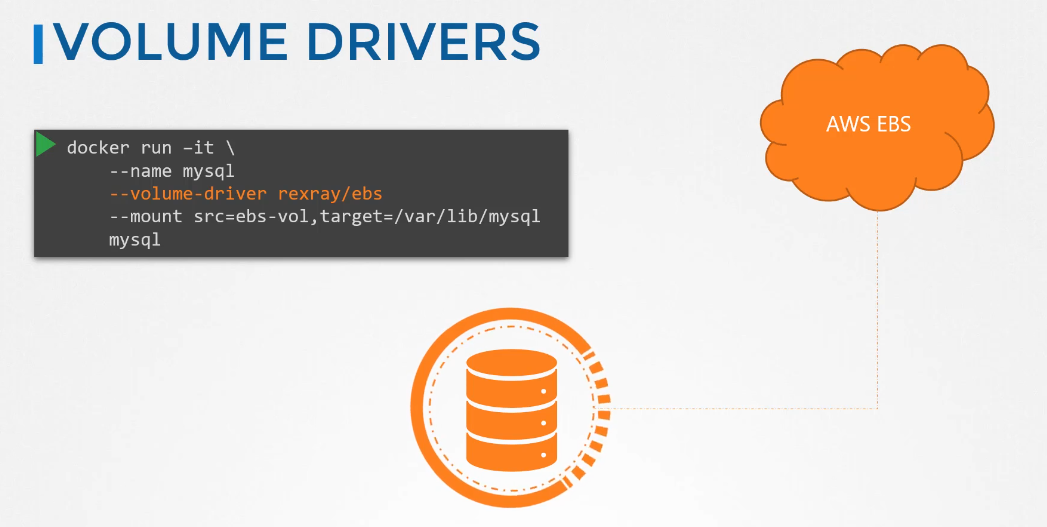 This will create a container and attach a volume
from the AWS Cloud.
When the container exits, your data is safe in the cloud.